Essence of Life - Food
  • Home
  • From My Kitchen
    • Heirloom Recipes
    • From God's Own Country
    • Sadhya
    • Kongu Cuisine
    • Chettinaad Cuisine
    • South East Asian
    • Around the World
  • Ebook
  • I Me Myself
Fresh chicken eggs in an egg crate with one egg cracked open

Eggs - Farm Fresh Chicken Eggs


     May be cooking a hard-boiled egg is kids play to most of us, but this is for people who find it confounded to get a perfectly hard-boiled egg.  Egg, a versatile culinary ingredient if cooked properly is a tasty substance.  The trick behind perfectly hard boiled eggs is nothing but COOKING, COOLING & TIMING.
     This is a simple and classic method with just two steps.  Trust me, it is fool-proof and works perfectly every time you cook a hard-boiled egg. A perfectly hard-boiled egg should neither be hard nor just boiled.  Boiling time plays a major part in getting perfect hard boiled eggs.  Slightly decrease the timing if you need a creamy yolk - they would be surely hard enough but not quite firm and perfect for Salads.  Just sprinkle some Salt & Pepper - have them as such or they are perfect to be served along with Biriyanis/Pulaos or any other Rice dish of your choice.
     Overall it is the versatility of an Egg that makes it more appealing and compatible.   Once you get perfect hard boiled Eggs, the job gets easier and you can stove them up into any dish of your choice.  I usually cook Eggs in a Pressure Cooker, not that it is less time consuming than the other method, but mainly for the reason, I am used to it.  When I am cooking just one or two Eggs then I  boil them in a Saucepan.
     Perfectly boiled eggs retain taste and nutrition.  Over-cooked eggs tend to lose the nutrition whereas under-cooked eggs can spoil the taste of the dish.  If we consider some simple steps, it is easy to get perfectly boiled eggs every time.

Recipes with HARD BOILED EGGS, Click here...

Preparation Time - 5 Minutes
Cooking Time - 10 -15 Minutes
Difficulty - Easy

Author - SM

How to Cook Perfect Hard Boiled Egg - Step-by-step Guide


HOW TO...
HOW TO MAKE THE PERFECT HARD BOILED EGG

INGREDIENTS :

Egg - 6 Nos.
Water - as required


METHOD :

In a Sauce Pan

  • Pour cold water into a Sauce pan and add eggs into it.
  • Place the Eggs in a single layer, do not overcrowd the sauce pan.
  • Switch on the flame and allow it to boil.
  • Once the water boils, cover the pot & lower the flame.
  • Let the Eggs cook for another 12- 15 minutes on a low flame.
  • Switch off the flame and allow it to cool. 
  • Alternatively, pour out the hot water and transfer the eggs into a bowl of Ice Water.
  • Leave this aside for 5 Minutes.
  • Remove the eggs from Ice water.
  • Crack the eggs shells and carefully peel them.


In a Pressure Cooker :

  • Pour cold water into the Pressure Cookers and add eggs to it.
  • Place the Eggs in a single layer.
  • Switch on the flame and allow it to boil.
  • Once the water boils, cover the Pressure Cooker with the lid and the Vent Weight.
  • Lower the flame and cook the Eggs for a Whistle or for 5-6 Minutes.
  • Switch off the flame and allow it to cool. 
  • Once the Pressure is completely released, open the lid and remove the eggs from the Pressure Cooker.
  • Transfer the eggs into a bowl of Ice Water.
  • Leave this aside for 5 Minutes.
  • Remove the eggs from Ice water, Crack the eggs shells and carefully peel them.


Notes :

  • Stir the saucepan occasionally, while boiling the eggs, this is to ensure that the yolk remains intact at the centre.
  • Cooking Time can range from 10 -15 Minutes.
  • Cool down the Eggs completely before peeling them.
  • Leaving the cooked Eggs in Ice Water for few minutes will help you to peel off the Egg shells easily
  • To ensure perfectly sliced eggs, slice them when they have cooled down.

A traditional Kerala dish, Aval Nanachathu, made with beaten rice flakes, freshly grated coconut, and sugar, served in a brass uruli with ripe bananas on the side.
Aval Nanachathu – Sweetened Beaten Rice Flakes with Fresh Coconut and Sugar

Aval Nanachathu – Sweetened Beaten Rice Flakes Recipe for Quick Evening Snack

Aval Nanachathu  (അവൽ നനച്ചത്) — a classic Kerala Naadan Palaharam that speaks the language of simplicity and nostalgia.  Kerala Sweetened Beaten Rice Flakes is one of those old-school snacks that needs no stove, no skill — just love, coconut, sweetener and a handful of aval. This humble no cook naadan palaharam from Kerala captures the comfort of home and the simplicity of tradition.  Soft, sweet, and beautifully rustic — it’s the kind of Naalumani Palaharam you can whip up in minutes, with flavours that linger like a fond memory of home.

      ↓ JUMP TO RECIPE  

Milo Dinosaur iced Malaysian Milo drink topped with a mountain of Milo powder, served kopitiam style in a tall glass
Milo Dinosaur, Malaysia's favourite kopitiam drink

Milo Dinosaur Recipe: Easy Kopitiam Style Iced Milo in 5 Minutes

Milo Dinosaur is more than just a drink, it's a Malaysian kopitiam legend, a nostalgic chocolate malt powerhouse crowned with a mountain of Milo powder. Loved by generations at mamak stalls, school sports days, and coffee shops, this iced Milo creation is indulgent, refreshing, and undeniably Malaysian.

Whether you're cooling off from the equatorial heat or reliving childhood afternoons, Milo Dinosaur delivers that perfect balance of creamy, chocolatey comfort with a playful, over-the-top twist. Learn how to make the authentic Milo Dinosaur at home, plus discover variations like Milo Ais, Milo Godzilla and Neslo, the ultimate café mash-up of Nescafé and Milo, and other Milo favourites that every sweet tooth in Malaysia craves.

↓ JUMP TO RECIPE
FROM GODS OWN COUNTRY/SADHYA
MORU KACHIYATHU/KACHIYA MORU


     Moru Kachiyathu/Kachiyamoru is a simple Kerala Style Curry prepared with Curd(Yogurt) /Buttermilk.  Moru Kachiyathu can be prepared with or without Coconut. 'Moru' means 'Buttermilk' in Malayalam but more or less the recipe usually calls for sour Curd/Yogurt as a base for Moru Kachiyathu/Kachiyamoru. 

 
     Moru Kachiyathu is one of the most commonly cooked and frequented Curries in a Kerala household. Also, it is one must-have item served under Ozhichu Curries in Kerala Sadhya(banquet) i.e the type of curries normally mixed along with rice and eaten. Moru Kachiyathu is a type of Curry prepared without adding any vegetable in it whereas a similar version with Vegetables called Moru Curry/Moru Kootan is also prevalent. Local vegetables like Ash Gourd(Kumbalanga), Yellow Cucumber(Vellarikka), Elephant Yams(Chena), Colocasia/Taro(chembu), Lady's Finger/Okra etc., can be added while preparing Moru Curry.


     Moru Kachiyathu is a more simple version of Moru Curry/Moru Kootan.  This recipe of Moru Kachiyathu is prepared with ground coconut paste.  Some recipes even do not add Coconut in it.  When we are down with indigestion or dysentery Moru Kachiyathu is one best dish which can be had along with Rice apart from Kanji(gruel)/Rice Porridge.


     Moru Kachiyathu is normally prepared with Coconut(Kerala Dishes without Coconuts? )ground to a fine paste along with Green Chillies, Ginger/Garlic and Cumin Seeds.  The flavour of Moru Curry is enhanced with its mild seasonings normally with Mustard seeds, Fenugreek seeds, Dry Chillies and Curry Leaves.  Some recipes call for Shallots while seasoning, but when it is prepared for a Sadhya/Banquet shallots and garlic are avoided in the dish. 


     This Moru Kachiyathu prepared with Yogurt/buttermilk and mild seasoning is an absolute treat when served with hot white rice/Kerala Rose Matta Rice. Apart from being a wonderful and soothing curry, this Moru Kachiyathu/ Kachiya Moru also serves best for digestion.


For more SADHYA RECIPES, click here...


Cuisine - Kerala (South India)
Course - Side dish
Spice Level - Low
Difficulty - Easy
Serves - 4
Author - SM


Preparation Time - 5 Minutes
Cooking Time - 7 - 10 Minutes

For more recipes from GODS OWN COUNTRY - KERALA  click here...

 HOW TO MAKE MORU KACHIYATHU/KACHIYA MORU


INGREDIENTS:

For Moru Kachiyathu:

Curd/Yogurt - 1 Cup
Turmeric Powder -  1/4 - 1/2 Teaspoon
Salt - To Taste

To Grind:

Coconut - 1/2 Cup
Garlic - 1 Clove(Optional)
Cumin Seeds - 1/4 Teaspoon
Green Chillies - 3-4 No's.
Water - 1/4 Cup


For Seasoning:

Coconut Oil - 1 Tablespoon
Mustard Seeds- 1/2 Teaspoon
Fenugreek Seeds - 1/4 Teaspoon
Dry Red Chillies - 2 No's.
Curry Leaves - a Sprig.

METHOD:

  • Whisk the Curd/Yogurt with a pinch of Salt and keep it aside.
  • Grind grated Coconuts with Green Chillies, Garlic clove and Cumin Seeds to a fine paste, adding 1/4 Cup of Water.  If required, adjust the water needed to grind the paste. 
  • Pour the ground Coconut paste into a cooking bowl.
  • Cook this on a very low flame until the Curry is just about to boil.
  • Pour in the beaten Curd/Yogurt mix and give a quick stir.
  • Keep this on a very low flame and cook for a brief moment, stirring continuously.
  • Switch off the flame.
  • For tempering, heat Coconut Oil in a pan, splutter Mustard Seeds, Fenugreek Seeds, Dry Red Chillies and Curry Leaves in it.
  • Pour the Tempered oil over the Moru Kachiyathu and give a quick stir.
  • Serve Moru Kachiyathu/Kachiya Moru along with steamed white Rice/ Kerala Rose Matta Rice, or serve it up along with a long list of dishes in a Sadhya.


MORU KACHIYATHU WITHOUT COCONUT PASTE:

  • Whisk the Curd/Yogurt along with some Salt & Turmeric Powder. 
  • Pour this into a cooking bowl and boil it on a very low flame for a few minutes, stirring continuously.
  • Switch off the flame.
  • For tempering, heat Coconut Oil in a pan, splutter Mustard Seeds, Fenugreek Seeds, Dry Red Chillies and Curry Leaves in it.
  • Pour the Tempered oil over the Moru Kachiyathu and give a quick stir.
  • This version of Moru Kachiyathu without Coconut Paste suits well to be served when you are down with dysentery or indigestion.

NOTES:

  • Sour Curd/Yogurt serves best for the recipe.
  • Let the Curd/ Buttermilk be at room temperature before adding it into the Coconut paste mix.
  • Do not over boil after adding Curd/Buttermilk.
  • Otherwise, the curry may curdle and become watery.
  • Stir continuously while boiling the coconut mix and after adding Curd/Buttermilk.
  • Coconut should be ground to a fine paste with the required amount of water. Make sure not to pour in more water, which can make the Moru Kachiyathu Watery.
  • Can add a pinch of Sugar, if preferred.
  • Coconut oil gives an authentic flavour to the dish, can use any other vegetable oil for the purpose. 
  • If preparing for Sadhya can avoid adding garlic clove. 


SNACKS & SAVOURIES
VAZHAKKAI BAJJI RECIPE/ PLANTAIN FRITTERS

     Vazhakkai Bajji/Plantain Fritters is a popular South Indian tea time snack.  Yet another crispy and spicy snack to glorify the uncrowned tea time.  Thinly sliced Raw Plantains are dipped in a spicy batter and then deep-fried until they turn crispy. Bajji is one of the most popular Indian Street Food found in every nook and corner of South Indian states. The memories of biting into Crispy Vazhakkai Bhajji wrapped in a torn old newspaper(cheap or at no cost, readily available so-called paper towel for a street vendor) are still so fresh and close to heart.
     Call it for a rainy day or just a moody evening, comes along an excuse for some spicy & crispy snack to rejuvenate the spirits.  A Bajji Recipe is a quick fix & a simple recipe with very few ingredients which are readily available in the pantry, i.e for the Batter.  Then comes the task to decide what could be used to make Bajji - Vazhakkai(Plantain), Onions, Potatoes, Green Chillies(Bajji Milagai), Eggplant(Brinjal) or Bread/Idlis.
     When it comes to Vazhakkai Bajji/Plantain Fritters, only certain varieties of Raw Bananas are suitable for the purpose. The colour of the Plantain should be Green, firm and hard to hold and moreover it should not be ripe.  Plantains taste tarty as the Sugar has yet not developed, it has more or less the taste and flavour of a Potato which makes it suitable for making fritters.
     Peel, Cut and thinly slice the Plantains into the desired shape, dip them in the spicy batter and deep fry until crispy.  There you go with an instant treat - Hot & Spicy Vazhakkai Bajji. Try the same recipe with Onions, Potatoes, Chillies etc., Serve Hot Bajjis with Coconut Chutney/Green Chutney or any ketchup/sauce of your choice. Or simply bite it up with a Cup of Hot Coffee/Tea.
    The thought of Bajjis is quite reminiscent of a Ponnu Pakkara scenes.  The occasion where the family of a Bridegroom visits the proposed Bride's house where they treat the family with light and simple Sweets & Snacks(BAJJI SOJJI), hot-hot Coffee/Tea in midst of the Pen Pakkum Padalam.


For more Recipes on SNACKS, Click here...


Cuisine - South Indian
Recipe Type - Snacks
Spice Level  -Medium
Difficulty - Easy
Serves - 3-4
Author - SM

Preparation Time - 5-10 Minutes
Cooking Time - 10-15 Minutes

SNACKS & SAVOURIES
VAZHAKKAI BAJJI RECIPE/ PLANTAIN FRITTERS

INGREDIENTS:

For Vazhakkai Bajji/Plantain Fritters:

Raw Plantains - 2 Nos.
Water - 2 Cups
Salt - 1/2 Tspn

For the Bajji Batter :

Bengal Gram Dhal Flour/Besan - 1/2 Cup
Corn Flour - 1/4 Cup
Red Chilli Powder - 1 Tspn
Asafoetida -1/8 Tspn
Sodium bi Carbonate - 3 Pinches(Optional)
Salt - To Taste
Water - as required
Hot Oil - 1 Tbspn

To Deep Fry :

Oil - to Deep Fry

                         HOW TO MAKE                                VAZHAKKAI BAJJI / PLANTAIN FRITTERS

SNACKS & SAVOURIES
VAZHAKKAI BAJJI RECIPE/ PLANTAIN FRITTERS


METHOD :

How to Clean and Slice Plantains:

  • Peel the skin of the Plantains with a knife or a peeler.
  • Cut the Plantains into two equal halves and then vertically cut them into thin slices. 
  • Immediately put the cut slices into salted water and keep them aside.

For the Bajji Batter:

  • Mix all the ingredients mentioned under ' For the Bajji Batter'.
  • Let the batter be slightly thicker than the Dosa Batter.
  • Add little water at a time and mix the batter without any lumps.
  • Adjust the amount of water as required.
  • Pour in the Hot Oil finally into the batter and mix well.

For Vazhakkai Bajji:

  • Heat Oil in a deep pan on a high flame and allow it to smoke off.
  • Lower the flame to medium-high.
  • Remove the sliced Plantains from the salted water and allow it to dry on a paper towel for a very brief time.
  • Dip the Plantain slices into the Bajji Batter and coat them well with the batter on both the sides.
  • Immediately drop Batter coated Plantain slices into the hot oil one by one.
  • Deep fry the  Batter coated Plantain slices on a medium-high flame until they turn into golden brown in colour and crispy.
  • Remove the deep fried Vazhakkai Bajji/Plantain Fritters from the oil and allow them to drain on a paper towel.
  • Serve Vazhakkai Bajji/Plantain Fritters hot along with Coconut Chutney/Green Chutney or any other chutney of your choice.
  • Goes well with Tomato Ketchup/ Chilli Sauce too.


NOTES:

  • The peel of raw bananas are tough to be removed unlikely to bananas
  • Peel the skin with a Peeler or a Knife.
  • The Plantain juice is slightly sticky & can stain your hands and cloth.
  • Rub your hands with oil before peeling & slicing the Plantains.
  • Immediately drop the sliced plantains into salted water.
  • Otherwise, they may turn dark and stained.
  • Leave them in salted water until you use them.
  • Just before dipping the Plantain slices into the batter, drain them on paper towels for a brief time. 
  • Otherwise, the batter may get watery and not stick to the plantain slices.
  • The Bajji Batter should be slightly thicker than the Dosa/Pancake Batter.
  • Add little water at a time, while mixing the ingredients for the batter.
  • Adding Sodium bi Carbonate to the batter is truly optional, but yields crispy Vazhakkai Bajji/Plantain Fritters.
  • If using it do not leave the batter for a long time, which may make the Vazhakkai Bajji/Plantain Fritters Oily.
  • Mix the Batter and immediately use them for best results.
  • Adding hot oil to the Batter is one trick to get crispy Vazhakkai Bajji/Plantain Fritters.


A vibrant, close-up shot of Karuveppilai Eral (Curry Leaf Prawns) served in a bowl lined with a green banana leaf, highlighting the rich spice texture.

Authentic South Indian Karuveppilai Eral

Karuveppilai Eral (Curry Leaves Prawns) – Authentic South Indian Dry Prawn Fry

Karuveppilai Eral is one of those dishes that doesn’t just sit quietly on your plate—it makes its presence known from the very first whiff. Juicy prawns, marinated and fried, are slowly roasted in a deeply aromatic curry leaves masala, where every spice has been carefully toasted and ground to perfection. The result is a dry, intensely flavourful prawn fry that carries the earthy warmth of curry leaves in every bite. Built on patience and traditional technique, this dish is simple at heart, yet bold, rustic, and utterly unforgettable in the way it lingers long after the meal is done.


    There are some dishes that don’t just sit on your plate… they announce themselves. Karuveppilai Eral is one of them.  Prawns cooked in a deeply fragrant, roasted Karuveppilai Podi, slow-cooked until every single piece is coated in that dark, earthy, spice coated Prawns. No gravy, no shortcuts… just flavour built patiently, the old-fashioned way.

A close-up side view of Karuveppilai Eral (Curry Leaves Prawns) roasted, showing the coarse texture of the spice coating and curry leaves.

Karuveppilai Eral Prawn Roas

What is Karuveppilai Eral?

    Karuveppilai Eral is nothing but prawns cooked in a fragrant Curry Leaves-based masala mixture.  Dhals, spices, and fresh Curry Leaves are roasted on a low flame until they turn aromatic and dry. This freshly roasted and ground mixture gives the dish its unmistakable depth and character.  Curry Leaves lend not just aroma, but a certain soul to the dish, the kind that lingers long after the meal is over.

A Note on Curry Leaves

    Karuveppilai, or Curry Leaves, are more than just a garnish we casually toss aside.  They are a natural flavouring agent with a beautifully distinct aroma. Rich in antioxidants and known in traditional cooking for supporting digestion, they bring both flavour and function to the table.

    But here’s the truth — in this dish, we’re not adding curry leaves for health.  We’re adding them because nothing else tastes quite like them.

Prawns That Swam Past the Arabian Coast

    Whenever I cook prawns, this one thought never fails to cross my mind.  There was a time I never imagined I would cook a dish like this so generously—let alone serve it without counting.

    Back when we were living in India, prawns were… not exactly a luxury, but very much treated like one within the family. My mother-in-law would bring home a batch of tiny Cochin shrimps, and what followed was nothing short of a partition ceremony. A kilo or two had to feed ten people.

Every prawn had a purpose...

    A portion went into a carefully measured Classic Chemmeen Ularthu, just enough so each person could get a few pieces. And that itself was a dangerously risky affair, because everyone waited for it with quiet eagerness. My rather strict MIL would quite literally count the number of prawns to be served per person.

The rest?  Oh, they were stretched like gold.

    Some into her personal favourite Chemmeen Manga Curry with mango, jackfruit seeds, and drumstick. Another small portion would disappear into Poriyals - greens, koorka, long beans, ridge gourd… you name it. The prawns swam past the Arabian Coast too long enough.

End result? Nobody ever got enough.

    And me? I wasn’t even particularly fond of prawns then… and honestly, not much has changed even now. So, no regrets about never getting enough!


From Taj Coromandel to My Kitchen Table in Malaysia

op-view of Karuveppilai Eral (Curry Leaf Prawns) arranged on a green banana leaf in a bowl, showing a garnish of fresh curry leaves.

Karuveppilai Eral - South Indian Curry Leaf Prawn Roast


    Then life moved.  Malaysia happened.  A coastal land, abundant with seafood—and a kitchen that suddenly belonged to a small, happy family of four.  No more counting. No more dividing.

    My husband, with his deep love for prawns and absolutely no restrictions of his mother’s careful partitioning, would walk in with kilos of fresh, prawns. And I, with no emotional attachment to “saving some for later”, would cook the whole lot, properly, generously with heart's content.

And that’s when I remembered this recipe.

“I remember first reading about this dish years ago in a Tamil magazine—most likely Ananda Vikatan or Kumudam. What stayed with me was the mention of it being a signature dish at Taj Coromandel, Chennai, often associated with celebrity favourites…”

    Now I should say, I’ve never stepped into Taj Coromandel, nor tasted their version.  But the idea stayed with me.  I had scribbled it down carefully, lovingly into my old handwritten recipe book. One of those quiet little “someday” recipes.

    And in Malaysia, that someday finally arrived.  I made it. Properly. Without fear of running out. Without dividing it into ten directions.  Just one dish. Full flavour. Full portion.

So much so, that this became one of those,

“Ammie, can you make that Karuveppilai Prawns?” kind of recipes…

Requested often. Cooked generously. 

And now, remembered just as fondly, with grown-up children, living their own lives in distant countries.


Karuveppilai Eral Recipe Overview

  • Cuisine - South Indian
  • Course - Side Dish
  • Spice Level - Medium-High
  • Difficulty - Medium
  • Serves - 2-3
  • Author - SM @ Essence of Life - Food

Time Estimate

  • Preparation Time: 15–20 minutes
  • Marination Time: 4–5 hours / Overnight
  • Cooking Time: 20–30 minutes


How to Cook Karuveppilai Eral – Prawns in Aromatic Curry Leaves Spice Powder

A close-up shot of Karuveppilai Eral (South Indian Curry Leaf Prawns) roasted in a pan with fresh green curry leaves and a coarse spice mixture.

Karuveppilai Eral - Authentic South Indian Curry Leaf Prawns


Ingredients:

To Marinate the Prawns

  • 250 g Prawns (cleaned, de-shelled & deveined)
  • 2 tsp Ginger-Garlic Paste
  • ½ tsp Turmeric Powder
  • 1 tsp Red Chilli Powder
  • 1 tsp All-Purpose Flour
  • Lemon Juice – from 1 lemon
  • Salt to taste

Karuveppilai Spice Mix (Dry Roast & Grind)

  • 1 tsp Black Gram Dhal (Urad Dhal)
  • 1 tsp Bengal Gram Dhal
  • 4-5 Dry Red Chillies
  • 1 tsp Coriander Seeds
  • 1 tsp Pepper
  • ½ tsp Cumin Seeds
  • ½ tsp Fenugreek Seeds
  • 1 cup Curry Leaves
  • ½ cup Coriander Leaves

For Frying the Marinated Prawns:

  • Oil for Deep Frying

Garnish:

  • Curry Leaves a handful
  • Coriander Leaves a handful

Method - Step-by-Step Cooking Instructions

Step 1: Clean & Marinate the Prawns
Raw prawns being marinated in ginger garlic paste with turmeric, chilli powder, and lemon juice.

  • Clean, de-shell, and devein the prawns.
  • Wash and drain well.
  • Marinate with all ingredients listed above.
  • Rest for 4–5 hours or overnight.


Step 2: Prepare the Karuveppilai Spice Mix

A top-down view of a pan with fresh green curry leaves, dried red chillies, and lentils being dry roasted for masala.
A close-up of a spice grinder jar containing freshly ground green curry leaf and spice masala powder.

  • Dry roast each ingredient one by one on low flame.
  • Roast dals & fenugreek till lightly golden.
  • Roast dry red chillies till they puff slightly.
  • Roast coriander seeds till aromatic.
  • Lightly roast cumin and pepper.
  • Roast curry leaves & coriander leaves till crisp and dry.
  • Cool completely and grind into a fine powder.

A top-down shot of deep-fried prawns in a pan, showing a crispy orange-red spice coating before being tossed in curry leaf masala.
Step 3: Fry the Prawns

  • Heat oil on high flame.
  • Reduce to medium-high.
  • Deep fry marinated prawns till ¾ cooked.
  • Remove and keep aside.


Step 4: Final Cooking – Karuveppilai Eral

A vibrant, top-down photograph of a bowl lined with a green banana leaf holding a mound of authentic Karuveppilai Eral, showcasing the texture of the coarse curry leaf spice masala coating the prawns.

Authentic Karuveppilai Eral Recipe


  • Arrange fried prawns in a wide pan.
  • Add the ground curry leaves mixture.
  • Cook on very low flame.
  • Toss gently until all prawns are evenly coated.
  • Cook till dry and aromatic.
  • Adjust salt if needed.
  • Garnish and serve hot.

Pro Tips & Notes

  • Patience is the key: Always, and I mean always, dry roast your spices and lentils on the lowest possible flame. High heat is the enemy here—it will scorch the outside while leaving the heart of the spice raw. We want that deep, nutty aroma that only comes from a slow, golden tan.
  • Don't Over-Fry: When deep-frying the marinated prawns, pull them out when they are about 75% done. They will finish cooking and soak up all that aromatic curry leaf powder in the final roasting stage. If they are fully cooked now, they’ll turn into rubber later.
  •  No-Extra-Oil: Resist the urge to add more oil when tossing the prawns with the powder. The residual oil from the deep-frying is more than enough to hydrate the spices and make them coat well to the prawns.
  • Curry Leaves... Curry Leaves... Curry Leaves...: Don't be stingy with the curry leaves! The more you use, the deeper the green colour and the more intense the fragrance. Just ensure they are washed and completely dry before roasting to get that perfect, crisp grind.
  • Spiciness: The "Medium-High" spice level comes from the black pepper and dry red chillies. If your palate prefers a gentler hum, cut back the pepper and chillies slightly, but keep the cumin and fenugreek for that unique aroma of the dish.
  • Fresh is Best: While frozen prawns work in a pinch, fresh-catch prawns have a natural sweetness that balances the earthy, bitter notes of the curry leaf perfectly.


Serving Suggestions

This dry prawn fry is wonderfully versatile:

  • Serve with Steamed Rice and Rasam for a classic meal.
  • Pair with any Vegetarian or Non-Vegetarian Curry of your choice.
  • Works beautifully alongside Biriyani or Pulao.
  • Or simply enjoy it as a Starter with a squeeze of lemon.


Storage Suggestions

  • Best enjoyed fresh
  • Can be refrigerated for up to 1 day
  • Reheat gently on low flame — avoid microwaving (it toughens prawns)

Frequently Asked Questions (FAQs)

Q. Can I skip deep-frying the prawns?

  • Yes, you can shallow fry them in a wide pan with 2-3 tablespoons of oil. However, deep-frying creates that signature texture that allows the curry leaf powder to coat much better.

Q. Can I use frozen prawns?

  • Absolutely! Just ensure they are completely thawed and, more importantly, patted dry with a paper towel. Any excess moisture will turn your marinade watery and ruin the crispness.

Q. Why is my masala bitter?

  • Watch the Flame: This usually happens if the fenugreek seeds or curry leaves are scorched. Fenugreek turns from aromatic to acrid in seconds! Keep that flame at a very low setting.

Q. Can I make the Curry Leaf Masala in advance?

  • Yes! You can roast and grind the masala mixture up to a week in advance. Store it in an airtight glass jar in a cool, dark place. It’s a fantastic flavour-booster for fish fries and even roasted potatoes!

Q. What if I don’t have Bengal Gram (Chana Dhal)?

  • You can substitute it with yellow split peas or add half a tsp of pottukadalai or just increase the Urad Dhal. The lentils are there to provide a nutty "crunch" and body to the spice coating.

Q. Is this dish too spicy for children?

  • The heat primarily comes from the black pepper and dry red chillies. To make it kid-friendly, de-seed the red chillies before roasting and halve the amount of black pepper. 

Recipes You Might Also Like 

If you loved this, you’ll enjoy:

  • Karuveppilai Podi – a spicy powder made with fresh Curry Leaves suitable to be eaten mixed with steaming hot rice and a drizzle of Ghee or simply add to Potato Roast or Fish Fry
  • Other Prawn Recipes from my kitchen (perfect for seafood lovers)


An overhead view of Karuveppilai Eral (Curry Leaf Prawns) served on a banana leaf in a bowl, featuring a fresh green curry leaf sprig as garnish, highlighting the finished dish.

Karuveppilai Eral (Curry Leaf Prawns)

We’ve all had those mediocre prawn recipes before.

    But Karuveppilai Eral is the antidote to the same old, boring routine. This is prawns done right—fragrant, spice-coated, and bursting with flavour in every bite. A medley of slow-roasted spices transforms this simple dish into something truly extraordinary.

No wonder it earned a bit of a celebrity following.

    The best part? You don’t have to step into Taj Coromandel to taste it. Stay right where you are and whip it up in your own kitchen.

My verdict?

    Easy to make, simple ingredients—but a proper flavour bomb that keeps you hooked. Give this recipe a try and also check for more recipes @ Essence of Life - Food.  Serve it as an appetiser or as a side dish… either way, you’ll love it from the very first bite.


FOOD AS MEDICINE
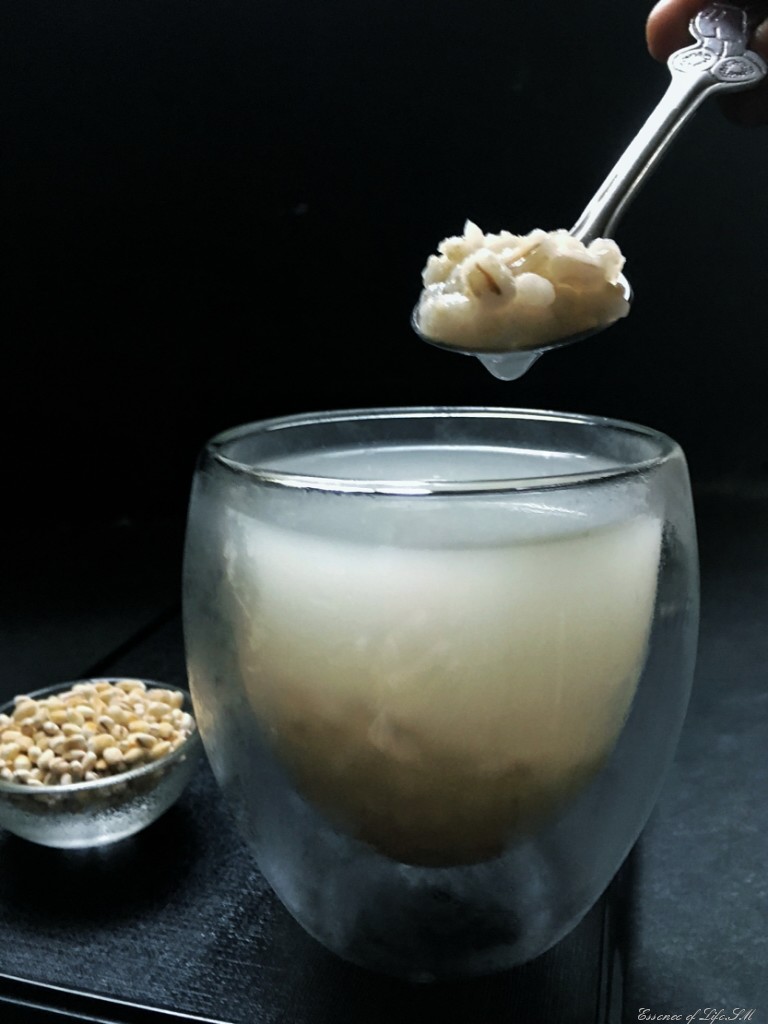
BARLEY DRINK
      Barley drink is one best homemade drink to keep your body cool and beat the internal heat.  Barley is a cereal grain, white in colour when hulled, a monocotyledon in the shape and colour of a pearl.  So it is commonly called as Barley Pearls.  Every Cuisine has its own home remedies to get rid of simple ailments and when it comes to Cold & Sore throat, this cooling Barley Drink is a traditional cure in many Chinese households.  Even it can treat Ance.
     Barley is rich in Carbohydrates, but has a remarkable amount of dietary fibre and has a very low-fat content.  It also contains minerals like Calcium, Iron, Magnesium, Selenium and Copper(which is very rarely found in any other food source).  It is a good source of Vitamins A, B1, B2, B6, B12, C, D, E & K.  Barley is rich in Anti-oxidants and Phytochemicals.
    As Barley has high soluble fibre, it helps in reducing Cholesterol and Blood Glucose Level. It is also a powerful Diuretic, which proves beneficial in keeping your body cool and benefits a healthy Kidney function too.  Barley also helps detoxify our body in a natural way.
    Cooking Barley Drink is quite easy.  I have given two methods of cooking Barley - In a Sauce Pan and in a Pressure Cooker.  Pressure Cooker method is a quick way of getting the job done.  Barley Drink as such has no much of a taste & flavour.  To sweeten it up with your choice of sweeteners like Sugar, Rock Sugar, Brown Sugar, Palm Sugar or add Candied Winter Melons. For a twist of fragrant Barley Drink cook it up with a knot of Pandan/Screwpine Leaf.  Can add some Lemon Juice to add a tinge of tanginess to the drink.

Health Benefits of Barley: 

High dietary fibre -
        helps to lower cholesterol
        fights constipation
        improves digestion
Low-Fat Content -
        helps in weight loss
Presence of Minerals -
        Helps lower Blood Pressure
        Maintains a healthy Bone
        Maintains a Healthy Heart
        Prevents Cancer
        Reduces Inflammation
   

Cuisine - Chinese, South East Asian
Recipe Type - Drink
Difficulty - Easy
Serves - 2
Author - SM

Preparation Time - 5 - 10 Minutes
Cooking Time - 30 - 45 Minutes


For more JUICES, DRINKS & SMOOTHIES, Click here...

HOW TO MAKE BARLEY DRINK


INGREDIENTS :

Barley Pearls - 1/4 Cup
Water - 1 Litre
Salt - a Pinch
Sugar/Rock Sugar - To Taste

Optional Ingredients :

Pandan/Screwpine Leaves - 1 Leaf
Dry Winter Melons - 1/4 Cup


METHOD :

In a Sauce Pan :

  • Wash the Barley Pearls 2 -3 times or until water runs clear.
  • Pour 1 Litre of Water to the Barley Pearls along with a pinch of Salt in a Sauce Pan.
  • Bring it to boil on a high flame.
  • Reduce the flame and cook on a low flame for other 30-45 minutes or until the Barley Pearls are well cooked and turns soft.
  • Adjust the amount of water, if necessary.
  • Add the Rock Sugar/Sugar at this stage and mix well.
  • Leave this on a flame for about 7-10 minutes.
  • Switch off the flame.
  • Serve Barley Drink hot or cold.

In a Pressure Cooker : 

  • Wash the Barley Pearls 2 -3 times or until water runs clear.
  • Pour 1 Litre of Water to the Barley Pearls along with a pinch of Salt in a Pressure Cooker.
  • Cover the Lid and cook on high flame for 4-5 Whistles.
  • Lower the flame and cook for other 7-8 whistles or for about 10-12 minutes.
  • Switch off the flame and allow the pressure to release.
  • Once the Pressure is released, remove the lid. 
  • Adjust the amount of water, if necessary.
  • Add the Rock Sugar/Sugar at this stage and mix well.
  • Leave this on a flame for about 5 minutes.
  • Switch off the flame.
  • Serve Barley Drink hot or cold.

NOTES:

  • If adding Pandan/Screwpine Leaves, tie it into a know and add it at the initial stage along with water and barley pearls.
  • Remove the Pandan Leaves once the Barley is cooked, leaving it in the drink for a long time can give a slightly bitter taste to the Barley Drink.
  • Add Candied Winter Melons also at the initial stage.
  • Adjust the amount of Rock Sugar /Sugar, if adding Candied Winter Melons.
  • As Candied Winter Melons are already sweet, it will on its own impart a sweetness to the Barley Drink.
  • Can also add some Milk to the Barely drink just before serving.
  • For a twist to plain Barley Drink, add some Lemon Juice to add a tinge of tanginess to the drink.
  • Can serve the Barley Drink hot or cold.
  • Can refrigerate the Barley drink for 1-2 Days.  
  • If storing the Barley Drink in the refrigerator for more than a day, remove the Barley Pearls from the Drink.
  • Otherwise, the Barley Drink may turn slimy.
  • Can use the cooked Barley Pearls in Soups, Stews and even in Cendol.
TIFFIN ITEMS
SEMIYA UPMA

     Semiya Upma - a South Indian dish prepared with roasted Vermicelli or Varutha Semiya is a quick fix Tiffin item which can be served as a Breakfast dish or as a simple evening Tiffin or for a simple Dinner. Common versions of  Upmas are prepared with Semolina/White Rava and Broken Wheat.  But this a version of Upma prepared with Vermicelli/Semiya.  Semiya or Seviyan is a type of Vermicelli prepared with Wheat Flour/All Purpose Flour, there are even Semiya varieties made with Millets like Ragi, Varagu, Thinai etc.,
     The strands of this type of Roasted Vermicelli are thin and they are already roasted.  I normally use ready-made Varutha Semiya/Roasted Vermicelli while preparing Semiya Upma.  But when it comes to making Vermicelli/Semiya Payasam, I use the thick stranded ones which are not roasted.  There a quite a number of varieties of Semiya Upma.  But this recipe is a simple version prepared with mild seasonings.  Serve Semiya Upma along with Coconut Chutney & Sambar or any chutney of your choice for an extra note of flavour and taste.


Cuisine - South Indian
Course - Main Course
Difficulty - Easy
Serves - 2-3
Author - SM

Preparation Time - 5-10 Minutes
Cooking Time - 15- 20 Minutes


For more recipes on TIFFIN ITEMS, Click here...

INGREDIENTS :

Roasted Vermicelli / Semiya - 2 Cups
Onion - 1 No.
Green Chillies - 5-6 Nos.
Ginger - 1/2" Piece
Garlic - 2 Cloves(Optional)
Curry Leaves - 1 Sprig
Mustard - 1 Tspn
Urad Dhal / Black Gram Dhal - 2 Tspn.
Bengal Gram Dhal - 1 Tspn
Ghee/ Oil - 3 Tbspns
Water -  4 Cups(Approximately)
Salt - To Taste

METHOD:

  • Chop Onions, Green Chillies, Garlic and Ginger.
  • Heat Ghee in a pan, splutter Mustard seeds, fry Bengal Gram Dhal and Urad dhal until they turn into light golden brown in colour.
  • Saute Onions, Green Chillies, Ginger, Garlic and Curry Leaves, until Onions turn translucent.
  • Pour 4 Cups of Water into the pan and boil.
  • Add Salt to taste.
  • When Water starts to boil, lower the flame and add a tablespoon of Ghee or oil into it and give a quick stir.
  • Slowly add Roasted Vermicelli/Semiya in small batches.
  • Stir continuously while adding Roasted Vermicelli/Semiya into the boiling water to avoid forming lumps.
  • Mix well and close the pan.
  • Leave it on a low flame for 3-4 minutes or until the mixture turns slightly thicker.
  • Add some ghee(optional) and stir it at regular intervals.
  • Cook on a very low flame until Roasted Vermicelli/Semiya turns soft.
  • Serve Roasted Vermicelli/Semiya Upma hot with any Chutney, Sambar or any preferred Curries.  Goes well with Curd/Yoghurt too.
  • Can eat with Sugar sprinkled over it.

NOTES :

  • I have used ready made roasted Roasted Vermicelli/Semiya in this recipe.
  • If you are using normal Vermicelli, roast in along with few teaspoons of Ghee/Oil until it turns into light golden brown in colour.
  • Adjust the amount of water to suit the type of Vermicelli you are using.
  • Over-roasted Roasted Vermicelli/Semiya tends to become dark and dry even after adding enough water, and under-roasted Roasted Vermicelli/Semiya turns gooey.
  • Can add 1/4 Teaspoon of Turmeric and few drops of lemon juice, if you prefer a slight tanginess in your Roasted Vermicelli/Semiya Upma.
  • Can also add vegetables like Carrot, Beans or Peas to Roasted Vermicelli/Semiya Upma.
  • If adding Vegetables add them immediately after sauteing the Onions, and let the vegetable turn soft, before adding water.
  • Can add few teaspoons of Ghee to Roasted Vermicelli/Semiya Upma, at the final stage too.
  • Adding Ghee to Roasted Vermicelli/Semiya Upma gives a nice flavour and texture to the dish. 
  • Can substitute it with any Vegetable Oil too.

Newer Posts Older Posts Home

Diwali Recipes: 85+ Sweets, Snacks and Desserts for Deepavali

Diwali Recipes: 85+ Sweets, Snacks and Desserts for Deepavali
From Mysore Pak and Boondi Ladoo to crisp murukku, creamy kulfi and kheer, plan your whole Deepavali platter in one place, with festive memories from my kitchen and a few last minute shortcuts.
Search for a Recipe

I Me Myself

A vintage-style horizontal oval frame showcasing ornate silver spoons on a dark rustic surface

Essence of Life - Food is all about daily cooking with a simple sense of taste and health. It is all about food. Not a day goes by without eating for most of us, so what we eat matters on the whole. Food in the mode of goodness increases the duration of life, purifies one's existence, and gives strength, health, happiness, and satisfaction. Above all ingredients, the most vital one in my kitchen is love.

Sm

Popular Posts

  • Thengai Paal Murukku Recipe: Coconut Milk Murukku for a Flavourful South Indian Snack
  • Instant Murukku Recipe: Crispy Diwali Snack with Baba’s & Lingam's Mix
  • Kerala Kanji Recipe: Authentic Rice Porridge with Payar, Chammanthi & Achar (3 Easy Methods)
  • Madurai Mutton Chukka Varuval
  • Malaysian Kopi Recipe: How to Brew Kopi O and Kopi C Like a Kopitiam
Ebook - What I Cook - For Onam

Ebook - “What I Cook - For Onam”

Amazon.com/dp/B0CGPVY6J3

Indulge in Kerala’s Culinary Heritage: Traditional Onam Sadhya Recipes, with Expert Serving Tips! Celebrate Onam the authentic way! Discover 25 timeless Kerala Sadya recipes in my ebook. From avial to payasam, bring home the flavours of tradition. Available now on Amazon!

Essence of Life

Subscribe & Follow

© 2026 | Essence of Life - Food

  • Home
  • Ask First
    Please note that all rights for the photographs and texts on this blog, unless otherwise mentioned, rests with the author. Please do not use without permission.
  • Privacy Policy