Essence of Life - Food
  • Home
  • From My Kitchen
    • Heirloom Recipes
    • From God's Own Country
    • Sadhya
    • Kongu Cuisine
    • Chettinaad Cuisine
    • South East Asian
    • Around the World
  • Ebook
  • I Me Myself

PEPPER
HOW TO MAKE BLACK PEPPER POWDER


     I have always felt intimidated when it comes to managing my Spice Cabinet.  A challenge of its own with Spices, can I say somewhere around 50 or 100 different spices, sometimes even more? Indian Kitchen is loaded with a Cornucopia of Spices.  Along with it comes the long number of Spice Powders stacked up in the cabinet ready to be used into the dishes demanding specific flavours.  Sambar Powder, Rasam Powder, Garam Masala to name the few. Meticulously sun-dried spices ground into Spice Powders for ready to use purposes.  Mix and match and there you go with a different concoction of various spices ready to cater to add flavour, taste & aroma into the dish.
     I have never felt difficulty in storing large quantities of spices when I was in India.  You see a small weevil in it and there I go punishing the Spices to stand in Sun for a whole long day and specifically on a Sunny day. But living in a place with high humidity, mostly Cloudy with the chance of Meatball, no, no, no...  with a daily chance of a Shower.  Punishing my Spices to stand up on the Bench, I mean in the Sun has gone out of my hands.  So they've become so unruly, undisciplined... and gets loaded with Weevils.  So I got into a practice of buying small quantities and store them in small bottles for daily use, remaining there it goes into my freezer. Same goes to the spice powders. I go hunting for fresh Spices every month. But to be frank I still have a box of Black Cardamom and a box of Cambodge dating back to Indus Valley Civilization.  Just kidding... I have these spices for more than 13 years, my SIL who has a farm gave me a whole batch when I was shifting to Malaysia.   They lie tightly shut inside an airtight container, left in the freezer.  I relieve them out of the place, whenever I need them in a recipe.
     Though I stack up numerous homemade Spice Powders from time to time, I make sure to make small batches and renew them as the stock starts to deplete.  This way I rescued my previously Vibrant Spices & Spice Powders turning into musty pale simulacrums.  Also, I feel preparing small batches helps to retain the flavour in it.  Me sitting at home 24x7 with no other work to do, I have my whole lot of time for all this stuff.  But in this long encounters with Spices, there was one spice which never let me down, one which never got Old.  And that was the good Old trusty Black Peppercorns. 
      Ok when talking about BLACK PEPPER POWDER, it is quintessential in a kitchen. One of the simplest ingredients, when added in  modest amounts, Black Pepper is subtle & unassumingly enhances other flavours in a dish. But in certain dishes like Pepper Chicken, Black Pepper Mushroom Sauce, black pepper deserves a chance at the centre stage. This humble spice turns into a superstar, in these dishes. I use Pepper & Pepper Powder lavishly in my kitchen  and it is one spice & spice powder which gets used up before it has a chance to turn old and bland.
     I thought of writing this post when many of my acquaintances asked me how to make Pepper Powder at home.  They were all used to store-bought ones and when I told homemade Pepper Powders are way better & it is one simple stuff, which could be incorporated within minutes, they were literally in awe.  So again this recipe is for beginners and who do not know how to make Black Pepper Powder at home.
     Choose the fresh and good quality of whole Peppercorns for flavour-filled Black Pepper Powder.  Sun Dry the Peppercorns for longer shelf life. Dry roasting the Peppercorns bring out an aroma unique to Peppercorns. And the major factor to get the flavours intact every time you use it,  store them in airtight containers, kept away from heat, sunlight and moisture. If you get everything right, then these Homemade Black Pepper Powder stays good for months.


For more HOMEMADE SPICE POWDERS, Click here...


Cuisine -  Indian
Recipe Type - Spice Powder
Spice Level - High
Difficulty - Easy
Yields - 1/2 - 3/4Cup(approx)
Author: SM

Preparation Time - 5 Minutes
Cooking Time - 10 - 15 Minutes

HOW TO MAKE BLACK PEPPER POWDER

PEPPER
HOW TO MAKE BLACK PEPPER POWDER

INGREDIENTS:

Black Pepper Corns - 1/2 Cup

METHOD:

  • Dry roast the Peppercorns on a very low flame until it turns aromatic.
  • Keep it aside until it cools down.
  • Transfer it to a small Mixer Jar/Coffee grinder.
  • Grind it into a coarse/fine powder.
  • Once ground transfer the Black Pepper Powder into a clean & dry airtight container.
  • Stays good @ room temperature for up to 2-3 months.
  • Alternatively use Pepper Mills to make fresh Black Pepper Powders on the go. 
  • Or if you are an Old School, the humble Stone Mortar & Pestle serves the purpose.

NOTES :

  • Can sundry the Peppercorns before preparing the Black Pepper Powder, but it is purely optional.
  • Dry Roast the Peppercorns on a very low flame.
  • Care should be taken not to burn the Peppercorns which will totally spoil/alter the taste of the Black Pepper Powder.
  • Cool the ingredients before grinding it.
  • If stored properly stays good for about 2-3 months in room temperature.
  • Store it in the freezer for longer shelf life.
  • Black Pepper Powder can be used while making Chicken Pepper Fry, Chicken Sukha Varuval, Pichu Potta Kozhi, Kerala Style Pepper Chicken, Buttermilk Fried Chicken.
  • Can add it while making Mutton Curries too.
  • Sprinkle a hearty amount of Black Pepper Powder while making Omelettes, Fried Eggs, Scrambled Eggs, Sunnyside Up, Boiled Eggs etc., 
  • Black Pepper Powder can be used to spice up the Soups or Rasams.


SHOP RELATED PRODUCTS:
 

KESARI BHATH
MILK RAVA KESARI - PAAL KESARI

      "Kesari Bhath" is a Classic Indian Sweet which originated from the South Indian State of Karnataka.  This recipe is a small twist made to the classic Kesari Bhath with the only difference that it is cooked in Milk instead of water and hence the name "Milk Rava Kesari or Paal Kesari". I usually add Milk while making Rava Kesari which makes it rich, creamy and gives a melt in the mouth texture. This recipe calls for a bit of extra Milk along with Water.  Rava Kesari is an easy recipe and the most frequented sweet at home.  A sting of Sweet Tooth or if you have to satiate your unexpected pang for a Snack/Tiffin, Rava Kesari comes for the rescue.  This is one sweet which is not only served as a Dessert but even as a Tiffin/Breakfast.  A scoop of Rava Kesari is a must-have in a good spread of South Indian Breakfast. 
     Maybe the name 'Kesari' would have been from the word Kesar/Saffron, a common term used for Saffron in India, which is the basic colour of this vibrant sweet.  Rava Kesari/Kesari Bhath, a sweet popular throughout India is prepared with Semolina/White Rava, Sugar, Ghee, Water/Milk. Though the quantity/ratio of the ingredient varies regionally, the basic ingredients remain the same.  It is called as Sheera/Suji Halwa in North India and the recipe is slightly different from that of Kesari Bhath. Kesari is one sweet which finds no excuse to sneak into my kitchen. 
     According to me Rava Kesari should be exactly like how Director/Actor Visu says in his Tamil Movie 'Samsaram Athu Minsaram' -  Rava Kesari should be so soft that, Ghee should drip out of the sweet and smoothly slide into your stomach the moment you keep it in your mouth, the way he says those words makes Rava Kesari so appetizing and all the more appealing. And this Milk Rava Kesari/Paal Kesari does total justice with all the above characterizations.

For different Versions of KESARI BHATH, Click here...


Cuisine - Karnataka, South India
Recipe Type - Sweet
Difficulty - Easy
Serves - 3 - 4
Author - SM  

Preparation Time - 5-10 Minutes
Cooking Time - 20 - 30 Minutes


For more NAIVEDHYAMS & PRASADHAMS, Click here...


HOW TO MAKE MILK RAVA KESARI RECIPE / PAAL KESARI

KESARI BHATH
MILK RAVA KESARI - PAAL KESARI


INGREDIENTS:

For Milk Rava Kesari/Paal Kesari:

White Rava/Semolina - 1 Cup
Sugar - 11/2 Cups
Water - 11/2 Cups
Milk - 2 Cup
Saffron Strands - few
Cardamom - 5-6 Nos.
Yellow/Orange Food Colouring - a Pinch(Optional)
Ghee - 1/4 Cup

For Garnishing:

Cashew Nuts - 15-20 Nos.
Almonds/Pistachios - Few
Raisins - 15 - 20 Nos.


KESARI BHATH
MILK RAVA KESARI - PAAL KESARI

METHOD:

  • Soak Saffron strands in few teaspoons of Milk/Water and keep it aside.
  • Grind the Cardamom Pods with few teaspoons of Sugar into a fine powder and keep it aside.
  • Heat 2 -3 Tbspns of Ghee in a Pan, roast Cashew nuts, Almonds/Pistachios & Raisins on a very low flame until Cashew nuts turn into light Golden Brown in Colour.
  • Remove the Nuts and Raisins from the Ghee and keep it aside.
  • Add few more teaspoons of Ghee to the same Pan and roast White Rava/Semolina on a very low flame.
  • Roast the White Rava/Semolina until it turns aromatic, it will take approximately 5-7 minutes.
  • Meanwhile, boil 11/2 Cups of Water in a separate Pan.
  • Boil 2 Cups of Milk in a separate Pan and keep it aside.
  • Gradually pour the hot water to the roasted White Rava/Semolina.
  • Stir continuously while pouring the hot water until the White Rava/Semolina absorbs the water and there are no lumps.
  • Slowly pour in 2 Cups of hot Milk and mix well.
  • Pour in the Saffron soaked liquid along with a pinch of Orange/Yellow food colouring and mix well.
  • Once the White Rava/Semolina is cooked, add Sugar and mix well.
  • Cook this mixture on a very low flame stirring continuously until the Sugar is well dissolved.
  • Add Cardamom powder to the Milk Rava Kesari and mix well.
  • Add the remaining Ghee and stir continuously.
  • Cook on a very low flame.
  • Stir the Milk Rava Kesari and mix it well all along, until the mix starts to separate from the pan.
  • Finally, add the roasted Cashew Nuts, Almonds/Pistachios & Raisins to the Rava Kesari and give a quick stir.
  • Serve Milk Rava Kesari/Paal Kesari hot or at room temperature.
  • Can serve it along with South Indian Breakfast items as a sweet or simply serve it as a dessert.


KESARI BHATH
MILK RAVA KESARI - PAAL KESARI


NOTES:

  • Perfectly roasted Semolina yields perfectly textured Milk Rava Kesari.
  • Adjust the amount of Milk/Water to suit your preferred consistency.
  • Adding the given amount of Ghee gives a soft texture to the Rava Kesari.
  • Adjust the amount of Sugar to suit your preference.
  • Adding artificial food colouring is truly optional
  • The colour from Saffron will not yield you a vibrant coloured Milk Rava Kesari.


CHUTNEYS & CONDIMENTS
BEETROOT CHUTNEY


     Beetroot - for the Pink of your Health. A vegetable which belongs to the Beet family with a deep, earthy flavour and a whole lot of crunch.  I love Beetroots for its incredible colour that can transform anything shocking pink and a mild natural sweetness this vegetable imparts into the dishes it is added into.  The vibrant hue of Beetroots converts the dishes appealing to the senses. Some absolutely menace the colour, but Beetroots are loaded with nutritious value & the health benefits.  It is one default vegetable always available in my pantry.  I use Beetroots lavishly in my cooking, in Curries, Stir-fries & Poriyals, convert them into Chutneys/Thogayals, Pachadi/Sasmi, add it while making Croquette/Cutlets, can easily convert it into Kola Urundai/ Kofta, add them into the Parathas, Idi/Dosa, make nutritious Beetroot Juice etc & etc.,
     Beetroot Chutney is one of my favourites.  I love to combine it up with Idli, Dosa, Uthappam, Chapati, Bread or Rice.  The speciality of a South Indian Chutney is that it has a hint of Dhal, Spices and Coconut in it, whereas North Indian Chutneys do not add Dhal & Coconut.  Roasted Dhals & Spices add a wonderful flavour to this Beetroot Chutney. My SIL Nithya adds Radish along with Beetroots and prepares a Chutney which is also equally tasty & nutritious.  Will post the recipe soon.
      There are different versions of Beetroot Chutney, where the basic ingredient, Beetroot remains the same but the Dhals/Lentils added into the Chutney varies.  Some add Roasted Gram Dhal/Tuvar Dhal/Black Gram Dhal(Urad Dhal) and use Green Chillies/Dry Red Chillies to spice up the Chutney. I have added Bengal Gram Dhal/Chana Dhal & have used Dry Red Chillies to spice up the Beetroot Chutney.  I have used a bit of Tamarind and have added a pinch of Sugar/Jaggery which balances the overall taste of the Chutney. This Chutney is to be loved for its beautiful colour, mild Sweetness, wonderful taste and above all, it is loaded with Nutritional Value.


Cuisine - South India 
Recipe Type - Condiment
Spice Level - Medium-High
Difficulty - Easy
Serves - 2-3
Author - SM

Preparation Time - 5 Minutes
Cooking Time - 5 - 7 Minutes


For more Recipes on CHUTNEYS & CONDIMENTS, Click here...


HOW TO MAKE BEETROOT CHUTNEY


CHUTNEYS & CONDIMENTS
BEETROOT CHUTNEY

INGREDIENTS :

Beetroot(grated) - 2 Cups
Oil - 1 Tbspn
Bengal Gram Dhal - 2 Tbspn
Dry Red Chillies - 4-5 Nos.
Coconut - 3 Tbspn
Tamarind Paste - 1/4 Tspn
Sugar/Jaggery - 1/2 Tspn
Salt - To Taste
Water - as required

For Tempering:

Coconut Oil - 1 -2 Tspn
Mustard Seeds - 1/4 Tspn
Dry Red chillies - 1 No.(Optional)
Curry Leaves - a Sprig


METHOD :

  • Clean, Wash & Peel the Beetroots and grate it.
  • Heat Oil in a Pan.
  • Add the Bengal Gram Dhal and fry until it on a very low flame until it turns into golden brown in colour.
  • Snap off the Dry Red Chillies, add it along with the above ingredient and saute it for a while.
  • Add the grated Beetroot and fry for a while on a very low flame until the raw flavours go.
  • Cover and cook for a few minutes, stirring occasionally.
  • There is no need to add water while sauteing the Beetroots.
  • Immediately, add grated Coconut, along with Tamarind Paste, Sugar/Jaggery & a dash of Salt.
  • Fry all the ingredients on a very low flame for a few minutes.
  • Do not allow the ingredients to burn.
  • Switch off the flame and allow the ingredients to cool down.
  • Grind the ingredients in a small blender jar/Coffee grinder into a smooth Paste.
  • Add water as required and grind the Beetroot Chutney into a smooth Paste.
  • Meanwhile, heat Oil in a pan, splutter Mustard Seeds, Dry Red Chillies & Curry Leaves in it.
  • Pour the tempering to the Beetroot Chutney.
  • Beetroot Chutney goes well with Idli, Dosa, Uthappam, Paniyaram, Chapati etc.,
  • Can serve it along with Rice too.

NOTES:

  • Can substitute 1/2 the amount of grated Beetroots with Carrots/Radish.
  • Can substitute Dry Red Chillies with Green Chillies.
  • Adjust the number of Chillies to suit your spice level.
  • Can add more Coconut if preferred.
  • Sugar/Jaggery along with Tamarind balances the overall taste of the Chutney.
  • Care should be taken not to burn the Dhal and Chillies while roasting the ingredients.
  • While frying the grated Beetroot just fry until the raw flavour goes and it cooks.
  • Adjust the consistency of the Chutney as per your preference.


A large dosa and three idlis served on a banana leaf with chutneys and sambar in the background.
Grinding the Perfect Idli & Dosa Batter in Mixie

How to Make Idli & Dosa Batter in a Mixie: A Fool-Proof Recipe

Why Idli Dosa Batter in a Mixie? Simplifying South Indian Meal Planning

    As a South Indian, Idli and Dosa are staple dishes, an unavoidable tiffin item at home. Having Idli Dosa Batter on hand makes meal planning much easier, solving the breakfast or dinner dilemma effortlessly. In my household, we usually enjoy tiffin items for dinner, as that is the only meal we all sit together and eat on weekdays.

    Idli Dosa Batter is a must-have in most South Indian households. It is a versatile ingredient that comes to the rescue, rain or shine. I have long wanted to write this specific post on "Idli Dosa Batter in Mixie." The Mixie, or simply the Blender, can be a great tool for those who do not have a wet grinder. Grinding a small batch using a Mixie/Blender for Idli Dosa Batter is a straightforward task.

No Wet Grinder? No Problem! Idli Dosa Batter Recipe with Mixie

    Until I lived in India, I never gave a second thought about making Idli Dosa Batter. It was a routine, foolproof process using the old school huge grinder with a pestle. However, when I moved to Malaysia, I couldn't bring the Mixer and Grinder from India. During the initial days, I used a 250W Philips Twist Blender to grind the batter. While the Dosas turned out well, the Idlis were a big mishap due to the type of starchy rice available locally, and the difficulty in finding Idli Rice. I resorted to using raw rice, which yields reasonably good Idlis and perfect Dosas when Idli Rice is unavailable.

Grinding the Perfect Idli & Dosa Batter in a Mixie

    After years of trial and error, I perfected a recipe that yields soft, spongy Idlis and crispy Dosas. This batter is ground using a Mixie.

Fool-Proof Recipe for Beginners: Grinding Idli Dosa Batter with a Mixer Grinder

    I’m sharing this recipe with the hope that many of you face similar challenges at home. This method is perfect for beginners and those who don’t own a wet grinder. It’s especially handy when you need to grind just a small batch. Trust me, this is a fool-proof recipe—tried and tested countless times. It consistently delivers soft, spongy Idlis and crispy Dosas. I typically use a 750-watt Preethi Mixer-Grinder, which grinds the Idli Dosa Batter efficiently without overheating. However, ensure the perfect output by following all the details.


For a detailed recipe on making Idli using a wet grinder, click here..."

Cuisine: South Indian
Course: Main Course
Difficulty: Medium
Author: SM


Preparation Time: 15-20 Minutes
Soaking Time: 4-5 Hours/Overnight
Fermenting Time: 8-10 Hours/Overnight
Cooking Time: 10 - 15 Minutes

For a wide range of  Tiffin Items, click here...


Step-by-Step Guide for making Perfect Idli Dosa Batter - Mixie Method


Close-up of idli and dosa on a banana leaf with bowls of chutney and sambar.

Grinding the Perfect Idli & Dosa Batter in Mixie


Essential Tips and Tricks for Perfect Idli Dosa Batter in a Mixer Grinder

    Before diving into the recipe, let's discuss the ingredients, along with some essential Secrets to Perfect Idli Dosa Batter in a Mixie. This versatile batter can also be used to make Uthappam and Paniyaram. If you're a beginner, take the time to read all the details before starting the process—it's worthwhile and will help you achieve the best results.

Why is Grinding Idli Dosa Batter in a Mixie Complicated?

    Grinding Idli Dosa batter in a Mixie can be tricky due to the small motor and the heat generated during repetitive grinding. This heat can cause the batter to warm up quickly, which, while encouraging bacterial growth for fermentation, can also overheat and kill the beneficial bacteria. This leads to the batter turning sour prematurely, affecting the fermentation process and ultimately the texture and taste of your Idlis and Dosas.

    To avoid this, it's crucial to grind the ingredients, especially the Urad Dhal, using ice-cold water. Alternatively, you can refrigerate the soaked rice and Urad Dhal for a few hours before grinding. Cold ingredients help reduce the heat generated during the grinding process, ensuring proper fermentation and preventing the batter from turning sour too quickly.

One Batter, Multiple Uses

    This Idli Dosa batter is not only ideal for making Idlis and Dosas but also works perfectly for Uthappam and Paniyaram. With just one batter, you can create multiple delicious dishes. So, make sure to follow these tips and tricks to enjoy soft, spongy Idlis and crispy Dosas every time.


Dosa and idlis arranged on a banana leaf with traditional accompaniments of chutney and sambar.Grinding Perfect Idli & Dosa Batter in Mixer Grinder

Homemade Idli and Dosa Batter in Mixie


Tips for Grinding Idli Dosa Batter Using a Mixie

    Typically, a wet grinder is the go-to appliance for grinding Idli Dosa batter. However, this recipe uses a Mixie/Blender, making it accessible for those without a wet grinder. Be sure to read all the instructions carefully and use ice-cold water while grinding the batter. Additionally, follow the specified water measurements for each ingredient to achieve the best results.

    All ingredients should be soaked separately for at least 4-5 hours or overnight. Sago/Tapioca Pearls can be soaked for a longer duration, preferably overnight.

Important Tips for Adding Water

    Be cautious when adding water while grinding the batter. Avoid adding too much water initially. Since the same batter will be used for both Idlis and Dosas, you can slightly dilute the batter after making Idlis when preparing Dosas. Keep in mind that the batter tends to thin out slightly after fermentation.

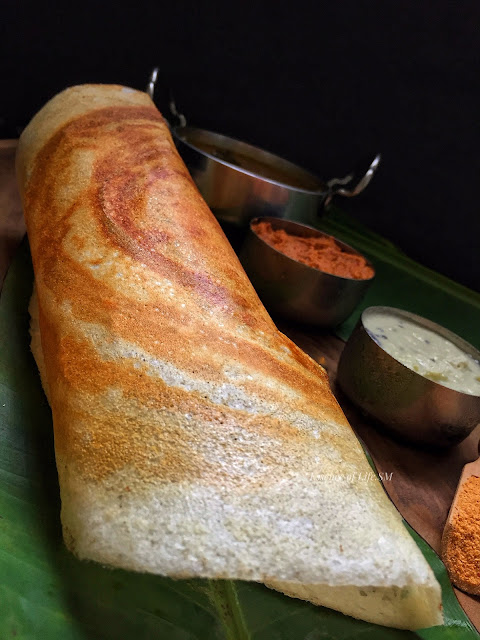
Close-up of a golden brown dosa on a banana leaf with chutney and sambar.
Crispy Dosa with Homemade Idli and Dosa Batter in Mixie

Ingredients for Idli Dosa Batter Using Mixie

For Idli Dosa Batter:

Idli Rice - 2 Cups
Whole Urad Dhal (Black Gram Dhal) - 1 Cup
Fenugreek Seeds - 2 Teaspoons
Sago (Tapioca Pearls) - 1/2 Cup
White Aval (Beaten Rice) - 1 Cup
Rock Salt - To Taste

The Perfect Rice to Urad Dhal Ratio (2:1)

    The ideal ratio for this Idli Dosa Batter is 2:1 (Rice to Urad Dhal). Including Sago and Beaten Rice complements the Urad Dhal ratio perfectly. This combination has always worked best for me when grinding the batter using a Mixie/Blender. It’s a foolproof method that ensures consistent results every time. However, this ratio is specifically for Mixie/Blender use and not for a traditional grinder.

Fenugreek Seeds: A Flavourful Addition

    There’s a debate about whether adding fenugreek seeds affects the colour of Idlis, but their addition is optional. From my experience and tradition, adding fenugreek seeds enhances the flavour and promotes fermentation. However, use them sparingly to avoid bitterness. Soak the fenugreek seeds in 1/4 cup of water, and include the soaking water while grinding. This step is crucial for achieving a smooth paste and better fermentation.

Choosing the Right Urad Dhal

    Selecting the right Urad Dhal is essential. For detailed information on varieties and their uses, refer to my IDLI RECIPE. I prefer using Whole White Urad Dhal for my batter. Soak the Urad Dhal separately in ample water for 3-4 hours or overnight. Before grinding, refrigerate the soaked Urad Dhal for a few hours. Use the large jar of your Mixie, and add 1/2 to 3/4 cup of ice-cold water gradually. This method ensures the batter fluffs up well. The water drop test can confirm the perfect consistency: a blob of batter should float on water.

Grinding Idli Rice

    Idli Rice, a short-grained, fat, parboiled rice, is ideal for this batter. Unlike the coarse grind in traditional recipes, this batter requires a fine paste since it’s used for both Idlis and Dosas. Grind the soaked and drained rice in two batches, using about 1 cup of ice-cold water. This ensures a smooth, thick consistency, perfect for Idlis, which can be diluted slightly when making Dosas. Combine the rice batter with the Urad Dhal batter, ensuring there’s enough space for fermentation.

Adding Sago for Soft, Spongy Idlis

    Sago, or Tapioca Pearls, is a key ingredient for achieving soft and spongy Idlis. Soak the Sago in 1 cup of water overnight for the best results. Grind it into a smooth paste in the Mixie, ensuring there are no lumps. This addition guarantees a soft texture for Idlis and crispiness for Dosas.

    Sago/Sabudhana is an essential ingredient while making Kushboo Idli/Malliga Poo Idli, contributing to their soft, spongy, and fluffy texture. For more details, check out my detailed recipe for Kushboo Idli/Malliga Poo Idli.

White Aval (Beaten Rice) for Perfect Texture

    Beaten Rice, or Aval, contributes to the softness of Idlis and the crispiness of Dosas. Soak Aval for 3-5 minutes before grinding. Use the soaking water to create a smooth paste and mix it with the other ground ingredients. This short soaking time is sufficient for Aval to blend well with the batter.

When to Add Salt?

    Salt can be added either during the fermentation process or after the batter has fermented. Adding salt later is advisable in hot climates to slow down the fermentation and prevent the batter from turning sour quickly. In colder regions, mix the batter thouroughly with salt and then leave the batter in a warm place, like an oven with the lights on, to promote fermentation.

Fermentation Time

    Fermentation typically takes 8-12 hours or overnight, depending on the batter volume, weather, and location. Once fermented, the batter will froth and increase in volume. Stir the batter thoroughly with a ladle to incorporate air, especially if salt was not added earlier.

Thoroughly Mixing the Batter

Mix the batter thoroughly at three stages:

  • After grinding.
  • After fermentation.
  • Just before making Idlis or Dosas.

Soft & Fluffy idlis served on a banana leaf with chutney and sambar, viewed from a side angle.
Soft & Fluffy Idlis with Homemade Idli and Dosa Batter in Mixie

Cooking Idlis: The Steaming Process

  • Pour water into the Idli vessel/steamer and bring it to a boil.
  • Grease the Idli moulds or line them with muslin cloth.
  • Thoroughly mix the Idli Dosa Batter.
  • Fill each mould with a ladle of batter.
  • Steam the Idlis for 4-5 minutes on high flame, then reduce to medium-low for another 3-5 minutes.
  • Do not over cook the Idlis.
  • Allow the Idlis to cool slightly before removing them from the moulds.
  • Serve hot with Sambar or Chutney.

 For a Variety of Idli Recipes, click here...

Close-up of a crispy dosa with chutney and sambar, all served on a banana leaf.
Crispy Dosa with Homemade Idli and Dosa Batter in Mixie

Making Crispy Dosas

  • Heat the Dosa griddle on high, then lower to medium-high.
  • Grease the griddle with oil.
  • Thoroughly mix the Idli Dosa Batter and pour one big ladle of batter over the Dosa Griddle.
  • Spread a ladle of batter evenly on the griddle.
  • Drizzle few teaspoons of Oil/Ghee over the Dosas.
  • Cook on a medium flame until crispy and golden.
  • Roll out the Dosa and serve with Sambar or Chutney.


For a Variety of Dosa Recipes, click here... 


Delicious dosa and soft idlis served on a banana leaf with traditional chutney and sambar.

Grinding the Perfect Idli & Dosa Batter


Storing and Using Idli Dosa Batter

  • Store fermented batter in the refrigerator for 3-4 days.
  • Bring to room temperature before use.
  • Use thick batter for Idlis and Uthappams.
  • Slightly dilute for Paniyarams.
  • A bit more diluted Batter for making Dosa. 
  • Can divide the Batter into portions and do so.
  • Once diluted the batter may not serve good for Idlis.

    Discover the joy of preparing perfect Idli and Dosa batter effortlessly with a Mixie. Whether you're a beginner or an experienced cook, this fool-proof recipe ensures soft, spongy Idlis and crispy Dosas every time. Embrace the convenience of grinding at home without a wet grinder, using the detailed guide in this recipe. Elevate your South Indian cuisine experience today with this tried and tested method. For more Delicious Tiffin Ideas and Recipes, explore my blog and start cooking like a pro!


NASI KAK WOK
NASI KAK WOK

     Nasi Berlauk or Nasi Kak Wok is a Malaysian one pack, set Rice served along with Chicken Curry a local delicacy called Gulai Ayam, Ayam Goreng Berempah - deep-fried Chicken pieces and complimented with a spicy Sambal. These dishes are wrapped in a piece of Parchment Paper sometimes lined with a Banana Leaf and that has become the identity of Nasi Berlauk or Nasi Kak Wok.

ROSE MILK
ROSE MILK - BANDUNG ROSE SYRUP

  As quoted by somebody,
 
 Rose Milk is a Drink, but Bandung is a feeling!!! 
 
I am sure this quote would have been from a person who has tasted both Rose Milk  & Bandung.
 
    I think this is one drink which comes along with nostalgic memories to most of us.  But I am not sure when & where we got into liking Rose Milk.  I haven't had this drink when I was a kid.  Though summers went by with loads of fresh juices, then came Kissan Squash & Rasna.  An Orange flavoured Kissan Squash and sometimes Lemon Squash was a default item stored by my Mother. Along with Doordarshan came Roohafza, a ready-made Rose Syrup, and our trial with that went along just once. We didn't have a fridge then and so very rarely my Mom bought Ice Cubes from the nearby shop and made these drinks with ice cubes for us.  Me with the Tonsillitis and my brother with wheezing problem, we were never allowed to have cold items.
    Those were the days these drinks were extra special and making it cold with ice cubes took us to another level of excitement. I feel nowadays we stock up all kind of drinks in our refrigerator and make it so often.  What's lost in the midst of it, is the excitement we had as kids for these Cold Drinks. We had to wait all year until Summer for these cold treats, least to mention our doze of Ice creams (allowed only once during Summer).
    Well, when talking about Rose Milk, I can never skip the topic mentioning the Rose Milk served at Coimbatore Shree Annapoorna Gowrisankar. A trip to the restaurant is incomplete without this Rose Milk drink. And the tradition is still continued even by my kids, to date... And it so happened that when I took my Malaysian friend to CBE. I was so damn eager to treat her with this wonderful drink, thinking that she’d have never tasted it before. (Least I had the knowledge of Malaysian Food & Drinks then...). To my astonishment, she said, BANDUNG LAH!!!  Oh well, though I was a bit disappointed, I thought I have to taste it when I’m back home.    
    Rose Milk & Bandung - Both being the same drink, but the only difference is that Rose Milk is usually made with Rose Syrup mixed with Milk. Whereas, Bandung is prepared with Evaporated Milk or Condensed Milk and Rose Syrup. Both the drinks are topped with loads of Ice Cubes or served cold.  Bandung is slightly thinner compared to Rose Milk.  Another version called Syrup Bandung prepared without Milk/Evaporated Milk is another popular drink in Malaysia & Singapore. I have given the recipe for both Rose Milk & Bandung Rose Syrup in this post, and I have used ready-made Rose Syrup for the purpose.
    But the real love for this Rose Milk alias Bandung happened with the Rose Milk sold at a Cendol Stall near my son's University at Nilai.  He had got into a routine addiction for this Rose Milk.  This recipe is prepared with the Rose Syrup I bought from the stall. They even sell it topped with ingredients like Sweet Corn, Rajma, Barley or Grass Jelly(Cincau).
    Rose Milk is a quick & wonderful summer cooler made with rose syrup & milk.  Mix the Rose Syrup into the chilled Milk and there you go with a cooling & refreshing drink.  Chill it up in the refrigerator or serve it topped with ice cubes. The Pink Colour and above all the inviting Rose flavour is what is best about this drink.  It also serves best to be served as a non-alcoholic drink in your Party Menu.  Another advantage of this Rose Milk is that it happily falls under the category of a dessert masquerading as a drink.


For more JUICES, DRINKS & SMOOTHIES, Click here...

Recipe Type - Drink
Difficulty - Easy
Serves - 2
Author - SM  

Preparation Time - 5–10 Minutes
Chilling Time - Few Hours

For a detailed Recipe on HOW TO MAKE ROSE SYRUP, Click here...

HOW TO MAKE ROSE MILK - INDIAN STYLE


ROSE MILK
ROSE MILK - BANDUNG ROSE SYRUP


INGREDIENTS:


For Rose Milk:


Milk - 2 Cups (Chilled)
Rose Syrup - 3–4 Tablespoons
Ice Cubes - few

Optional Ingredients:


For Garnishing:


Basil(Sabja) Seeds - 1 Teaspoon
Rose Petals - few


METHOD:


  • Chill the Milk in the refrigerator for a few hours. 
  • Fill a Boston Shaker with some Ice Cubes.
  • Pour in the Rose Syrup & Chilled Milk into it.
  • Shake well until well combined.
  • Pour in the Rose Milk/Bandung into a tall glass.
  • Garnish Rose Milk with soaked Basil Seeds & fresh/dry Rose Petals (Optional).
  • Serve Rose Milk chilled, immediately.


NOTES: 


  • I usually chill the Milk in the refrigerator before making Rose Milk.
  • Can add more Ice cubes if you prefer to.
  • Traditional Rose Milk is not watery.
  • Adjust the amount of Rose Syrup to suit your preference and sweet level.
  • Garnishing the Rose Milk with Basil Seeds & Rose Petals are truly optional.
  • Can simply mix all the ingredients in a big bowl, too.


HOW TO MAKE BANDUNG ROSE SYRUP - MALAYSIAN STYLE


ROSE MILK
ROSE MILK-BANDUNG ROSE SYRUP


INGREDIENTS:


For Bandung Rose Syrup:


Evaporated Milk - 1/2 Cup
Water - 2 Cups
Rose Syrup - 3/4 Cup
Ice Cubes - a few

Optional Ingredients:


For Garnishing:


Sweet Corn - a few Teaspoons
Rajma/Red Bean - a few Teaspoons
Barley - a few Teaspoons
Cincau - a few pieces


METHOD:


  • In a large bowl, combine the Rose Syrup, Evaporated Milk.
  • Pour in the Water and stir well until well combined.
  • Top it up with few Ice cubes.
  • Pour in the Bandung Rose Syrup into a tall glass.
  • Garnish Bandung Rose Syrup with few teaspoons of cooked Barley/Rajma/Red Bean, few teaspoons of Sweet Corn or with few pieces of Grass Jelly(Cincau) (Optional).
  • Can add all the above garnishing or play around with one or two of your preferred ingredient.
  • Serve Bandung Rose Syrup chilled, immediately.

NOTES: 


  • Traditionally, Bandung Rose Syrup is slightly thinner than Rose Milk.  Adjust the consistency to suit your preference.
  • Can substitute Evaporated Milk with Condensed Milk (use about 2-3 Tablespoons).
  • Condensed Milk & Rose Syrup have added sugar in it.  Adjust accordingly.
  • Adjust the amount of Rose Syrup to suit your preference and sweet level.
  • Can add more Ice cubes if you prefer to.
  • Garnishing Bandung Rose Syrup with Barley or Rajma/Red Bean or Sweet Corn or with few pieces of Grass Jelly(Cincau)are truly optional.
  • If preferred, serve Bandung with all the above garnishing, or play around with one or two of your preferred ingredient.

Newer Posts Older Posts Home
Search Essence of Life - Food

I Me Myself

A vintage-style horizontal oval frame showcasing ornate silver spoons on a dark rustic surface

Essence of Life - Food is all about daily cooking with a simple sense of taste and health. It is all about food. Not a day goes by without eating for most of us, so what we eat matters on the whole. Food in the mode of goodness increases the duration of life, purifies one's existence, and gives strength, health, happiness, and satisfaction. Above all ingredients, the most vital one in my kitchen is love.

Sm @ Essence of Life - Food

Popular Posts

  • Kizhi Parotta: Kothu Parotta and Salna Wrapped in Banana Leaves
  • Kerala Sadhya Vibhavangal: Ultimate Guide to Traditional Onam & Vishu Sadhya
  • Nannari - Indian Sarsaparilla Roots
  • How to Make Kerala Kanji | Traditional Rice Porridge with Payar, Chammanthi & Achar
  • Brewing Authentic Malaysian Kopi: A Step-by-Step Guide to Mastering the Art of Kopi Making
Ebook - What I Cook - For Onam

Ebook - “What I Cook - For Onam”

Amazon.com/dp/B0CGPVY6J3

Indulge in Kerala’s Culinary Heritage: Traditional Onam Sadhya Recipes, with Expert Serving Tips! Celebrate Onam the authentic way! Discover 25 timeless Kerala Sadya recipes in my ebook. From avial to payasam, bring home the flavours of tradition. Available now on Amazon!

Essence of Life

Subscribe & Follow

© 2026 | Essence of Life - Food

  • Home
  • Ask First
    Please note that all rights for the photographs and texts on this blog, unless otherwise mentioned, rests with the author. Please do not use without permission.
  • Privacy Policy