Essence of Life - Food
  • Home
  • From My Kitchen
    • Heirloom Recipes
    • From God's Own Country
    • Sadhya
    • Kongu Cuisine
    • Chettinaad Cuisine
    • South East Asian
    • Around the World
  • Ebook
  • I Me Myself


STIR FRY
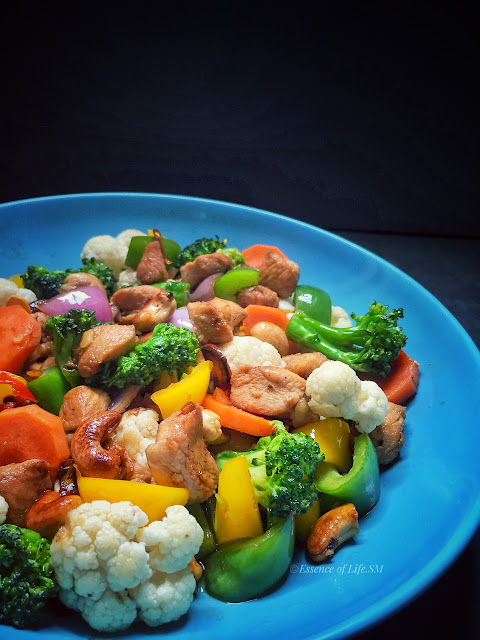
CHINESE VEGETABLE & CHICKEN STIR FRY

    I love to cook the local way, the Malaysian Style, Thai, Chinese, all greatly influenced by my 15 years of living in Malaysia -the Food Haven. I am amazed by the simplicity of the dishes and all the more what I love about cooking Chinese food at home is, It is rather easy, and we can incorporate it in no time.

    This Chinese Style Vegetable & Chicken Stir fry is quite similar to the Vegetable Stir Fries, and the only difference is that we add some boneless Chicken pieces along with it, which gives an overall fullness to the dish.

    All the more, these recipes are inspired from the Chinese Restaurants we dine at, in Malaysia.  Initially, when we used to dine at such places, we loved to try different Stir-fries. Stir-fries with Veggies, stir-fried vegetables with Tofu or Chicken or Sausages. Veggies like Eggplants, Brocolli, Long Beans Stir fried  Stir-fried Greens like Baby Kailan, Bok Choy, Napa Cabbages Kang Kung etc., The introduction to these recipes gave me a new way of cooking and combining vegetables, egg, meat, salted fish, shrimps, or tofu into these stir fries.  And also these recipes gave me a total new revelation to cooking vegetables, the way it has to be, retaining the colour, texture, and nutrition.

    Chinese Style Vegetable & Chicken Stir Fry is a quick & easy Chinese dish, with a simple addition of seared Chicken pieces into it.  This style of cooking vegetables & chicken together adds a whole new dimension to the all plain vegetables.  

    But the secret behind perfect Chinese Style Stir Fry is the techniques you need to follow to get it right.  Keep in mind that the vegetables in the stir-fry should retain the colour, crunchiness, and freshness of the vegetables.  When perfectly done, this Chinese Style Vegetable & Chicken Stir Fry is going to be lustrous, gorgeously beautiful, presenting itself with a cornucopia of colours with a remarkable texture.  I love this stir-fry whatsoever.

STIR FRY
CHINESE VEGETABLE & CHICKEN STIR FRY

    Just follow these simple tips and techniques for perfectly cooked Vegetable & Chicken Stir-fry.

VEGETABLES:

    As we need to stir-fry the vegetable in one quick movement in a high heat, it is always advisable to keep all the needed items ready side by side.  First clean, peel & cut the vegetables and when it comes to the Vegetables which you can add into this stir-fry, I mostly use Carrots, Mushrooms, Broccoli, Cauliflower, Capsicums & Snow peas. Can add Baby Corn too. If using mushrooms, use varieties like Button Mushrooms, Crimino Mushrooms, Shitake, or Oyster Mushrooms.  Small Beech or Bunapi Mushrooms also suits well for Vegetable stir fries.

BLANCHING THE VEGETABLES:

    Then I blanch the vegetables before stir-frying them.  Blanching shortens the time required for stir-frying.  And also the vegetables are cooked half way, retaining the shape & colour.  Then, while stir-frying, the idea is just to mix them up with the sautéed garlic and the sauces on a high heat.  This way the Stir Fry turns out to be perfectly cooked through, retaining the texture, colour, and all the more the nutrition. Once the Vegetables are blanched, you can straight away go with the stir-frying process.

    Then mince the Garlic, Cut the Onions into big pieces and then thinly slice the bird's eye chillies.  Well, I do add a Bird's eye chilli into this Stir Fry.  After all, the taste buds of Indian ethnicity asks for a bit of heat in everything.  You can totally skip it in this recipe.

SEARING THE CHICKEN:

    Well, any Chinese restaurant style Chicken recipes, habe an extremely tender and silky texture.  Soft & Succulent Chicken pieces.  The secrfet behind this velvety texture is that, most Chinese Chefs "treat" the chicken with baking soda.  Baking Soda removes the "meaty" odour and also tenderizes it at the same time.

    Searing a Chicken/Meat is a simple cooking technique where the meat is tosses in hot oil (a litlle amount just to coat the pan) until the colour changes.  This method changes the chemical composition in the meat creating an intense flavour and develop a perfect texture.  And the main point is that they are not deep fried.

SAUCE:

    The next step is to get the sauce ready.  The idea of a sauce in a stir-fry is to add taste and flavour into the bland vegetables.  So you can get easy with the type of sauce you use.  Commonly Oyster Sauce is used along with seasoning like salt, sugar and a dash of white pepper powder.  I love to add the popular locally available ABC Sauce, which is a sweet thick soy sauce with caramelized palm sugar in it. Alternatively, can add Dark Soy Sauce.  I have added the Corn Flour slurry into the sauce mix.  So, you do not need to add ‘cornflour slurry’  during stir-frying.  Corn flour slurry glazes & gives a sheen to the stir-fried vegetables. 

STIR-FRYING:

    Then, the stir frying - keep in mind, you need to stir-fry in a high heat, in quick movements.  Sauté, the garlic, Onions, bird's-eye chillies, briefly sauté the Capsicums & then pour in the sauce and cook for a few minutes, then add in all the vegetables and mix it well in quick movements over a high flame.  Once the sauces all coated and the vegetables are glazed, switch off the flame and serve immediately.


For more VEGGIES & STIR FRY Recipes, Click here...


Cuisine – Chinese; Southeast Asian
Recipe Type – Stir Fry
Spice Level – Low
Difficulty – Easy
 Serves - 2–3
Author – SM

Preparation Time - 15–20 Minutes
Cooking Time - 5–10 Minutes


For more Recipes from CHINESE CUISINE, Click here...

HOW TO MAKE CHINESE VEGETABLE & CHICKEN STIR FRY

STIR FRY
CHINESE VEGETABLE & CHICKEN STIR FRY

INGREDIENTS:

Vegetables:

Carrots – 1/2 Cup
Broccoli – 1/2 Cup
Cauliflower – 1/2 Cup
Snow Peas – 1/2 Cup
Mushroom – 1/2 Cup 


To Marinate the Chicken:

Boneless Chicken Pieces – 1 Cup
Shaoxing Wine - 1 Tespoon
Salt - To Taste
White Pepper - A Pinch
Cornstarch - 1 Teaspoon


For Blanching:

Water - 4–5 Cups
Salt – To Taste
Sugar – a Pinch  


For the Sauce:

Oyster Sauce/ABC Sauce – 2 Tablespoons
Salt – to Taste
Sugar – 11/2 Teaspoons
White Pepper Powder – 1/8 Teaspoon
Corn Flour – 1/2 Teaspoon
Cold (Ice) Water – 4 Tablespoons


Sautéing:

Garlic - 6–8 Cloves
Onion – 1 Big
Bird's eye Chillies - 1–2 Numbers
Capsicum (Green) – 1/4 Cup
Capsicum (Yellow/Red) – 1/4 Cup 
Cashew Nuts - 1/4 Cup


For Vegetable Stir-fry:

Oil – 2 Tablespoons
Salt – To Taste
Sugar – a Pinch


METHOD:

Preparing the Vegetables:

  • Carrots – Peel, wash and cut Carrots into Wedges or thick slices.
  • Snow peas – Wash & then remove the ‘string’ of the snow peas on both the sides and snap it off into two or three pieces.  No need to cut it, just snap it off using your hands.
  • Broccoli – Wash & then cut the florets into medium or large sized ones. Discard the lower part of the stem, which is hard & fibrous. Use the tender part of the stem, cut them into slices or wedges. The tender stem is full of flavour, so do not throw them away.
  • Cauliflower – Wash & then cut the cauliflower into florets, preferably into medium or large florets.
  • Mushroom – Cut off the ends, wash them and then cut the Mushroom into slices.
  • Capsicum – Wash & then snip off the tip and then remove the core and seeds. Cut the capsicum into large slices.
  • Onions – Peel, wash and cut Onions into fours and then cut them into small cubes.  We need some square shaped Onions in this Vegetable stir-fry.
  • Garlic – Peel, wash and mince the garlic cloves and keep them aside.
  • Bird's eye Chillies – Remove the stalk and then cut it into thin slices. Alternatively, you can mince it.

Blanching the Vegetables:

  • Boil enough water in a large pot, let the amount of water be good enough to cover the vegetables.
  • Add a dash of Salt and a pinch of Sugar into it.
  • Let it boil.
  • First add the Carrot Wedges into the water and cook them for about 2–3 minutes.
  • Once the Carrots are cooked halfway through, add Cauliflower & Broccoli florets and blanch them for about 2 minutes.
  • Then follow it with snow peas, mushrooms and blanch it for about a minute.
  • I usually do not blanch Capsicums.
  • Once done, drain it through a colander and keep it aside.

For the Sauce:

  • Mix all the ingredients mentioned under “For the Sauce” in cold water & keep it aside.
  • Make sure there are no lumps in the sauce.

Marinating & Searing the Chicken:

  • Clean, wash & Cut the Chicken into smll pieces.
  • Marinate the Chicken Pieces with the ingredients mentioned under 'To Marinate." 
  • Leave this aside for about 20-30 minutes.
  • In a wok, heat 2 Tablespoons of Oil, then sear the marinated Chicken Pieces in hot oil for a few minutes until the colour changes.
  • Remove it from oil and keep it aside.
    STIR FRY
    CHINESE VEGETABLE & CHICKEN STIR FRY

Sautéing & Stir frying the Vegetables & Chicken:

  • Heat oil in a Wok/Pan over high heat. 
  • Roast the Cashewnuts on a medium-low flame until it turns crisp and keep it aside. 
  • Add minced Garlic and Bird's-eye Chillies, stir-fry for about 10 seconds until fragrant(should not be browned).
  • Then add Onion chunks & Capsicums and sauté it for a while. 
  • Now add, the blanched Vegetables and give a quick stir.
  • Immediately pour in the Sauce and mix well.
  • Let it cook for about 2 minutes or until it thickens
  • Stir-fry until well combined on a high flame, & the vegetables are glazed. 
  • Add in the seared Chicken Pieces & the roasted Cashew Nuts and toss well. 
  • Immediately, serve Chinese Vegetable & Chicken Stir Fry hot.
  • Chinese Vegetable & Chicken Stir Fry goes well with Fragrant Rice or any Rice/Noodles recipe.

NOTES:

  • Use your preferred combination of vegetables in this stir-fry.
  • Do not cover the pan while cooking.
  • Once the sauce thickens, stir-fry the vegetables on high heat for a short time.  This will retain its nutrients & texture.
  • Do not brown the garlic, as they would tend to give a bitter taste to the dish.
  • Adding Bird's eye Chilli is purely optional.
  • Cook the vegetables to suit your preference. I like to keep it crunchy & tender, and mainly love to retain the colours in the vegetables.
  • We need boneless Chicken pieces for the recipe.  
  • Chicken breasts fit well into the crew.  
  • Searing the chicken pieces in oil yileds you with tender and juicy chicken pieces 
  • You can substitute any meat, shrimp, or dry fish instead of Chicken in this recipe. 
  • Can add Tofu or Egg Tofu too.


Flat lay of chicken chow mein bowls, and served along with chilli jeruk

Classic Chicken Chow Mein Recipe


This easy chicken chow mein recipe is perfect for busy weeknights and comes together quickly with simple pantry ingredients. Made with stir-fried noodles, tender chicken, and fresh vegetables, it delivers a flavour that is comforting, balanced, and very close to your favourite takeaway-style Chicken Chow Mein


What is Chicken Chow Mein

    Chow Mein, a popular dish in many terms, has traces of origin from China. These stir-fried noodles, are one of the most widely known and celebrated Chinese noodle around the world.  Though the name Chow Mein comes from the Mandarin "Chǎomiàn" and Taishanese "Chāu-mèing", the recipe has taken leaps of twists and turns, and is served in many variations with different sauces to suit the palate.

    There are quiet a few variations when it comes to Chow Mein, and it differs with regional cuisines in & around China.  But, the basic preparation remains the same.  Noodles are boiled and stir-fried until it turns slightly crispy, then it is tossed with a choice of meat along with Sauces & often flavoured with Rice Wine Vinegar.  This recipe is Chicken Chow Mein, so one main ingredients which goes into the recipe is Chicken.  On top of it, vegetables like Cabbage, Carrots, Mushrooms, etc.,

    It might sound like the easiest to make and most basic and one of the quickest Chow Mein recipes, but there are a few things which should be considered for an excellent bowl of take-away style Chow Mein. 


Key Elements for a Perfect Chow Mein Recipe

ide profile of a bowl of chicken chow mein with steam effect and floral patterned chopsticks.

Homemade Chicken Chow Mein Recipe


Good Quality Noodles:

    Chow Mein typically uses egg noodles, Chow Mein noodles are made with wheat and egg. They are very similar to Italian pasta noodles and have a wonderful bite to them. Most grocery stores carry dry chow Mein noodles in the Asian aisle. But, if you are lucky, you will find pre-cooked Chow Mein noodles in the refrigerated section that can be used in the recipe. The noodles should be boiled well, drained and then stir-fried with all the other ingredients together.

Sauces:

    Each cuisine uses different Sauces, the Westernized and Indo-Chinese versions use their own sauces to suit the palate.  Whatsoever, what's important is to use the right amount of sauce, just enough to bring out the flavour without leaving the noodles dry or soggy. Chow Mein gets its signature flavour from the sauces and the rice wine vinegar the noodles are tossed with. It gives the perfect balance of sweetness & sourness to the Chow Mein.

Vegetables: 

    Carrots, Cabbage, Capsicums/Bell Peppers are the perfect combination of veggies to use for Chow Mein. Greens like Bok Choy, Sawi, or veggies like Beans, Baby Corn, Mushrooms fits well into the recipe.

Meats: 

    Chicken Breasts are the best fit for slicing into strips for Chow Mein.  But can easily swap Chicken with for beef, shrimp or pork.

The Heat on the Wok:

    It has to be right—not too hot or too low.  And it also helps to bring out the 'Aroma from the Wok', which is unique to Chinese Stir fries - stir-fry on high heat.  The cook plays with the flame & the Oil in the dish, in & around the wok to give the dish a smoky aroma to the stir fries – may be its Fried Rice, Noodles or Veggies.

Why You Will Love This Recipe

  • Faster than delivery: From prep to plate in under 45 minutes.
  • Pantry friendly: Uses basic sauces you likely already have.
  • Versatile: Toss in whatever veg is wilting in the crisper drawer—it’s very forgiving!
  • Budget-conscious: Feeds a family for a fraction of the cost of a restaurant meal.


For more Chinese-style recipes and Indo-Chinese favourites, you can explore the collection here.

Chicken Chow Mein Recipe Overview

Cuisine – Chinese Cuisine/Indo-Chinese
Course – Main
Spice Level – Low – Medium
Difficulty – Easy
Serves - 3–4
Author – SM @ Essence of Life - Food

Time Estimate

Preparation Time - 20–30 Minutes
Cooking Time – 15-20 Minutes


For more Noodle Recipes and Quick Stir-fry Dishes, check this section.


How to Cook Chicken Chow Mein - Step-by-step Guide for Perfect Chicken Noodles 

Macro shot of chow mein noodles showing texture of succulent chicken pieces and sautéed cabbage.

Quick & Easy Chicken Chow Mein

Ingredients for Chicken Chow Mein:

For the Noodles:

  • 300-400g Egg Noodles (Dry or Fresh)
  • 1 teaspoon Oil (to prevent sticking)
  • Water (to cook the noodles) 
  • Salt to taste

The Chow Mein Sauce:

  • 1 tablespoon Oyster Sauce
  • 1/2 tablespoon Dark Soy Sauce 
  • 2 tablespoon ABC Sauce (Kicap Manis)
  • 3 tablespoon Light Soy Sauce (for saltiness)
  • 1/4 cup Chicken Stock
  • 1 tablespoon Rice Wine Vinegar
  • 1 tablespoon Corn Starch (the secret to a glossy sauce)
  • 1 tablespoon Sugar

For the Stir-Fry:

  • 250 grams Chicken Breast, sliced into thin strips
  • 1/2 Large Onion, sliced
  • 3 Cloves Garlic, finely minced
  • 2-3 Green Chillies, slit (adjust to your spice preference)
  • 1/4 cup Carrots, julienned
  • 1/4 Green Bell Pepper, sliced into strips
  • A handful of Cabbage, shredded
  • 2 tablespoons of Spring Onions, chopped (for garnish)
  • 3–4 tablespoons of Vegetable Oil
  • 1 teaspoon White Pepper Powder
  • A pinch of Salt and Sugar


Overhead view of two bowls of stir-fried chicken chow mein with chopsticks and pickled chillies.

Authentic Stir-Fried Chicken Chow Mein


Method: Step-by-step guide on How to Make Chicken Chow Mein:

This quick chicken chow mein comes together in under 30 minutes and is best cooked on high heat for that signature takeaway-style flavour. 

Step 1. Prepping the Noodle Base

  • Boil water in a large pot with a teaspoon of oil and salt. 
  • Add noodles and cook until al dente (just soft but with a bite).

Pro Tip: |Immediately drain and rinse under cold running water. This "shocks" the noodles, stopping the cook and preventing them from turning into a gummy mass. 

Step 2. Whisk the Sauce

  • In a small bowl, combine all the sauce ingredients. Stir well to ensure the corn starch is fully dissolved. Set aside.

Close up of Chicken Chow Mein noodles with green capsicum and sliced carrots in a white bowl.

Chicken Chow Mein with Fresh Vegetables


Step 3: Prepping for the Chow Mein

  • Clean, Wash and Cut Chicken into small pieces.
  • Clean, peel and cut the Carrots into Julienne's and keep it aside. 
  • Chop Bell Peppers into thin strips and shred the Cabbage.
  • Finely chop the Onions, Garlic and Green Chillies 

Step 4: The High-Heat Stir-frying

  • Heat oil in a wok or large frying pan until shimmering. Sauté onions, garlic, and chillies on high heat.
  • Add chicken strips and sear until they turn opaque and slightly golden.
  • Toss in the carrots and peppers. Sprinkle a pinch of salt and sugar.

Pro Tip: | The sugar helps the vegetables retain their vibrant colour against the dark sauces.

Step 5: The Final Toss

  • Pour in your prepared Chow Mein sauce. Let it bubble for 30 seconds until it begins to thicken and look glossy.
  • Add your cooked noodles. Using tongs or two spatulas, toss vigorously on high heat so every strand is coated.
  • Fold in the shredded cabbage at the very last second—we want it wilted but still crunchy!
  • Sprinkle with white pepper, garnish with spring onions, and serve immediately.


Pro Tips and Notes

  • The "Wok Hei" Secret:  Don't overcrowd the pan. If you're doubling the recipe, cook in two batches to keep the heat high and avoid "stewing" the meat.
  • Noodle Swap: Any variety of Noodles can be used for the recipe.  If you can't find egg noodles, spaghetti works in a pinch, though the texture will be slightly different. 
  • Vegetable Crunch: Always add your "soft" greens (like cabbage or bok choy) at the very end to maintain texture.

Serving Suggestions

Chicken Chow Mein is best served hot, straight from the wok. It pairs well with simple sides like Kung Pao Chicken, Cauliflower Manchurian, or even a Cantonese Chicken Corn Soup. A drizzle of Chilli Oil or a dash of soy sauce on top can elevate the flavours further.

Storage Suggestions

  • Store leftovers in an airtight container in the fridge for up to 2 days. 
  • Reheat in a pan with a splash of water or stock to loosen the noodles.

FAQs

Q: Can I make chicken chow mein without oyster sauce?

  • Yes, the recipe still works well without oyster sauce. You can adjust the soy sauce and other seasonings to balance the flavour.

Q: Which noodles are best for chicken chow mein?

  • Egg noodles are most commonly used as they hold the texture well and give an authentic bite.

Q: Can I use instant noodles for chicken chow mein?

  • Yes, but cook them briefly and avoid over-softening, as they can turn mushy during stir-frying.

Q: How do I prevent chow mein from becoming soggy?

  • Cook the noodles just until soft and stir-fry everything on high heat without overcrowding the pan.

Q: Can I use other meats instead of chicken?

  • Yes, beef, prawns, or even tofu can be used as substitutes.

Q: Is chicken chow mein spicy?

  • This version is mildly spiced, but you can increase the heat by adding chilli oil or sauces.

Recipes You Might Like

  • Nyonya Prawn Curry with Pineapples
  • Stir-fried Glutinous Rice
  • Fried Wantons


If you enjoy simple, home-style recipes like this, do explore more from Essence of Life - Food where flavours are kept honest and cooking stays uncomplicated.


    There you have it—a bowl of comfort that proves homemade is always heartier! Whether you're a chopstick pro or a "fork-and-hope" kind of eater, this Chicken Chow Mein is bound to become a weekly staple.


HOW TO MAKE LYCHEE SYRUP
LYCHEE SYRUP

      What would you do when you land up with a lot of fresh Lychees, and a few tins of canned lychees, devour the fresh juicy fruit as fresh as it is.  And as the days go by and a few batches still lying out in the refrigerator staring at me with wide red-eyes, the never ending plan of converting it into some recipe or the other, pops into my head.  Pudding?!!! Sorbet?!!!  Or go to the extent of converting it into Lychee Syrup???

    Well, though making Syrups seemed tedious in the beginning and once I got the knack for it, I realized it is one simple recipe which just need a bit of time and patience.   In recent years I have been making my own Rose Syrups, Nannari (Sarsaparilla Syrup), Lemon Syrup, Caramel Syrup, Apple Syrup, Coffee Syrup etc., that now I have a bit of confidence to convert fruit juices into syrups.  And also, it is one best way to preserve the produce, when you have them in abundance.

    Along with Lychee comes the memory of our first trip to Thailand. Then it happened to be their National Tourism Week, and they handed a big packet of fresh Lychees to each passenger landing up at Swarnabhoomi International Airport at Bangkok.  We had all together 4 big packets of Lychees.  Though we had them in our hands, we were all busy getting our Entry Visa done and waiting for the Taxi.  Suddenly, an old lady pulled my hand. Alarmed and shocked at the same time, I turned to her... There beside me was a pleasant looking Old Lady, with a pleasant smile & beaming with pride, she said these Lychees are from Chiang Mai, enjoy them!!! Me, with my wide & amused smile, thanked her and said I will surely eat them right away.  To the word, we gobbled up a whole packet of Lychees within no time.  They were so fresh, tasty, juicy and the memorable Lychee flavour (my first acquaintance). Went back to the counter and got hold of two more packets. I still remember the day with all those evening twilight in Bangkok Airport waiting for our taxi to Pattaya, fresh Lychee and the sweet old lady. The whole stay I stored the Lychee in the hotel room refrigerator and had it heartily.  Even I bought back home a packet of Lychees, which we couldn't finish off. The reminiscence of these anecdotes, travel with me even after all these years, and I still relate Lychees to our trip to Thailand.

    Water, Sugar, and Lychees are all you need to easily make this lychee syrup at home.  Boil Sugar & Water along with fresh/canned Lychees until it reaches one string consistency or becomes slightly thick & sticky all together. Finally, add a few teaspoons of Lemon Juice, strain it and there you go with a Lychee syrup ready to add taste and aroma to the dishes.

HOW TO MAKE LYCHEE SYRUP
LYCHEE SYRUP

This Lychee syrup has equal parts of water and sugar, lychees.

  • This is Lychee Syrup and what you would need are Lychees – You can use fresh Lychees if available.  Peel and discard the skin and seed.  Can use canned Lychees too, just be sure to drain the lychees before using.
  • Then what you require is Sugar – White Sugar – I have used white sugar in this recipe, which will help you to retain the natural white colour. Add a dash of lime juice to avoid crystallization. 
  • Then you would need Water.

    Just 2 simple ingredients and you would be rewarded with a wonderfully fruity Lychee syrup.  This easy and extremely versatile Lychee Syrup is sure to elevate your desserts, drinks, cocktails, and mocktails. This Lychee Syrup can be added to almost anything in which you would love to have a note of tropical flavour in it. It will leave you with an elegantly sweet, dainty, and exotic fruity note. 


Cuisine – Asian
Recipe Type – Syrup
Difficulty – Medium
Author – SM   


Preparation Time – 10-15 Minutes
Cooking Time - 30–45 Minutes 
 

For more HOMEMADE SYRUPS, Click here...


HOW TO MAKE LYCHEE SYRUP - HOMEMADE LYCHEE SYRUP

HOW TO MAKE LYCHEE SYRUP
LYCHEE SYRUP

INGREDIENTS: 

For Lychee Syrup:

Sugar – 1 Cup
Water – 1 Cup
Lychees – 1 Cup
Lemon Juice – 1/2 Tablespoon

METHOD:

  • If using fresh Lychees, peel off the skin and cut the lychees and remove the seed. 
  • Then rinse the Lychees well and leave it in a colander for a few minutes.
  • Then cut them into small pieces and grind it into a coarse paste.
  • In a Saucepan, pour in the water and add sugar into it.
  • Stir well to combine, and boil it over a medium-high heat until the sugar is dissolved completely.
  • Now, add the puréed Lychees and give a quick stir.
  • Let it boil for about 5 minutes.
  • Boil this over a low flame for about 30 minutes.
  • Pour in the Lemon Juice and cook for about 5 more minutes.
  • Boil the Syrup until it reaches one string consistency.
  • Switch off the flame and allow it to cool down for a few minutes.
  • When the mixture is warm, strain the syrup. 
  • Once the Lychee Syrup cools down completely, store it in a sterilized glass jar or bottle.
  • Lychee syrup stays fresh for up to 6 months when stored in a dark, cool place. 
  • For a longer shelf life, store the Lychee Syrup in the refrigerator. 
HOW TO MAKE LYCHEE SYRUP
LYCHEE SYRUP

NOTES:

  • I have used white sugar in this Lychee syrup recipe. Brown sugar may darken the Syrup, but if you prefer, substitute White Sugar with Brown Sugar.
  • I had a can of Lychees and some fresh Lychees, So used about a Cup of both in the recipe.
  • Adding Lemon juice while making the syrup is to prevent it from crystallization, and it also acts as a preservative. 
  • Boil the Syrup until it reaches one string consistency.
  • The Syrup gets slightly thicker after cooling down. 
  • Store Lychee Syrup in the refrigerator. This will increase the Shelf life of the Syrup.
  • I have added no preservatives or artificial colouring in this Homemade Lychee Syrup.

How to use Lychee Syrup?

HOW TO MAKE LYCHEE SYRUP
LYCHEE SYRUP
    Lychee syrup is such a versatile concoction, you can use it in many ways. Here are some simple and easy uses of Homemade Lychee Syrup:
LYCHEE JUICE
LYCHEE LEMONADE
LYCHEE MARTINI
LYCHEE PUDDING
 
  • For Lychee Juice – Add this Lychee syrup to plain water & top it up with some Ice cubes.  For a variation, can mix it in Soda.  Or add a dash of Lime/Lemon and serve it with a few leaves of Mint.
  • Make a simple tea and add a hint of Lychee Syrup in it.
  • Add a teaspoon of Lychee Syrup into your limeade or lemonade, for a lychee flavoured Lime/Lemon drink.
  • Or add it to your Cocktails, Mocktails, Mimosas, Martinis or sparkling drinks.  
  • Can add Lychee Syrup while making Lychee Pudding.


A beautifully arranged Kerala-style Christmas breakfast featuring appam, vattayappam, a bowl of stew, and a plate of spicy egg roast, served on a banana leaf.

Kerala Style Christmas Breakfast Spread


"Kerala Christmas Breakfast: A Celebration of Traditional Kerala Christian Cuisine"

Commemorating the Occasion - Blog Anniversary!

    To mark the special occasion of our blog anniversary, I decided to finally share a long-pending post that I had been planning for Christmas and Easter. In a typical Kerala Christian household, breakfast for any celebration—be it a festival, family function, wedding, engagement, christening, or communion—features a unique spread.

Pongal cooking in earthern pot with sugarcanes, coconuts and ingredients ready for making sweet pongal for pongal celebrations
Pongal - Harvest Festival from Tamil Nadu

Pongalo Pongal: A Celebration of Harvest and Tradition

    The arrival of January marks the beginning of the vibrant Pongal Season, a time of gratitude, joy, and traditional feasting. Pongal, both a harvest festival and a dish, beautifully encapsulates the spirit of Tamil Nadu’s agrarian culture. The festival’s name derives from the Tamil word "Pongal," meaning "to boil over," symbolising abundance and prosperity. In this post, we’re diving into the world of Pongal recipes—a mix of both sweet and savoury delights that you can recreate in your kitchen to celebrate the season.

PONGAL
MILLET SWEET PONGAL/SARKKARAI PONGAL

    Those were the days when people looked forward to eating Rice.  Rice was a delicacy to the common man then, and it came to his palate only on special occasions and on festivals. Pongal is one special occasion, a four-day-long festival celebrated at the nook and corner of Tamil Nadu.  As Rice is the staple crop grown in South India, along with other local produces comes this divine dish Sarkkarai Pongal/Chakkara Pongal. Pongal is a harvest festival celebrated in Tamil Nadu to commemorate the divinity of the Sun, and its major role in agriculture and cattle rearing. Even the most poor will try to make Sarkkarai Pongal on this day with a handful of Rice.  So is the speciality of this harvest festival and the dish Pongal.

    Well, coming to recent years, where the folks have turned to eating Millets, Brown Rice etc., the age-old custom of Millet culture is steadily seeping into the kitchens through health conscious minds.  This Sarkkarai Pongal recipe is a twist given to the traditional Pongal where Millets are used instead of Rice. I have used Samai or the Little Millet in this recipe. The cooking method remains the same, with just a mild adjustment in Millet Water ratio. I felt that Pongal made with Millets turned out to be softer with a perfect melt in the mouth like texture. It was tastier than the Rice version, and obviously, a healthier version as Millets are rich in Fibre.

PONGAL
MILLET SWEET PONGAL/SARKKARAI PONGAL

    Though, festivals calls for indulgence and good food, as a norm I would like to prepare Pongal with Rice and Dhal. If you are looking for a twist and a healthier version, then this Millet Sarkkarai Pongal falls gently into the genre.  The cooking method is same as how we make Sarkkarai Pongal with Rice, where millet is substituted instead of Rice. Millet and Moong Dhal(Pasi Paruppu) are used to prepare this Sweet Pongal and Jaggery(Cane Sugar) is used to sweeten the dish, which gives the name Sarkkarai Pongal/Chakkarai Pongal.  Though variant methods are prevalent throughout South India, the major ingredients stick onto the above three major ingredients along with milk, flavoured with cardamoms, dry ginger, edible camphor or clove and garnished with Cashews and Raisins roasted in Ghee.

     This Millet Sarkkarai Pongal/Chakkara Pongal recipe is a simple version which can be prepared at home for any occasion/festival.  Above all, this Sweet Pongal is a major Naivedhyam/Prasadham served in most of the temples or during Poojas at home. Sarkkarai Pongal/Chakkara Pongal served in temples have a special note of taste and flavour which is quite divine.
 
PONGAL
MILLET SWEET PONGAL/SARKKARAI PONGAL


    You can make this Millet Pongal with any type of Millets(Siru Dhaniyam) like Kodo Millet(Varagu Arisi), Samai (Little MIllet), Barnyard Millet(Kuthiraivali), Thinai (Foxtail Millet). I have cooked this Millet Pongal in a Pressure Cooker. Samai Water Ratio is 1:3 for this Millet Pongal, and the ratio remains the same for Moong Dhal. And I substitute 1/2 Cup of Water with Milk which yields you with a softer Pongal and yah, don't forget to add an extra bit of Ghee. Can follow the same ratio for Kodo Millet(Varagu Arisi), Thinai (Foxtail Millet) & Barnyard Millet(Kuthiraivali) too. These Millets are nutritious & it is truly a comfort dish that is so easy to make.


For more PONGAL RECIPES, Click here... 

Cuisine - South Indian
Recipe Type - Sweet, Dessert
Difficulty - Medium
Serves - 3 - 4
Author - SM  

Preparation Time - 15 - 20 Minutes
Cooking Time - 30 - 45 Minutes
 
 
For more RECIPES WITH MILLET, Click here...


HOW TO COOK MILLET SWEET PONGAL/SARKKARAI PONGAL


PONGAL
MILLET SWEET PONGAL/SARKKARAI PONGAL

INGREDIENTS:

For Samai (Little Millet) Pongal:

Samai (Little Millet) -3/4 Cup
Yellow Moong Dhal - 1/2 Cup
Water - 3 1/4 Cup
Milk - 1/2 Cup
Salt - a Pinch
 

For Millets Sarkkarai Pongal:

Jaggery - 1 Cup
Cardamom - 4–5 Pods
Dry Ginger Powder - a Pinch (Optional)
Edible Camphor - 1 small Pinch (Optional)
Cloves - 2 Nos. (Optional)

For Garnishing :

Ghee - 1/4 Cup
Cashew nuts - 10-12 Nos.
Raisins - 3 Tablespoons


METHOD:

  • Melt Jaggery with 1 Cup of Water and 1/2 Teaspoon of Ghee until the jaggery pieces dissolve completely and start to boil.
  • Switch off the flame, filter the melted Jaggery to remove any impurities and keep it aside.
  • Grind Cardamom Pods & Dry Ginger (if using) with a Mortar and Pestle into a fine Powder and keep it aside.
  • Dry Roast Moong Dhal on a low flame for about 5 minutes until the colour changes slightly, and it turns fragrant. (Do not over roast the Dhal).
  • Wash Moong dhal & Samai (Little Millet) for at least 3–4 times or until water runs clear.
    Drain any excess water from it.
  • Pour in 31/4 Cups of Water & 1/2 a Cup of Milk to Samai (Little Millet) and Moong Dhal.
    Pressure Cook on a high flame for a whistle.
  • Lower the flame and cook for another 2 whistles and switch off the flame.
  • Once the pressure is released, open the lid. 
  • Then slightly mash the cooked Samai (Little Millet) and Moong Dhal.
  • Pour the melted Jaggery to the above along with powdered Cardamom and Dry Ginger Powder and mix well.
  • Leave this on a very low flame until Jaggery is well absorbed into the millet and dhal mix.
  • Meanwhile, heat Ghee in a pan and roast Cashew nuts until golden brown colour and Raisins fluff-up.
  • Pour this onto the Millet Sarkkarai Pongal Mixture and mix well.
  • Cook this on a low flame for a few more minutes until you get the desired consistency.
  • Serve Millet Sarkkarai Pongal hot with a drizzle of ghee over it.
PONGAL
MILLET SWEET PONGAL/SARKKARAI PONGAL

NOTES:

  • But dry roasting the dhal enhances the aroma and gives an even texture while cooking.
  • Dry Roast the dhal on a medium flame until they are just hot to touch. (over roasting can alter the flavour of the dish)
  • Adjust the amount of water as for the millet variety.
  • Can substitute one cup of Water with Milk for a rich Sarkkarai Pongal
  • We need the millet and dhal to be well cooked, so a bit of extra water would be needed (more than what we use normally for cooking millets). 
  • Do not over boil the Jaggery mix.  We don't need to boil it into string consistency for Sarkarrai Pongal
  • Adjust the sweetness to suit your taste preference.
  • Adding extra ghee is strictly optional, but gives a wonderful flavour to Millet Sarkkarai Pongal/Sweet Pongal.
  • Adding Dry Ginger powder is optional.
  • Can also add edible camphor and cloves to Millet Sarkkarai Pongal if preferred.
Newer Posts Older Posts Home
Search Essence of Life - Food

I Me Myself

A vintage-style horizontal oval frame showcasing ornate silver spoons on a dark rustic surface

Essence of Life - Food is all about daily cooking with a simple sense of taste and health. It is all about food. Not a day goes by without eating for most of us, so what we eat matters on the whole. Food in the mode of goodness increases the duration of life, purifies one's existence, and gives strength, health, happiness, and satisfaction. Above all ingredients, the most vital one in my kitchen is love.

Sm @ Essence of Life - Food

Popular Posts

  • Kizhi Parotta: Kothu Parotta and Salna Wrapped in Banana Leaves
  • Kerala Sadhya Vibhavangal: Ultimate Guide to Traditional Onam & Vishu Sadhya
  • Nannari - Indian Sarsaparilla Roots
  • How to Make Kerala Kanji | Traditional Rice Porridge with Payar, Chammanthi & Achar
  • Brewing Authentic Malaysian Kopi: A Step-by-Step Guide to Mastering the Art of Kopi Making
Ebook - What I Cook - For Onam

Ebook - “What I Cook - For Onam”

Amazon.com/dp/B0CGPVY6J3

Indulge in Kerala’s Culinary Heritage: Traditional Onam Sadhya Recipes, with Expert Serving Tips! Celebrate Onam the authentic way! Discover 25 timeless Kerala Sadya recipes in my ebook. From avial to payasam, bring home the flavours of tradition. Available now on Amazon!

Essence of Life

Subscribe & Follow

© 2026 | Essence of Life - Food

  • Home
  • Ask First
    Please note that all rights for the photographs and texts on this blog, unless otherwise mentioned, rests with the author. Please do not use without permission.
  • Privacy Policy