Essence of Life - Food
  • Home
  • From My Kitchen
    • Heirloom Recipes
    • From God's Own Country
    • Sadhya
    • Kongu Cuisine
    • Chettinaad Cuisine
    • South East Asian
    • Around the World
  • Ebook
  • I Me Myself

HEALTH BENEFITS OF BLACK PEPPER
BLACK PEPPERCORNS

 BLACK PEPPER - THE KING OF SPICES - THE BLACK GOLD

    An indigenous Spice from "Gods own Country - Kerala". The history of Black Pepper has long written stories earning Kerala transnational fame. A history of its own which attracted seafarers in hordes at one stage in the history of Kerala for this priced BLACK GOLD. Black Pepper was such a desirable Spice that it is used for its varied Culinary and Therapeutical Uses. Since then, Black Pepper has become an inevitable ingredient in several Cuisines around the world.
    Black Pepper comes from the dried, unripe fruit of the plant Piper Nigrum. These Green Berries when ripe & dried turns out into Black Pepper alias Black Gold.  Whereas in the medieval period the Arabs, to maintain their Monopoly in Pepper Trade kept it as a trade secret and propagated a mythical story that the Peppers are grown in the Groves of trees in India in the mountains, guarded by poisonous serpents. In order to harvest the pepper, the trees have to be burned, driving the snakes away and in the process turning the fruit black.
    Commonly named as Peppercorns, but its native name calls it as 'Kurumulagu or Nalla Mulagu' - Milagu, Kali Mirch, Mira.  Peppercorns are indigenous to South India specifically Kerala and it founds its way throughout the world.  This Black Gold was once considered to be one of the most expensive spice and the term "Pepper Expensive" is used for the most expensive & prohibited items.
    Peppercorns have a wonderful aroma and an enticing warm, spicy flavour. The Peppercorns can be either added whole or ground into a variety of dishes, marinades and sauces. It's widely used in the Cuisines Around the World.     

      Black Pepper is called the "King of Spices" as it is an amazing spice traded around the world since ancient times.  Traded mainly for its desirable pungent nature. It is valued as a Spice and also as a Medicine.  Ground, dried and cooked Peppercorns have been used since antiquity, both for flavour and as traditional medicine. This spice has loads of Health Benefits.

  • Rich in Vitamin B and produces Calcium
  • It consists of Potassium that helps in regulating heart rate and high blood pressure.
  • Helps in producing red blood cells
  • Detoxifies your body
  • Cleanses your intestines and stomach
  • Prevents constipation
  • Prevents cancer
  • Prevents skin deformation & wrinkles
  • Helps in losing weight
    Black Pepper is a good source of Proteins, Vitamins & Minerals. It is also rich in antioxidants which help protect cells from damage.


TYPES OF PEPPERCORNS:

Black Peppercorns


    The most common variety of Black peppercorns are Ripe Green    Peppercorns that have then been left out to dry in the sun.  Enzymes in the berries cause the skin to turn black during the drying process.
    They have the strongest & the most pungent flavour. Freshly ground Peppercorns along with Salt are ideal for seasoning pretty much anything.  There are many varieties, including the Kerala Peppercorns which has a pungent and sharp taste; Brazilian Peppercorns have a harsh taste whereas the Indonesian variety has a citrusy note & it is mild compared to the other varieties.


Green Peppercorns

     
    Green Peppercorns are unripe Peppercorns picked at the same stage of ripeness as for Black Peppercorns.  But these are not allowed to dry.  Sometimes they are dehydrated which makes it more flavourful.
    Green Peppercorns are slightly spicy and aromatic, they’re great for flavouring sauces for meat dishes. Their flavour and spiciness are less concentrated than black peppercorns and are considered the least pungent of the peppercorns. Green Peppercorns are commonly preserved in brine or vinegar.


White Peppercorns


    White Peppercorns are the mature Peppercorns that are allowed to ripen to a red colour before being picked. After harvesting, they are soaked and then the outer skin is removed, revealing a smooth white underlayer. They are then dried and bleached under the sun.
     They have a fiery, but a less pungent taste.  White Peppercorns and White Pepper Powder are good for seasoning light coloured Dishes & Sauces. They are widely used in Asian Cuisine.  White Peppercorns serves the purpose by mildly spicing the dish with the required Peppery feel.


Red Peppercorns


    When Peppercorns are left to fully ripen on the vine they turn into a brilliant shade of red. Red Peppercorns are rare to find. Typically they are dried which develops a black coat or when the skin is removed from it what we get is White Peppercorns.
    Red Peppercorns are very expensive and are usually used in gourmet food.
Pink Peppercorns
Pink Peppercorns

    These aren’t actually Peppercorns. They come from the Baies rose plant imported from Madagascar. Pink Peppercorns are expensive. Pink peppercorns are pungent and slightly sweet with fruity and floral notes.
    They are not as flavorful as the real Peppercorns but still have a peppery bite, they also have  They’re best for garnishing. Pink Peppercorns are very delicate, so experts suggest crushing them in a spice grinder or with a knife rather than a pepper mill.


HEALTH BENEFITS OF BLACK PEPPER

HEALTH BENEFITS OF BLACK PEPPER
BLACK PEPPERCORNS

    Black Peppercorn is a potluck filled with not just the pungency but it caters a plethora of health benefits. Though it's a part of ancient Indian heritage, it plays a major role in Ayurveda and in Traditional Chinese Medicine too.  It is widely sued for its medicinal properties & culinary usage.

PREVENTS CANCER:

    Black Pepper is said to prevent cancer when it is mixed with Turmeric. You can consume it by mixing both Black Pepper Powder and Turmeric Powder into fresh Cow Milk. This is a traditional home remedy followed by Indian women folks to get rid of gold & Phlegm. Black Peppercorns consist of antioxidants, Vitamin A and Carotenoids that help in curing Cancer and other deadly diseases. 

AIDS DIGESTION:

    Black Pepper aids digestion. When you consume Peppercorns hydrochloric acid is released by the stomach and helps in breaking down the proteins. Hydrochloric acid helps in cleaning your intestines and prevents you from other gastrointestinal diseases. This is the main reason that most of the meat dishes are seasoned/marinated with Black Pepper Powder.

PREVENTS CONSTIPATION:

    Adding Peppercorns into your daily diet can help you relieve constipation. It also helps to prevent Colon Cancer, Diarrhoea and other intestinal bacterial diseases.

DETOXIFY YOUR BODY:

    Consuming Black Pepper helps to sweat and urinate a lot.  And thus it helps to discharge toxins from our body.  Alternatively, it also burns fat. It also flushes out the toxins, free radicals and dangerous fluids which are harmful to our body. It is a great blood purifier and removes excess urea, calcium and other toxins from the kidney.

TREATS URINARY DISORDERS: 

    Ayurveda uses Black Pepper in treating Urinary tract infections and disorders such as cystitis, nephritis, and gonorrhoea.  

AIDS WEIGHT LOSS:

  The phytonutrients present in the spice helps in breaking down excess fat and also helps to improve metabolism. Adding Pepper in your daily diet can help you lose weight.

TREATS RESPIRATORY DISEASES: 

    Black Peppercorns are one best spice when it comes to treating respiratory diseases like Cold, &Cough. Black Pepper is one simple ingredient used by Indian women folks as a Home Remedy to treat Cold, Cough and to get rid of Phlegm.

ASTHMA: 

    Black Pepper is found to be highly beneficial in treating Asthma, Whooping Cough and Bronchitis.

IMPROVES BLOOD CIRCULATION: 

    Regular consumption of Black Pepper improves Blood Circulation.  This reduces High Blood Pressure/Hypertension and also improves Cardio-vascular health.

REDUCES CHOLESTEROL: 

    The micronutrients in Black Pepper counteract with the surge of lipids in the body. The antioxidant enzymes help in controlling the cholesterol levels significantly.

REDUCES JOINT PAINS:

    Black Pepper has medicinal properties that can alleviate joint pains & arthritis.  It also helps to prevent Gout.  

TREATS DEPRESSION:

 Chewing Raw Peppercorns helps to release mood-inducing chemicals to the brain that will keep your mind calm and soothing.  It has proven beneficial in elevating one's mood and also helps in treating Depression.

MEDICINAL PROPERTIES - BEAUTY

     Consuming this spice in the raw or cooked form are both good enough for your daily diet that will benefit your body and most importantly rejuvenate your skin.  

SKIN ALLERGY:  Due to its antibacterial properties, it is used as an antiseptic to treat skin problems.

SKINCARE:  Black Pepper helps in removing blemishes from the skin and also improves the complexion. It also flushes out the toxins, free radicals and dangerous fluids which are harmful to our body, thus providing a clearer skin.
PREVENTS SKIN PIGMENTATION: Black Pepper protects the skin from any sort of skin pigmentation like Vitiligo where your skin appears to have white patches. It prevents skin pigmentation and also helps maintain the original colour of the skin.
PREVENTS WRINKLES & AGING SPOTS: Consuming Black Pepper from a very young helps to prevent Wrinkles and skin problems.age. It also prevents premature ageing and dark spots too.
TREATS ACNE: Black Pepper helps to flush away the intoxicants from the body and also helps to smoothen the skin.
HAIR CARE: Anti-oxidative properties in Black Pepper provide nourishment to the scalp and hair follicles. Antibacterial properties prevent the scalp from infections and irritation. It also proves to be beneficial in treating Dandruff. Black Pepper strengthens the roots and prevents hair loss. It also provides shine and lustre to the hair.


CULINARY USES:

      Peppercorns can be used in whole or in ground form in a variety of dishes. Freshly ground Peppercorns has a strong, unique spicy-sweet taste and they are more aromatic. Most recipes call for Black Peppercorns. It is one major component in most of the Spice Mixes too.  It's widely used in Spicy dishes, Marinades, Sauces & Soups.  It is also used while in beverages like Tea and Coffee.
  • Peppercorns are one of the main ingredients in Garam Masala Powder & Kitchen King Masala, a combination of spices used in both vegetarian and non-vegetarian dishes in Indian Cuisine. It is also used in the preparation of Curry/Masala Powders, Rasam Powders and Spice Mixes commonly used in Indian cooking.
  • Sukku Malli Coffee - a native brew prepared with ground Dry Ginger, Coriander Seeds, Peppercorns, Cloves & Cardamoms and then served sweetened with Palm Sugar is one beverage with a rejuvenating nature and loads of health benefits aiding digestion of the food side by side.  A simple tea prepared with freshly ground Peppercorns,  sweetened with Honey and served with a dash of lime is one best home remedy to relieve Cold, Flu and Sore throat. 
  • Black Pepper Tea - Ground Pepper Powders can be added to tea or coffee to impart a pleasant and soothing effect. It serves as a good home remedy for sore throats, cold & flu.
  • Turmeric & Black Pepper Milk - A drink prepared by mixing Pepper Powder & Turmeric Powder to Milk is one good home remedy to get rid of Cold & Phlegm.  It also has proven benefits in preventing Cancer.
  • Black Peppercorns are mainly added to Biriyanis & Pulaos, Indian Stews, Curries, Kormas, Dhals, Kebabs, Cutlets etc.,  It enhances the flavour of the dish along with other spices.
  • Peppercorns can be used while making Non-Vegetarian Curries like Kerala Style Pepper Chicken, Chettinad Chicken Kuzhambu, Kongu Style Mutton Kuzhambu, Chicken Pepper Fry, Pichu Potta Kozhi, Nattu Kozhi Kuzhambu etc., & etc.,
  • Peppercorn is one main ingredient in South Indian Rasams.
  • Thandai Masala Powder a combination of homemade sweet drink uses Peppercorn as one ingredient in it.
  • Ground Pepper Powder can be used to flavour foods like Soups, Patties, Stews, Purees, Sauces etc.,
  • Whole Peppercorns & Pepper Powder can be used in Rice dishes like Ven Pongal, Fried Rice.
  • Black Peppercorns. Pepper Powder can be used in the marinades while grilling Chicken or Lamb.  Black Pepper Powder enhances the flavour of Tandoori Chicken, Buttermilk Fried Chicken, Honey Roast Chicken etc.,

HOME REMEDIES WITH BLACK PEPPER: 

Cold & Cough:

  • Black Pepper Tea - Make a simple concoction by adding 1/2 Tspn of Black Pepper Powder & boil it, can also add Ginger/Dry Ginger to it, sweeten it with honey & drink this Black Pepper Tea hot.
  • Turmeric & Pepper Powder Milk - Add 1/2 Tspn of Black Pepper Powder & a pinch of Turmeric to fresh Cow Milk and boil it. Consume it hot or lukewarm for best results.  This drink is best to get rid of Cold and Phlegm.
  • Black Pepper Powder & Honey - Add a teaspoon of Pepper Powder to 1 Tablespoon of Honey.  This is one best home remedy to get rid of Cough and also helps to prevent Chest congestion.
  • Use Black Pepper & Black Pepper Powder in your dishes for a daily of Black Pepper in your diet.  Especially during Winter, it is best to induce Black Pepper in your daily diet which can help you stay healthy and prevent yourself from different diseases.

For a detailed Recipe on HOW TO MAKE PEPPER POWDER, click here...


NOTES :

    Black Pepper is a wonder spice.  It can be used as a standalone Spice or used along with other spices. Compared to other Spices, Black Pepper tends to retain its flavour & aroma even after a long time of storage. Buy dry Black Peppercorns free from moist or any white patches. Store them in airtight containers in a cool, dry place away from sunlight to extend its shelf life. And use freshly ground Black Pepper for the best of flavour & aroma.
________________________________________________________________________________

*DISCLAIMER:

Please remember these options are only meant as guidelines and in no way replaces the advice or treatment provided by your medical practitioner. It is always good to seek the advice of your physician for professional advice in any matter related to your health. This is for information purposes only.


SHOP RELATED PRODUCTS:


BEVERAGES
SUKKU MALLI COFFEE/ CHUKKU KAAPI/DRY GINGER TEA


    Sukku/Chukku in Tamil/Malayalam means Dry Ginger and Malli means Coriander Seeds and hence the name of this Beverage Sukku Malli Coffee.  Well, it is always said as Coffee though the traditional beverage doesn't have any Coffee in it. As a kid, I should say that I have never tasted this concoction, but always knew there existed something called Sukku Malli Kaapi from a monotonous Radio Advertisement which flaunted the taste, aroma and benefits of this Chukku Kaapi.
    Even I have fond memories deciphering the name of this concoction into a similar colloquial word which made it sound funny then.   Even my kids laughed when a vendor who sells this Sukku Kaapi near Nehru Stadium Ground shouted out Sukku Kaapi... Sukku Kaapi... Not to mention it now...  If anybody out there can relate the word, fine!
    My acquaintance with this beverage was when my Husband bought a pack of this Sukku Malli Coffee from Isha Yoga Center in the early 2000s when he was doing a Project for them.  I and my MIL loved this beverage and since then we always stocked up Sukku Malli Coffee at home.  Long forgotten and left alone, when recently my doctor said I have to reduce Coffee consumption😞 Just a Cup of Coffee a day, should I reduce it anymore, I am giving a second... no third... no hundredth thought whether I should quit(NO WAY!!! I already know...) I even have started drinking Moringa Tea in the Evenings. Thought, maybe... I can give a try by making this Sukku Malli Kaapi.  Now my question is whether I should add Coffee in it or not.  Sugar? Anyway, I always drink Coffee without Sugar. 
    There goes my reason for a new batch of freshly ground Homemade Sukku Malli Coffee Powder.

Cuisine - South Indian
Recipe Type - Beverage
Difficulty - Medium
Author - SM   


Preparation Time - 5 Minutes
Cooking  Time - 5 - 10 Minutes
Brewing Time - 5-10 Minutes


HOW TO MAKE SUKKU MALLI COFFEE/ CHUKKU KAAPI/DRY GINGER TEA POWDER

BEVERAGES
SUKKU MALLI COFFEE POWDER

    The traditional recipe calls for Dry Ginger & Coriander Seeds, there are few optional addons like Peppercorns, Cumin, Cardamoms & Cloves.  And this Chukku Kaapi is usually sweetened with Palm Sugar/ Jaggery that adds to the wellness quotient of this time-tested beverage.  
     
    Sukku Malli Coffee is loaded with health benefits.  Anti-inflammatory properties present in the ingredients help clear and soothe your throat and also aids digestion. Ya, I forgot to say it even aids in Weight Loss. It also serves as a good home remedy for Sore Throat & Cold. If you are seeking for a Caffeine free beverage then this Chukku Kaapi is a great choice. If at all you need a bit of Coffee Flavour in this drink then opt for adding Blended Coffee Powders rather than Instant Coffee Powders. Boil a teaspoon of this Homemade Sukku Malli Coffee Powder in 1 Cup of Water add Jaggery/Palm Sugar to sweeten it, strain it and there you go with a rejuvenating flavourful healthy drink. You could drink this as a cold beverage but the curative properties of Chukku Kaapi work best when it's served hot. It's also a preferred beverage in cold weather. On a rainy day - a cup of this hot-hot Sukku Malli Coffee and a crispy savoury snack of your choice is one wonderful combination for the weather.


BEVERAGES
INGREDIENTS FOR SUKKU MALLI COFFEE

INGREDIENTS:

Sukku Malli Coffee Powder:

Coriander Seeds - 2 Tablespoons
Black Peppercorns - 1 Tablespoon
Cumin Seeds - 1 Tablespoon
Green Cardamom - 3 Pods
Cloves - 3 Nos.
Dry Ginger(1" Piece) - 2 Nos.(Do not Dry Roast)


METHOD:

  • Dry roast all the ingredients except Dry Ginger on a very low flame until the spices splutter & turns fragrant. 
  • Care should be taken not to burn the ingredients, which will totally spoil/alter the taste of this beverage.
  • Switch off the flame and let it cool.

 DRY ROASTING THE INGREDIENTS

BEVERAGES
DRY ROASTING FOR SUKKU MALLI COFFEE

  • Carefully cut the Dry Ginger into small pieces.
  • Add in the Dry Ginger pieces along with the other ingredients into small mixer jar/coffee grinder.
  • Grind all the ingredients together into a coarse/fine powder. 
  • Store Sukku Malli Coffee Powder in an airtight container.
  • Stays good up to a month @ room temperature.


HOW TO MAKE SUKKU MALLI COFFEE/ CHUKKU KAAPI/DRY GINGER TEA POWDER

BEVERAGES
SUKKU MALLI COFFEE/ CHUKKU KAAPI/DRY GINGER TEA

INGREDIENTS:

For Sukku Malli Coffee/Chukku Kaapi:

Sukku Malli Coffee Powder - 2 Teaspoons
Water - 1 Cup  
Jaggery/Palm Sugar - To Taste


How to make Sukku Malli Coffee/Chukku Kaapi:

  • Heat 1 Cup of Water along with a few teaspoons of the Sukku Malli Coffee Powder. 
  • Bring it to a boil. 
  • Once it comes to a boil, remove from heat and mix in a teaspoon of jaggery/palm sugar.
  • Strain the Sukku Malli Coffee & Serve hot.
BEVERAGES
SUKKU MALLI COFFEE/ CHUKKU KAAPI/DRY GINGER TEA

NOTES:

  • The traditional recipe calls for Dry Ginger & Coriander Seeds as main ingredients.
  • Add rest of the ingredients to suit your preference.
  • Dry roast the ingredients on a very low flame until it splutters and turns fragrant.
  • Care should be taken while dry roasting the ingredients.
  • Do not Dry Roast DRY GINGER. 
  • Can grind it into a fine/coarse powder. You can even sift the ground powder if you prefer not to strain while making this Sukku Malli Coffee.
  • I usually make this Sukku Malli Coffee Powder in small batches.  This way it retains most of its flavours and aroma.
  • Add any preferred sweetener. Can serve this Chukku Kaapi without any sweeteners too.
  • Tastes and serves best with its curative properties when served HOT.


PEPPER
HOW TO MAKE BLACK PEPPER POWDER


     I have always felt intimidated when it comes to managing my Spice Cabinet.  A challenge of its own with Spices, can I say somewhere around 50 or 100 different spices, sometimes even more? Indian Kitchen is loaded with a Cornucopia of Spices.  Along with it comes the long number of Spice Powders stacked up in the cabinet ready to be used into the dishes demanding specific flavours.  Sambar Powder, Rasam Powder, Garam Masala to name the few. Meticulously sun-dried spices ground into Spice Powders for ready to use purposes.  Mix and match and there you go with a different concoction of various spices ready to cater to add flavour, taste & aroma into the dish.
     I have never felt difficulty in storing large quantities of spices when I was in India.  You see a small weevil in it and there I go punishing the Spices to stand in Sun for a whole long day and specifically on a Sunny day. But living in a place with high humidity, mostly Cloudy with the chance of Meatball, no, no, no...  with a daily chance of a Shower.  Punishing my Spices to stand up on the Bench, I mean in the Sun has gone out of my hands.  So they've become so unruly, undisciplined... and gets loaded with Weevils.  So I got into a practice of buying small quantities and store them in small bottles for daily use, remaining there it goes into my freezer. Same goes to the spice powders. I go hunting for fresh Spices every month. But to be frank I still have a box of Black Cardamom and a box of Cambodge dating back to Indus Valley Civilization.  Just kidding... I have these spices for more than 13 years, my SIL who has a farm gave me a whole batch when I was shifting to Malaysia.   They lie tightly shut inside an airtight container, left in the freezer.  I relieve them out of the place, whenever I need them in a recipe.
     Though I stack up numerous homemade Spice Powders from time to time, I make sure to make small batches and renew them as the stock starts to deplete.  This way I rescued my previously Vibrant Spices & Spice Powders turning into musty pale simulacrums.  Also, I feel preparing small batches helps to retain the flavour in it.  Me sitting at home 24x7 with no other work to do, I have my whole lot of time for all this stuff.  But in this long encounters with Spices, there was one spice which never let me down, one which never got Old.  And that was the good Old trusty Black Peppercorns. 
      Ok when talking about BLACK PEPPER POWDER, it is quintessential in a kitchen. One of the simplest ingredients, when added in  modest amounts, Black Pepper is subtle & unassumingly enhances other flavours in a dish. But in certain dishes like Pepper Chicken, Black Pepper Mushroom Sauce, black pepper deserves a chance at the centre stage. This humble spice turns into a superstar, in these dishes. I use Pepper & Pepper Powder lavishly in my kitchen  and it is one spice & spice powder which gets used up before it has a chance to turn old and bland.
     I thought of writing this post when many of my acquaintances asked me how to make Pepper Powder at home.  They were all used to store-bought ones and when I told homemade Pepper Powders are way better & it is one simple stuff, which could be incorporated within minutes, they were literally in awe.  So again this recipe is for beginners and who do not know how to make Black Pepper Powder at home.
     Choose the fresh and good quality of whole Peppercorns for flavour-filled Black Pepper Powder.  Sun Dry the Peppercorns for longer shelf life. Dry roasting the Peppercorns bring out an aroma unique to Peppercorns. And the major factor to get the flavours intact every time you use it,  store them in airtight containers, kept away from heat, sunlight and moisture. If you get everything right, then these Homemade Black Pepper Powder stays good for months.


For more HOMEMADE SPICE POWDERS, Click here...


Cuisine -  Indian
Recipe Type - Spice Powder
Spice Level - High
Difficulty - Easy
Yields - 1/2 - 3/4Cup(approx)
Author: SM

Preparation Time - 5 Minutes
Cooking Time - 10 - 15 Minutes

HOW TO MAKE BLACK PEPPER POWDER

PEPPER
HOW TO MAKE BLACK PEPPER POWDER

INGREDIENTS:

Black Pepper Corns - 1/2 Cup

METHOD:

  • Dry roast the Peppercorns on a very low flame until it turns aromatic.
  • Keep it aside until it cools down.
  • Transfer it to a small Mixer Jar/Coffee grinder.
  • Grind it into a coarse/fine powder.
  • Once ground transfer the Black Pepper Powder into a clean & dry airtight container.
  • Stays good @ room temperature for up to 2-3 months.
  • Alternatively use Pepper Mills to make fresh Black Pepper Powders on the go. 
  • Or if you are an Old School, the humble Stone Mortar & Pestle serves the purpose.

NOTES :

  • Can sundry the Peppercorns before preparing the Black Pepper Powder, but it is purely optional.
  • Dry Roast the Peppercorns on a very low flame.
  • Care should be taken not to burn the Peppercorns which will totally spoil/alter the taste of the Black Pepper Powder.
  • Cool the ingredients before grinding it.
  • If stored properly stays good for about 2-3 months in room temperature.
  • Store it in the freezer for longer shelf life.
  • Black Pepper Powder can be used while making Chicken Pepper Fry, Chicken Sukha Varuval, Pichu Potta Kozhi, Kerala Style Pepper Chicken, Buttermilk Fried Chicken.
  • Can add it while making Mutton Curries too.
  • Sprinkle a hearty amount of Black Pepper Powder while making Omelettes, Fried Eggs, Scrambled Eggs, Sunnyside Up, Boiled Eggs etc., 
  • Black Pepper Powder can be used to spice up the Soups or Rasams.


SHOP RELATED PRODUCTS:
 

KESARI BHATH
MILK RAVA KESARI - PAAL KESARI

      "Kesari Bhath" is a Classic Indian Sweet which originated from the South Indian State of Karnataka.  This recipe is a small twist made to the classic Kesari Bhath with the only difference that it is cooked in Milk instead of water and hence the name "Milk Rava Kesari or Paal Kesari". I usually add Milk while making Rava Kesari which makes it rich, creamy and gives a melt in the mouth texture. This recipe calls for a bit of extra Milk along with Water.  Rava Kesari is an easy recipe and the most frequented sweet at home.  A sting of Sweet Tooth or if you have to satiate your unexpected pang for a Snack/Tiffin, Rava Kesari comes for the rescue.  This is one sweet which is not only served as a Dessert but even as a Tiffin/Breakfast.  A scoop of Rava Kesari is a must-have in a good spread of South Indian Breakfast. 
     Maybe the name 'Kesari' would have been from the word Kesar/Saffron, a common term used for Saffron in India, which is the basic colour of this vibrant sweet.  Rava Kesari/Kesari Bhath, a sweet popular throughout India is prepared with Semolina/White Rava, Sugar, Ghee, Water/Milk. Though the quantity/ratio of the ingredient varies regionally, the basic ingredients remain the same.  It is called as Sheera/Suji Halwa in North India and the recipe is slightly different from that of Kesari Bhath. Kesari is one sweet which finds no excuse to sneak into my kitchen. 
     According to me Rava Kesari should be exactly like how Director/Actor Visu says in his Tamil Movie 'Samsaram Athu Minsaram' -  Rava Kesari should be so soft that, Ghee should drip out of the sweet and smoothly slide into your stomach the moment you keep it in your mouth, the way he says those words makes Rava Kesari so appetizing and all the more appealing. And this Milk Rava Kesari/Paal Kesari does total justice with all the above characterizations.

For different Versions of KESARI BHATH, Click here...


Cuisine - Karnataka, South India
Recipe Type - Sweet
Difficulty - Easy
Serves - 3 - 4
Author - SM  

Preparation Time - 5-10 Minutes
Cooking Time - 20 - 30 Minutes


For more NAIVEDHYAMS & PRASADHAMS, Click here...


HOW TO MAKE MILK RAVA KESARI RECIPE / PAAL KESARI

KESARI BHATH
MILK RAVA KESARI - PAAL KESARI


INGREDIENTS:

For Milk Rava Kesari/Paal Kesari:

White Rava/Semolina - 1 Cup
Sugar - 11/2 Cups
Water - 11/2 Cups
Milk - 2 Cup
Saffron Strands - few
Cardamom - 5-6 Nos.
Yellow/Orange Food Colouring - a Pinch(Optional)
Ghee - 1/4 Cup

For Garnishing:

Cashew Nuts - 15-20 Nos.
Almonds/Pistachios - Few
Raisins - 15 - 20 Nos.


KESARI BHATH
MILK RAVA KESARI - PAAL KESARI

METHOD:

  • Soak Saffron strands in few teaspoons of Milk/Water and keep it aside.
  • Grind the Cardamom Pods with few teaspoons of Sugar into a fine powder and keep it aside.
  • Heat 2 -3 Tbspns of Ghee in a Pan, roast Cashew nuts, Almonds/Pistachios & Raisins on a very low flame until Cashew nuts turn into light Golden Brown in Colour.
  • Remove the Nuts and Raisins from the Ghee and keep it aside.
  • Add few more teaspoons of Ghee to the same Pan and roast White Rava/Semolina on a very low flame.
  • Roast the White Rava/Semolina until it turns aromatic, it will take approximately 5-7 minutes.
  • Meanwhile, boil 11/2 Cups of Water in a separate Pan.
  • Boil 2 Cups of Milk in a separate Pan and keep it aside.
  • Gradually pour the hot water to the roasted White Rava/Semolina.
  • Stir continuously while pouring the hot water until the White Rava/Semolina absorbs the water and there are no lumps.
  • Slowly pour in 2 Cups of hot Milk and mix well.
  • Pour in the Saffron soaked liquid along with a pinch of Orange/Yellow food colouring and mix well.
  • Once the White Rava/Semolina is cooked, add Sugar and mix well.
  • Cook this mixture on a very low flame stirring continuously until the Sugar is well dissolved.
  • Add Cardamom powder to the Milk Rava Kesari and mix well.
  • Add the remaining Ghee and stir continuously.
  • Cook on a very low flame.
  • Stir the Milk Rava Kesari and mix it well all along, until the mix starts to separate from the pan.
  • Finally, add the roasted Cashew Nuts, Almonds/Pistachios & Raisins to the Rava Kesari and give a quick stir.
  • Serve Milk Rava Kesari/Paal Kesari hot or at room temperature.
  • Can serve it along with South Indian Breakfast items as a sweet or simply serve it as a dessert.


KESARI BHATH
MILK RAVA KESARI - PAAL KESARI


NOTES:

  • Perfectly roasted Semolina yields perfectly textured Milk Rava Kesari.
  • Adjust the amount of Milk/Water to suit your preferred consistency.
  • Adding the given amount of Ghee gives a soft texture to the Rava Kesari.
  • Adjust the amount of Sugar to suit your preference.
  • Adding artificial food colouring is truly optional
  • The colour from Saffron will not yield you a vibrant coloured Milk Rava Kesari.


CHUTNEYS & CONDIMENTS
BEETROOT CHUTNEY


     Beetroot - for the Pink of your Health. A vegetable which belongs to the Beet family with a deep, earthy flavour and a whole lot of crunch.  I love Beetroots for its incredible colour that can transform anything shocking pink and a mild natural sweetness this vegetable imparts into the dishes it is added into.  The vibrant hue of Beetroots converts the dishes appealing to the senses. Some absolutely menace the colour, but Beetroots are loaded with nutritious value & the health benefits.  It is one default vegetable always available in my pantry.  I use Beetroots lavishly in my cooking, in Curries, Stir-fries & Poriyals, convert them into Chutneys/Thogayals, Pachadi/Sasmi, add it while making Croquette/Cutlets, can easily convert it into Kola Urundai/ Kofta, add them into the Parathas, Idi/Dosa, make nutritious Beetroot Juice etc & etc.,
     Beetroot Chutney is one of my favourites.  I love to combine it up with Idli, Dosa, Uthappam, Chapati, Bread or Rice.  The speciality of a South Indian Chutney is that it has a hint of Dhal, Spices and Coconut in it, whereas North Indian Chutneys do not add Dhal & Coconut.  Roasted Dhals & Spices add a wonderful flavour to this Beetroot Chutney. My SIL Nithya adds Radish along with Beetroots and prepares a Chutney which is also equally tasty & nutritious.  Will post the recipe soon.
      There are different versions of Beetroot Chutney, where the basic ingredient, Beetroot remains the same but the Dhals/Lentils added into the Chutney varies.  Some add Roasted Gram Dhal/Tuvar Dhal/Black Gram Dhal(Urad Dhal) and use Green Chillies/Dry Red Chillies to spice up the Chutney. I have added Bengal Gram Dhal/Chana Dhal & have used Dry Red Chillies to spice up the Beetroot Chutney.  I have used a bit of Tamarind and have added a pinch of Sugar/Jaggery which balances the overall taste of the Chutney. This Chutney is to be loved for its beautiful colour, mild Sweetness, wonderful taste and above all, it is loaded with Nutritional Value.


Cuisine - South India 
Recipe Type - Condiment
Spice Level - Medium-High
Difficulty - Easy
Serves - 2-3
Author - SM

Preparation Time - 5 Minutes
Cooking Time - 5 - 7 Minutes


For more Recipes on CHUTNEYS & CONDIMENTS, Click here...


HOW TO MAKE BEETROOT CHUTNEY


CHUTNEYS & CONDIMENTS
BEETROOT CHUTNEY

INGREDIENTS :

Beetroot(grated) - 2 Cups
Oil - 1 Tbspn
Bengal Gram Dhal - 2 Tbspn
Dry Red Chillies - 4-5 Nos.
Coconut - 3 Tbspn
Tamarind Paste - 1/4 Tspn
Sugar/Jaggery - 1/2 Tspn
Salt - To Taste
Water - as required

For Tempering:

Coconut Oil - 1 -2 Tspn
Mustard Seeds - 1/4 Tspn
Dry Red chillies - 1 No.(Optional)
Curry Leaves - a Sprig


METHOD :

  • Clean, Wash & Peel the Beetroots and grate it.
  • Heat Oil in a Pan.
  • Add the Bengal Gram Dhal and fry until it on a very low flame until it turns into golden brown in colour.
  • Snap off the Dry Red Chillies, add it along with the above ingredient and saute it for a while.
  • Add the grated Beetroot and fry for a while on a very low flame until the raw flavours go.
  • Cover and cook for a few minutes, stirring occasionally.
  • There is no need to add water while sauteing the Beetroots.
  • Immediately, add grated Coconut, along with Tamarind Paste, Sugar/Jaggery & a dash of Salt.
  • Fry all the ingredients on a very low flame for a few minutes.
  • Do not allow the ingredients to burn.
  • Switch off the flame and allow the ingredients to cool down.
  • Grind the ingredients in a small blender jar/Coffee grinder into a smooth Paste.
  • Add water as required and grind the Beetroot Chutney into a smooth Paste.
  • Meanwhile, heat Oil in a pan, splutter Mustard Seeds, Dry Red Chillies & Curry Leaves in it.
  • Pour the tempering to the Beetroot Chutney.
  • Beetroot Chutney goes well with Idli, Dosa, Uthappam, Paniyaram, Chapati etc.,
  • Can serve it along with Rice too.

NOTES:

  • Can substitute 1/2 the amount of grated Beetroots with Carrots/Radish.
  • Can substitute Dry Red Chillies with Green Chillies.
  • Adjust the number of Chillies to suit your spice level.
  • Can add more Coconut if preferred.
  • Sugar/Jaggery along with Tamarind balances the overall taste of the Chutney.
  • Care should be taken not to burn the Dhal and Chillies while roasting the ingredients.
  • While frying the grated Beetroot just fry until the raw flavour goes and it cooks.
  • Adjust the consistency of the Chutney as per your preference.


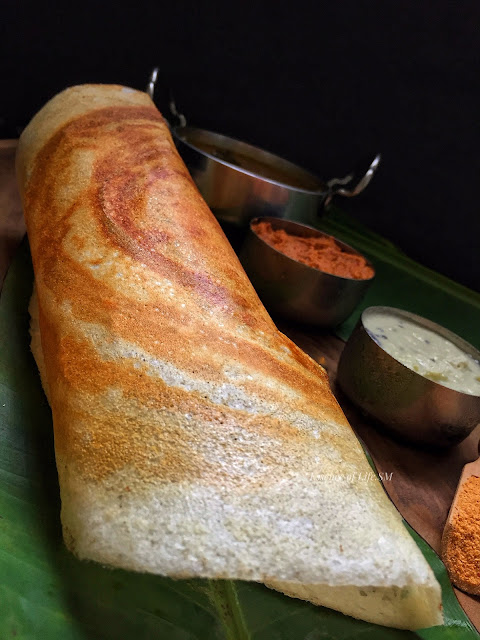
A large dosa and three idlis served on a banana leaf with chutneys and sambar in the background.
Grinding the Perfect Idli & Dosa Batter in Mixie

How to Make Idli & Dosa Batter in a Mixie: A Fool-Proof Recipe

Why Idli Dosa Batter in a Mixie? Simplifying South Indian Meal Planning

    As a South Indian, Idli and Dosa are staple dishes, an unavoidable tiffin item at home. Having Idli Dosa Batter on hand makes meal planning much easier, solving the breakfast or dinner dilemma effortlessly. In my household, we usually enjoy tiffin items for dinner, as that is the only meal we all sit together and eat on weekdays.

    Idli Dosa Batter is a must-have in most South Indian households. It is a versatile ingredient that comes to the rescue, rain or shine. I have long wanted to write this specific post on "Idli Dosa Batter in Mixie." The Mixie, or simply the Blender, can be a great tool for those who do not have a wet grinder. Grinding a small batch using a Mixie/Blender for Idli Dosa Batter is a straightforward task.

No Wet Grinder? No Problem! Idli Dosa Batter Recipe with Mixie

    Until I lived in India, I never gave a second thought about making Idli Dosa Batter. It was a routine, foolproof process using the old school huge grinder with a pestle. However, when I moved to Malaysia, I couldn't bring the Mixer and Grinder from India. During the initial days, I used a 250W Philips Twist Blender to grind the batter. While the Dosas turned out well, the Idlis were a big mishap due to the type of starchy rice available locally, and the difficulty in finding Idli Rice. I resorted to using raw rice, which yields reasonably good Idlis and perfect Dosas when Idli Rice is unavailable.

Grinding the Perfect Idli & Dosa Batter in a Mixie

    After years of trial and error, I perfected a recipe that yields soft, spongy Idlis and crispy Dosas. This batter is ground using a Mixie.

Fool-Proof Recipe for Beginners: Grinding Idli Dosa Batter with a Mixer Grinder

    I’m sharing this recipe with the hope that many of you face similar challenges at home. This method is perfect for beginners and those who don’t own a wet grinder. It’s especially handy when you need to grind just a small batch. Trust me, this is a fool-proof recipe—tried and tested countless times. It consistently delivers soft, spongy Idlis and crispy Dosas. I typically use a 750-watt Preethi Mixer-Grinder, which grinds the Idli Dosa Batter efficiently without overheating. However, ensure the perfect output by following all the details.


For a detailed recipe on making Idli using a wet grinder, click here..."

Cuisine: South Indian
Course: Main Course
Difficulty: Medium
Author: SM


Preparation Time: 15-20 Minutes
Soaking Time: 4-5 Hours/Overnight
Fermenting Time: 8-10 Hours/Overnight
Cooking Time: 10 - 15 Minutes

For a wide range of  Tiffin Items, click here...


Step-by-Step Guide for making Perfect Idli Dosa Batter - Mixie Method


Close-up of idli and dosa on a banana leaf with bowls of chutney and sambar.

Grinding the Perfect Idli & Dosa Batter in Mixie


Essential Tips and Tricks for Perfect Idli Dosa Batter in a Mixer Grinder

    Before diving into the recipe, let's discuss the ingredients, along with some essential Secrets to Perfect Idli Dosa Batter in a Mixie. This versatile batter can also be used to make Uthappam and Paniyaram. If you're a beginner, take the time to read all the details before starting the process—it's worthwhile and will help you achieve the best results.

Why is Grinding Idli Dosa Batter in a Mixie Complicated?

    Grinding Idli Dosa batter in a Mixie can be tricky due to the small motor and the heat generated during repetitive grinding. This heat can cause the batter to warm up quickly, which, while encouraging bacterial growth for fermentation, can also overheat and kill the beneficial bacteria. This leads to the batter turning sour prematurely, affecting the fermentation process and ultimately the texture and taste of your Idlis and Dosas.

    To avoid this, it's crucial to grind the ingredients, especially the Urad Dhal, using ice-cold water. Alternatively, you can refrigerate the soaked rice and Urad Dhal for a few hours before grinding. Cold ingredients help reduce the heat generated during the grinding process, ensuring proper fermentation and preventing the batter from turning sour too quickly.

One Batter, Multiple Uses

    This Idli Dosa batter is not only ideal for making Idlis and Dosas but also works perfectly for Uthappam and Paniyaram. With just one batter, you can create multiple delicious dishes. So, make sure to follow these tips and tricks to enjoy soft, spongy Idlis and crispy Dosas every time.


Dosa and idlis arranged on a banana leaf with traditional accompaniments of chutney and sambar.Grinding Perfect Idli & Dosa Batter in Mixer Grinder

Homemade Idli and Dosa Batter in Mixie


Tips for Grinding Idli Dosa Batter Using a Mixie

    Typically, a wet grinder is the go-to appliance for grinding Idli Dosa batter. However, this recipe uses a Mixie/Blender, making it accessible for those without a wet grinder. Be sure to read all the instructions carefully and use ice-cold water while grinding the batter. Additionally, follow the specified water measurements for each ingredient to achieve the best results.

    All ingredients should be soaked separately for at least 4-5 hours or overnight. Sago/Tapioca Pearls can be soaked for a longer duration, preferably overnight.

Important Tips for Adding Water

    Be cautious when adding water while grinding the batter. Avoid adding too much water initially. Since the same batter will be used for both Idlis and Dosas, you can slightly dilute the batter after making Idlis when preparing Dosas. Keep in mind that the batter tends to thin out slightly after fermentation.

Close-up of a golden brown dosa on a banana leaf with chutney and sambar.
Crispy Dosa with Homemade Idli and Dosa Batter in Mixie

Ingredients for Idli Dosa Batter Using Mixie

For Idli Dosa Batter:

Idli Rice - 2 Cups
Whole Urad Dhal (Black Gram Dhal) - 1 Cup
Fenugreek Seeds - 2 Teaspoons
Sago (Tapioca Pearls) - 1/2 Cup
White Aval (Beaten Rice) - 1 Cup
Rock Salt - To Taste

The Perfect Rice to Urad Dhal Ratio (2:1)

    The ideal ratio for this Idli Dosa Batter is 2:1 (Rice to Urad Dhal). Including Sago and Beaten Rice complements the Urad Dhal ratio perfectly. This combination has always worked best for me when grinding the batter using a Mixie/Blender. It’s a foolproof method that ensures consistent results every time. However, this ratio is specifically for Mixie/Blender use and not for a traditional grinder.

Fenugreek Seeds: A Flavourful Addition

    There’s a debate about whether adding fenugreek seeds affects the colour of Idlis, but their addition is optional. From my experience and tradition, adding fenugreek seeds enhances the flavour and promotes fermentation. However, use them sparingly to avoid bitterness. Soak the fenugreek seeds in 1/4 cup of water, and include the soaking water while grinding. This step is crucial for achieving a smooth paste and better fermentation.

Choosing the Right Urad Dhal

    Selecting the right Urad Dhal is essential. For detailed information on varieties and their uses, refer to my IDLI RECIPE. I prefer using Whole White Urad Dhal for my batter. Soak the Urad Dhal separately in ample water for 3-4 hours or overnight. Before grinding, refrigerate the soaked Urad Dhal for a few hours. Use the large jar of your Mixie, and add 1/2 to 3/4 cup of ice-cold water gradually. This method ensures the batter fluffs up well. The water drop test can confirm the perfect consistency: a blob of batter should float on water.

Grinding Idli Rice

    Idli Rice, a short-grained, fat, parboiled rice, is ideal for this batter. Unlike the coarse grind in traditional recipes, this batter requires a fine paste since it’s used for both Idlis and Dosas. Grind the soaked and drained rice in two batches, using about 1 cup of ice-cold water. This ensures a smooth, thick consistency, perfect for Idlis, which can be diluted slightly when making Dosas. Combine the rice batter with the Urad Dhal batter, ensuring there’s enough space for fermentation.

Adding Sago for Soft, Spongy Idlis

    Sago, or Tapioca Pearls, is a key ingredient for achieving soft and spongy Idlis. Soak the Sago in 1 cup of water overnight for the best results. Grind it into a smooth paste in the Mixie, ensuring there are no lumps. This addition guarantees a soft texture for Idlis and crispiness for Dosas.

    Sago/Sabudhana is an essential ingredient while making Kushboo Idli/Malliga Poo Idli, contributing to their soft, spongy, and fluffy texture. For more details, check out my detailed recipe for Kushboo Idli/Malliga Poo Idli.

White Aval (Beaten Rice) for Perfect Texture

    Beaten Rice, or Aval, contributes to the softness of Idlis and the crispiness of Dosas. Soak Aval for 3-5 minutes before grinding. Use the soaking water to create a smooth paste and mix it with the other ground ingredients. This short soaking time is sufficient for Aval to blend well with the batter.

When to Add Salt?

    Salt can be added either during the fermentation process or after the batter has fermented. Adding salt later is advisable in hot climates to slow down the fermentation and prevent the batter from turning sour quickly. In colder regions, mix the batter thouroughly with salt and then leave the batter in a warm place, like an oven with the lights on, to promote fermentation.

Fermentation Time

    Fermentation typically takes 8-12 hours or overnight, depending on the batter volume, weather, and location. Once fermented, the batter will froth and increase in volume. Stir the batter thoroughly with a ladle to incorporate air, especially if salt was not added earlier.

Thoroughly Mixing the Batter

Mix the batter thoroughly at three stages:

  • After grinding.
  • After fermentation.
  • Just before making Idlis or Dosas.

Soft & Fluffy idlis served on a banana leaf with chutney and sambar, viewed from a side angle.
Soft & Fluffy Idlis with Homemade Idli and Dosa Batter in Mixie

Cooking Idlis: The Steaming Process

  • Pour water into the Idli vessel/steamer and bring it to a boil.
  • Grease the Idli moulds or line them with muslin cloth.
  • Thoroughly mix the Idli Dosa Batter.
  • Fill each mould with a ladle of batter.
  • Steam the Idlis for 4-5 minutes on high flame, then reduce to medium-low for another 3-5 minutes.
  • Do not over cook the Idlis.
  • Allow the Idlis to cool slightly before removing them from the moulds.
  • Serve hot with Sambar or Chutney.

 For a Variety of Idli Recipes, click here...

Close-up of a crispy dosa with chutney and sambar, all served on a banana leaf.
Crispy Dosa with Homemade Idli and Dosa Batter in Mixie

Making Crispy Dosas

  • Heat the Dosa griddle on high, then lower to medium-high.
  • Grease the griddle with oil.
  • Thoroughly mix the Idli Dosa Batter and pour one big ladle of batter over the Dosa Griddle.
  • Spread a ladle of batter evenly on the griddle.
  • Drizzle few teaspoons of Oil/Ghee over the Dosas.
  • Cook on a medium flame until crispy and golden.
  • Roll out the Dosa and serve with Sambar or Chutney.


For a Variety of Dosa Recipes, click here... 


Delicious dosa and soft idlis served on a banana leaf with traditional chutney and sambar.

Grinding the Perfect Idli & Dosa Batter


Storing and Using Idli Dosa Batter

  • Store fermented batter in the refrigerator for 3-4 days.
  • Bring to room temperature before use.
  • Use thick batter for Idlis and Uthappams.
  • Slightly dilute for Paniyarams.
  • A bit more diluted Batter for making Dosa. 
  • Can divide the Batter into portions and do so.
  • Once diluted the batter may not serve good for Idlis.

    Discover the joy of preparing perfect Idli and Dosa batter effortlessly with a Mixie. Whether you're a beginner or an experienced cook, this fool-proof recipe ensures soft, spongy Idlis and crispy Dosas every time. Embrace the convenience of grinding at home without a wet grinder, using the detailed guide in this recipe. Elevate your South Indian cuisine experience today with this tried and tested method. For more Delicious Tiffin Ideas and Recipes, explore my blog and start cooking like a pro!


Newer Posts Older Posts Home
Search Essence of Life - Food

I Me Myself

A vintage-style horizontal oval frame showcasing ornate silver spoons on a dark rustic surface

Essence of Life - Food is all about daily cooking with a simple sense of taste and health. It is all about food. Not a day goes by without eating for most of us, so what we eat matters on the whole. Food in the mode of goodness increases the duration of life, purifies one's existence, and gives strength, health, happiness, and satisfaction. Above all ingredients, the most vital one in my kitchen is love.

Sm @ Essence of Life - Food

Popular Posts

  • Kizhi Parotta: Kothu Parotta and Salna Wrapped in Banana Leaves
  • Kerala Sadhya Vibhavangal: Ultimate Guide to Traditional Onam & Vishu Sadhya
  • Nannari - Indian Sarsaparilla Roots
  • How to Make Kerala Kanji | Traditional Rice Porridge with Payar, Chammanthi & Achar
  • Brewing Authentic Malaysian Kopi: A Step-by-Step Guide to Mastering the Art of Kopi Making
Ebook - What I Cook - For Onam

Ebook - “What I Cook - For Onam”

Amazon.com/dp/B0CGPVY6J3

Indulge in Kerala’s Culinary Heritage: Traditional Onam Sadhya Recipes, with Expert Serving Tips! Celebrate Onam the authentic way! Discover 25 timeless Kerala Sadya recipes in my ebook. From avial to payasam, bring home the flavours of tradition. Available now on Amazon!

Essence of Life

Subscribe & Follow

© 2026 | Essence of Life - Food

  • Home
  • Ask First
    Please note that all rights for the photographs and texts on this blog, unless otherwise mentioned, rests with the author. Please do not use without permission.
  • Privacy Policy