Essence of Life - Food
  • Home
  • From My Kitchen
    • Heirloom Recipes
    • From God's Own Country
    • Sadhya
    • Kongu Cuisine
    • Chettinaad Cuisine
    • South East Asian
    • Around the World
  • Ebook
  • I Me Myself
STIR FRY
SPICY SNAKE GOURD & EGG STIR FRY


   Malaysian Curry Houses or Mamak restaurants flaunt a wide variety of dishes. I love to have lunch in these restaurants especially, for the wide range of Veggies, a local lingo used for Stir-fries & Poriyals. The curries, gravies, fries with chicken, mutton, beef, egg, fish, squid, prawns, tofu, salted eggs & a whole lot of dishes with veggies. All these dishes would be lined up in serving trays & displayed within a glass case, from which we can choose our preferred curries & side dishes which would be served into our plate. I would mostly end up with more Veggies in my plate rather than any non-vegetarian side dishes. And mainly I would be sure to take a serving of deep-fried bitter gourds.


    Well, this spicy Snake Gourd & Egg Stir Fry is one dish I got into my cooking repertoire. Inspired & replicated from the lunch arenas in Malaysian Curry Houses. This recipe was a different version, from what I had eaten before. A spicy stir fry made with Snake Gourds cut differently into a U shape or can we say C Shaped? We can find two versions of the same, sometimes without Eggs in it. This dish can be found in almost all Indian Curry Houses and Mamak Shops in Malaysia.


   Though an Indian dish prepared to suit the local palate has given this dish a new dimension. This recipe is a spicy and dry version compared to the ones available in eateries. This spicy stir-fry goes well with Fragrant Rice or Fried Rice. It can also be eaten as a side dish along with rice and curry.


For more MALAYSIAN RECIPES, Click here...


 Cuisine - Malaysian Mamak Style

 Recipe Type - Stir Fry

 Spice Level - Medium - High

 Difficulty - Easy

 Serves - 2- 3 

 Author - SM


 Preparation Time - 10 - 12 Minutes 

 Cooking Time - 10 - 15 Minutes


For more STIR FRY RECIPES, Click here...


HOW TO COOK SPICY SNAKE GOURD & EGG STIR FRY
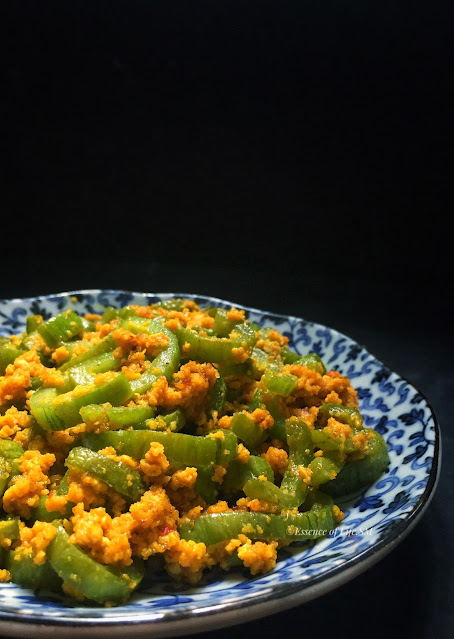

STIR FRY
SPICY SNAKE GOURD & EGG STIR FRY


INGREDIENTS:


For Spicy Snake Gourd & Egg Stir Fry: 


Snake Gourd - 1 Medium Sized

Egg - 2 Nos.

Salt - 1 Tspn

Sugar - 2 Tspn

Oil - 1 Tbspn


For the Spice Paste:


Shallots - 4-5 Nos.

Garlic - 2 Cloves

Fresh Turmeric - 1 Small Piece

Dry Red Chillies - 2-3 Nos.

Red Bird's Eye Chillies (Chilli Padi) - 2-3 Nos.


METHOD:


  • Trim both the ends and Scrape the whitish layer on the Snake Gourd with a knife.
  • Cut it into two halves lengthwise and scoop out the white pulp with seeds.
  • Cut Snake Gourd into 4-5mm thick strips and leave it aside.
  • Soak Dried Red Chillies in hot water for 10 minutes.
  • Grind it along with other ingredients mentioned under 'for the Spice Paste' into a fine paste.
  • Heat oil in a pan and saute the Spice Paste on a low flame until oil separates from the mix and it turns aromatic for about 5-7 minutes.
  • Add Snake Gourd, Salt and Sugar to the spice paste and mix well.
  • At this stage, sprinkle some water if necessary.
  • Saute it until the vegetable is cooked, and spice paste turns fragrant & dry.
  • Meanwhile, Crack open the Eggs, beat it lightly along with a dash of Salt and Turmeric Powder.
  • Push the Snake Gourd to one side of the pan. 
  • Pour the beaten egg into the Pan & Scramble it on a medium flame until cooked.
  • Now mix both the Snake Gourd and the scrambled eggs. 
  • Serve it along with Fragrant Rice or any other dish of your choice.


STIR FRY
SPICY SNAKE GOURD & EGG STIR FRY


NOTES:


  • Adjust the amount of Dry Chillies and Red Bird's Eye Chillies to suit your spice level.
  • Adding sugar is optional, but it helps to retain the colour of the vegetable. 
  • Can add Turmeric powder instead of Fresh Turmeric.
  • Do not overcook the Snake Gourd.
  • Cooking on a high flame yields crunchy and sweet-tasting Snake Gourd.
  • Snake Gourd should not be overcooked or turn soggy.
  • Pushing off the cooked Snake Gourds to one side of the pan and then pour the Eggs & scramble it up.
  • This way, the eggs can be scrambled well until cooked and doesn't get coated to the Snake Gourd.
  • If you pour the eggs over to the Snake Gourd, it gets coated to the vegetable and doesn't get cooked well, which may result in an eggy smelling stir fry. 
  • The same recipe can be prepared without Eggs too.  For Spicy Snake Gourd Stir Fry, click here...


HOW TO COOK STICKY RICE/GLUTINOUS RICE


    Sticky Rice is a particular variety of rice grown in the South East and East Asia. Though, commonly called as Sweet Rice & Glutinous Rice(not because they contain any gluten, but for the reason, they are sticky). This round-grained Sticky Rice tends to become Sticky and Translucent once cooked. The reason behind its stickiness is the absence of the starch amylose, which makes it extra starchy. The trick of getting perfectly cooked Sticky Rice is to Soak them before cooking, and my foolproof method is to Steam Cook. 


  Sticky Rice/Glutinous Rice is a versatile ingredient used in many forms of Asian cooking. Sticky Rice is used in both savoury & sweet recipes. Sticky Rice Flour is used in a wide range of dishes & kuihs locally, and I use it while making Onde Onde. And one popular Dessert - Thai Mango Sticky Rice is the dish which made me try Sticky Rice. Went with the cooking trials to get perfectly textured Sticky Rice for the Dessert. Trying to cook in a Saucepan initially, then in a rice cooker, pressure cooker. I couldn't get the perfect texture whatsoever, the rice was sticky, and it turned out to be like one big lump when cooled. 

WHITE GLUTINOUS RICE / STICKY RICE

HOW TO COOK STICKY RICE
WHITE GLUTINOUS RICE / STICKY RICE

    Again, getting help from Google God. Tried the traditional method of Steam cooking the Sticky Rice in a regular steamer, and with a few trial & errors perfected the Microwave Method. When Steam Cooking Sticky Rice, you do not need water to be poured into the rice. So no Rice Water ratio required to be followed in this method. What you need is to soak the Sticky Rice for about 6-8 hours/overnight. Drain it up and the line it up in a steamer cloth & Steam cook. This way the Sticky Rice come out perfectly every time, & each rice kernels stays separate. No more mushy, soggy or under cooked /overcooked Sticky Rice.  


    Well, when it comes to the cooking utensil, traditionally Sticky Rice is cooked in a Bamboo Steamer. I still have to acquire one. If you have a regular/electric Steamer, it is good enough. Rather, it is what you would actually need. No steamer, no worries. All you need is a large, deep pot with a lid, a trivet     (even an empty can, serves good), & a heatproof bowl/plate/dish.


Cuisine - South East Asian
Course - Dessert
Difficulty - Medium
Serves -2-3
Author - SM

Preparation Time - 10 - 15 Minutes
Soaking Time - 6-8 hours/Overnight
Cooking Time - 30-45 Minutes

HOW TO COOK STICKY RICE/GLUTINOUS RICE

HOW TO COOK STICKY RICE/GLUTINOUS RICE


Points to remember when cooking Sticky Rice:


  • Soak the Sticky Rice for at least 6-8 hours/overnight.
  • Steam Cooking is the best way to cook Sticky Rice.
  • Line up the Steaming Plate/dish with a parchment paper or a clean kitchen cloth or a steamer liner.
  • Cooked Sticky Rice is really sticky! 
  • One simple trick I learnt accidentally (very recently) is to wet the serving tools & your hands to prevent sticking.
  • Once cooked, Sticky Rice tends to dry-up & hardens quickly @ room temperature.
  • Keep it covered all the time & make sure it's still warm before adding it into any recipe.
  • If serving as such, it is better to serve it hot.
  • Cold & hardened cooked sticky rice can be hard to digest.


TWO IMPORTANT POINTS 

  1. SOAK 

  2. STEAM COOK 

    HOW TO COOK STICKY RICE/GLUTINOUS RICE
    SOAK
    HOW TO COOK STICKY RICE/GLUTINOUS RICE
    STEAM COOK


So, here I go with TWO Fool Proof method of cooking Sticky Rice, which can be used in various dishes & desserts. The STEAMER METHOD & MICRO-WAVE METHOD.


IN STEAMER - TRADITIONAL METHOD

HOW TO COOK STICKY RICE/GLUTINOUS RICE

INGREDIENTS:

Sticky Rice - 1 Cup
Water in the Steamer - 5-6 Cups


METHOD:

  • Wash the Sticky Rice for two-three times, or until the water runs clear.
  • Soak the Sticky Rice in ample of water for about 6-8 Hours or Overnight.
  • Once soaked, drain the sticky rice and discard the water.
  • Pour 5-6 Cups of Water at the bottom of the steamer pot.
  • Carefully place the steamer plate and line it up with a clean Muslin/Cheesecloth.
  • Spread the Sticky Rice over the Muslin/Cheesecloth and cover the steamer pot with the lid.
  • Cook the Sticky Rice on high flame for about 5-8 minutes.
  • Lower the flame to medium and cook for another 15-20 minutes.
  • Once cooked, the Sticky Rice would turn translucent.
  • Switch off the flame and leave it aside for about 8-10 minutes.
  • Remove the lid of the steamer pot and fluff up the rice with a chopstick/fork.
  • Transfer the cooked Sticky Rice into a bowl. 
  • Keep the sticky rice in the steamer or covered to prevent drying out until you serve it or use it in a recipe. 


MICROWAVE METHOD:

INGREDIENTS:

Sticky Rice - 1 Cup
Water - 1 Cup


METHOD:

  • Soak the Sticky Rice in Warm Water for 10-15 minutes.
  • Drain the Sticky Rice and discard the water,
  • Add the Sticky Rice and Water in a microwave safe bowl big enough to hold rice and water.
  • For 1 Cup of Sticky Rice, I used 1 Cup of Water.(Rice Water Ratio = 1:1).
  • Cover the bowl and cook on high power for 3 Minutes.
  • Carefully remove the bowl and stir the ingredients well.
  • Cook for another 3 Minutes.
  • Once cooked, the Sticky Rice would turn translucent.
  • Remove the bowl and give a quick stir.
  • If the Sticky Rice has not cooked, cook for another few minutes.
  • The timing to cook the Sticky Rice depends on the type of Microwave.
  • For every 2-3 minutes, remove the bowl from the Microwave and mix it well.
  • This way, you can ensure that the Sticky Rice is evenly cooked.


NOTES:

  • Soak the Sticky Rice before cooking. 
  • Line up the Steaming Plate/dish with a parchment paper or a clean kitchen cloth or a steamer liner.
  • Once cooked, Sticky Rice tends to dry-up & hardens quickly @ room temperature. 
  • If serving as such, it's better to serve it hot. 
  • Keep it covered all the time & let the Sticky Rice be warm when you add it into any recipe.
  • This way, it is easy to handle.
  • Cooked Sticky Rice is really sticky! One simple trick I learnt accidentally (very recently) is to wet the serving tools & your hands to prevent sticking. 
  • Cold & hardened cooked sticky rice can be hard to digest.
  • When making a larger batch, steam it in two batches or adjust the cooking time.
  • You can check the rice and increase the steaming time if necessary. 


CHICKEN CURRY
CHICKEN CURRY - MY STYLE


    This year we celebrated our 25th Wedding Anniversary. While I was in midst reminiscing a number of memories, I was remembering my initial days of cooking in my in-laws' house. Trying hard & always sceptical enough, thinking whether they would like my cooking. As it was a joint family & the cooking was always to suit each & everyone at home, it had too many specifications as a matter of fact. FIL wanted a non-vegetarian dish to be served daily, MIL never wanted to come out of the comfort zone of classic cooking. Any new dishes were termed out to be fashion cooking. But now you should see the way she tries out all-new recipes she sees in TV shows. Time changes!


    And all the more, I wanted to impress my husband with my cooking. He was always busy with his work and never gave much notice to what he ate( all the more what I cooked). Gradually, I started cooking a few dishes, to suit everybody's liking(so what I think it was...) specifically I made sure to cook Tiffin items for breakfast. Earlier my MIL used to make Kanji for breakfast at least 2-3 times a week & it was like, my Hubby & my FIL somehow made sure to convince my MIL they ate it and then, they went to Annapoorna Gowrishankar to finish off their breakfast. Whatsoever, I am not sure whether they went to eat out, even when I made Tiffin items. But I got a distinguished comment from my MIL saying that "Marumakal Kanji Kudi Muttichu."


    Well, coming to the story of Chicken Curry. Though I used to cook even during my college days, I had never ever ventured into cooking Non-vegetarian dishes. So, just a month after my wedding my MIL went to her mother's place in Cochin. She gave me the instructions that a batch of Chicken is lying in the Freezer and how to cook it. I was literally apprehensive about the idea and least knew how to cook a Chicken, how much masala to be added, how long to cook a Chicken etc., But I had to cook as my FIL wanted some non-vegetarian dish for lunch. Initial 2-3 days, I escaped by making Egg Curry, then Omelette, next day I fried some fish & so on and finally the day dawned that I was out of ideas & I had to make Chicken Curry.  And above all it was a Sunday.


    Somehow, I made sure to cook Chicken, with my whims & fancies, but wanted a justified version. Chicken or Mutton curries cooked without Potatoes are a big Taboo at home, so added a few Potatoes 

into the Chicken Curry. Sauteed the Onions & Tomatoes & spices and then ground them into a paste - that was to make sure that the Masala didn't taste anywhere raw. Then I spluttered some fennel seeds and sauteed the ground masala until oil separated from the mix, added the Chicken Pieces, waited until it was half cooked and then added Potatoes into it. Adjusted the consistency and finished off the Chicken Curry garnishing it with Coriander Leaves. I wouldn't say it was the best curry ever, but nobody had any comments or complaints about the curry. So there I came up with a Chicken Chicken - My style, My version.


CHICKEN CURRY
CHICKEN CURRY - MY STYLE


    When I am too lazy to ponder about for some new versions of Chicken Curry or when I need to cook something within 20-30 minutes, I stick on to my style of this Chicken Curry. I have perfected this Chicken Curry to the core with my innumerable repetitions & it is our family favourite. When you are cooking up a lot of dishes for a celebration or an occasion, then this Chicken Curry recipe can be easily incorporated into your menu for two good reasons:


  • Quick to prepare
  • Fewer Ingredients

    This Chicken Recipe is prepared with Pan-seared Chicken Pieces, simmered to perfection in an Onion Tomato base with mild spices. Every time I cook Chicken Curry,  I usually Pan sear the Chicken Pieces, which gives a perfectly cooked juicy and succulent chicken pieces.  Pan searing the Chicken pieces is one technique I learnt & perfected out of experience.  This simple Chicken Curry goes well with all type of Indian bread like Rotis, Naan, Kulcha, Chapatis, Parathas & Parottas and Tiffin Items like Idli, Dosa, Uthappam, Vellayappam, Idiyappam and Puttu.  Also, it is a good accompaniment along with Rice, Pulaos and Biriyanis too. The best about this Chicken Curry is that it is authentic and it is an absolutely flavour filled Curry justifying the very nature of Indian spices added into it. At the same time enhancing the overall taste and aroma of the Curry.

For more CHICKEN Recipes, Click here...

Cuisine - Indian
Course - Side Dish
Spice Level - Medium - High
Difficulty - Easy
Serves - 3 - 4
Author - SM

Preparation Time - 20-30 Minutes
Cooking Time - 25-30 Minutes


HOW TO COOK CHICKEN CURRY - MY STYLE

CHICKEN CURRY
CHICKEN CURRY - MY STYLE

INGREDIENTS: 

For Chicken Curry - My Style:

Oil - 2 Tbspn
Fennel Seeds - 1/2 Tspn
Curry Leaves - 2 Sprigs
Chicken - 1/2 Kg
Potatoes - 4-5 Nos.(medium-sized)
Turmeric Powder - 1/2 Tspn
Red Chilli Powder - 1 Tspn
Garam Masala - 1 Tspn
Tamarind Paste - 1 Tspn
Salt - to Taste
Sugar - a Pinch

For the Masala Paste(To Saute & Grind):

Oil - 2-3 Tbspn
Cloves - 3 Nos.
Cinnamon - 1" Stick
Fennel Seeds - 1 Tspn
Cardamom - 3 Pods 
Onion - 2 Nos.
Ginger - 1" Piece
Garlic  - 8-10 Cloves
Dry Red Chillies - 5-6
Coriander Powder - 1 Tbspn
Tomato - 2 Nos.
Coriander Leaves - few


To Garnish :

Coriander Leaves - Few

METHOD:

For the Masala Paste(To Saute & Grind):

  • Heat oil in a Pan, Splutter the spices mentioned under 'For Masala Paste.'
  • Immediately add finely chopped Onions, garlic & ginger and saute until onions turn translucent.
  • Add Dry Red Chillies and fry them on a very low flame until it fluffs up.
  • Then add Coriander Powder and fry it on a low flame until the raw flavour goes.
  • Add finely chopped Tomatoes and cook this on a low flame until the tomatoes turn soft & cooked.
  • Once the tomatoes turn soft, switch off the flame & add a few strands of fresh coriander leaves to 
  • the above.
  • Give a quick stir and allow the mixture to cool down.
  • Once cooled, grind the ingredients into a fine paste and keep it aside.


For Chicken Curry - My style:

  • Clean, wash & cut Chicken into small pieces. Allow it to drain in a colander. 
  • Clean, Peel & wash the Potatoes.
  • Cut them into cubes and leave them in a bowl of salted water until use.
  • Meanwhile, heat oil in a Pan, splutter Fennel seeds and Curry Leaves on a very low flame.
  • Add Chicken pieces to the oil along with a dash of salt and pan sear the chicken pieces until water runs out clear.
  • Toss the chicken pieces once or twice and cook until the colour changes and it is evenly coated with oil, for about 5-8 minutes.
  • Pour the ground Masala Paste to the Seared Chicken pieces and mix well.
  • Add Turmeric Powder, Red Chilli Powder and Garam Masala to the above and fry for a while until the raw flavour goes. 
  • Cook this on a low flame until oil separates from the mix.
  • Add cubed Potatoes along with a dash of salt, and mix well.
  • Let it cook on a low flame for a few minutes or until the Potatoes turn soft & cooked. 
  • Then, pour in the Tamarind extract along with a pinch of Sugar and mix well. 
  • Sprinkle some water if necessary at this stage.
  • Cook the curry on a low flame for about 7-10 minutes or until it reaches the desired consistency.
  • Switch-off the flame and garnish it with Coriander Leaves.
  • Serve Hot. 
  • Goes well with Vellayappam, Idiyappam, Chapatis, Rotis, Parathas.
  • Can be served along with Rice, Pulaos and Biriyanis too.

CHICKEN CURRY
CHICKEN CURRY - MY STYLE


 NOTES:

  • Adjust the amount of Spices to your taste preference.
  • Can pre-boil the cubed Potatoes & then add it into the Chicken Curry.
  • Pan searing the Chicken Pieces gives a perfect texture.
  • Sauteing & grinding the Onions and Tomatoes gives you a rich gravy.
  • Adding Sugar & Tamarind is totally optional. But it helps to balance the overall taste of the Chicken Curry.
PALANI PANCHAMIRTHAM
PANCHAMIRTHAM RECIPE


    Today is my Dad's Birthday & Thaipusam. He shares his Birthday with Lord Muruga. He was born on Thaipusam, and so they named him Velayudhan. This day has always been a special day of celebration at home. The day begins with Achan's visit to Marudhamalai, & then an elaborate Sadhya with my Mom's specialities and her benchmark Gothambu Payasam. Nowadays he gets busy with serving food(Annadhanam) for the devotees who walk, who carry out Padha Yathirai to Marudhamalai shrine for the special day.


    When it comes to making Panchāmirtam, my Dad is an expert in it, and he makes it at our neighbourhood Vinayagar Temple during festivals and special occasions. So today is Thaipusam & my Dad's Birthday. So, posting an all-time special Prasadham from South India - Panchāmirtam. It is years that I tasted Panchāmirtam. And it was one day that I felt like eating Panchāmirtam & I had a few bunches of Bananas from the tree in my Backyard. So this recipe went with my craving for the same. I prepared a small batch of Panchāmirtam to feed my fancy & nostalgia hit mind.


    When we say Panchāmirtam, it has always been Palani Panchāmirtam. It is a world-renowned Prasadham served in Palani Murugan Temple. A visit to Palani Temple is incomplete without a bottle of Panchāmirtam. Panchāmirtam means 5 elixirs. And this consists of 5 or more unique ingredients depending upon the recipe. Traditionally it is made with Bananas, Jaggery, Kalkandu(Rock Sugar), Dates, Raisins, Cardamoms & Ghee in proper proportions. Some even use Honey & edible Camphor in it.


    When it comes to Palani Panchāmirtam, they traditionally use Viruppāchchi pazham, small-sized bananas with less water content. And this variety of Bananas are grown in Viruppāchchi village in Palani Hills. Yet another ingredient which yields for the taste of Palani Panchāmirtam is the Kandasari Jaggery from Kangeyam area. The quality of the ingredients used makes it suitable for storage & consumption over a long period, without refrigeration. And there is a saying that "Older the Panchāmirtam, tastier it becomes".


    In olden days it was crushed using hands, and nowadays they use electrically operated utensils for the purpose. The speciality of Palani Panchāmirtam is that the Panchāmirtams collected after abhishekam has medicinal values. It is poured over the statue of Lord Muruga which is made of Navapashanam (9 unique poisonous substances). Navapashaman is the most acclaimed Siddha elixirs known to mankind. When Milk or Panchāmirtam poured over the idol, then it is believed to become medicine to cure diseases. Panchāmirtam, collected after abhishekam, is not only delicious and nourishing food. It also has astonishing medicinal properties.


    So here I go with the technique of making Panchāmirtam, which I have seen my Dad make numerous times. The quantity given here suits best for a small serving to be served as a Naivedhyam during a Pooja at home.


For more NAIVEDHYAMS & PRASADHAMS, Click here...


Recipe Type - Naivedhyam/Prasadham
Difficulty - Easy
Serves - 3-4
Author - SM  

Preparation Time - 20-25 Minutes


HOW TO MAKE PANCHAMIRTHAM


PALANI PANCHAMIRTHAM
PANCHAMIRTHAM RECIPE

INGREDIENTS:


For Panchāmirtam:


Ripe Bananas - 2 Nos.

Dates - 3 Nos.

Kalkandu(Sugar Candy) - 1 Tbspn

Powdered Jaggery - 2 Tbspn

Raisins - 8-10 Nos.

Honey - 1 Tbspn 

Cardamom Powder - a Pinch

Edible Camphor - a very small Pinch(size of a mustard seed)

Ghee - 1 Tbspn


METHOD: 


  • Take a wide bowl, big enough to hold all the ingredients.
  • Mash or slice Bananas into small pieces.
  • Chop Raisins & Dates into small pieces.
  • Add powdered Jaggery, Kalkadu, Honey, Ghee, Cardamom Powder & Edible Camphor.
  • Gently mix all the ingredients until it turns mushy.
  • Leave this aside for about 15-20 minutes,
  • Let all the ingredients get well soaked up, and the Sugars starts to meltdown. 
  • Panchāmirtam is ready to be served. 
  • Serve it as a Naivedhyam/Prasadham.
  • Can store Panchāmirtam in the refrigerator for a day.


PALANI PANCHAMIRTHAM
PANCHAMIRTHAM RECIPE

NOTES:


  • If you can get hold of Viruppāchchi Pazham & Kandasari Jaggery, it would make a whole lot of difference to Panchāmirtam.
  • Karpooravalli Pazham also can be used in the recipe.
  • I have used the locally available small variety of Banana(Pisang Emas or the Golden Banana).
  • As it is a small-sized Banana, I have used 2 Bananas in the recipe.
  • Use small cube-shaped Kalkandu(Sugar Candy).
  • Adding Edible Camphor is purely optional. Add just a small mustard sized pinch of it in the recipe.
  • Mix well until all the ingredients are well incorporated.
  • Do not store this Panchāmirtam for a long time.
Newer Posts Older Posts Home
Search Essence of Life - Food

I Me Myself

A vintage-style horizontal oval frame showcasing ornate silver spoons on a dark rustic surface

Essence of Life - Food is all about daily cooking with a simple sense of taste and health. It is all about food. Not a day goes by without eating for most of us, so what we eat matters on the whole. Food in the mode of goodness increases the duration of life, purifies one's existence, and gives strength, health, happiness, and satisfaction. Above all ingredients, the most vital one in my kitchen is love.

Sm @ Essence of Life - Food

Popular Posts

  • Kizhi Parotta: Kothu Parotta and Salna Wrapped in Banana Leaves
  • Kerala Sadhya Vibhavangal: Ultimate Guide to Traditional Onam & Vishu Sadhya
  • Maida Chapati - All-Purpose Flour Chapati
  • Nannari - Indian Sarsaparilla Roots
  • Brewing Authentic Malaysian Kopi: A Step-by-Step Guide to Mastering the Art of Kopi Making
Ebook - What I Cook - For Onam

Ebook - “What I Cook - For Onam”

Amazon.com/dp/B0CGPVY6J3

Indulge in Kerala’s Culinary Heritage: Traditional Onam Sadhya Recipes, with Expert Serving Tips! Celebrate Onam the authentic way! Discover 25 timeless Kerala Sadya recipes in my ebook. From avial to payasam, bring home the flavours of tradition. Available now on Amazon!

Essence of Life

Subscribe & Follow

© 2026 | Essence of Life - Food

  • Home
  • Ask First
    Please note that all rights for the photographs and texts on this blog, unless otherwise mentioned, rests with the author. Please do not use without permission.
  • Privacy Policy