Essence of Life - Food
  • Home
  • From My Kitchen
    • Heirloom Recipes
    • From God's Own Country
    • Sadhya
    • Kongu Cuisine
    • Chettinaad Cuisine
    • South East Asian
    • Around the World
  • Ebook
  • I Me Myself
APPAM, VELLAYAPPAM
APPAM RECIPE


      "Appam" is indigenous to Kerala, an integral part of Kerala Cuisine. A signature dish popularized by Kerala Syrian Christians. A popular breakfast dish equally competent along with Puttu & Idiyappam.  Not only that it is served as a breakfast dish, but it also takes a special place in most of the Festive Menu List.  A day of importance/special occasion in a Christian household, surely calls for Appam & Stew in the menu.  
     Origin of Appam - though a topic of debate, whether Appam originated from Sri Lanka or from Tamil Nadu. There is also a theory that it originated from the Kodavas whose cuisine and culture are similar to the Malayali Syrian Christians or the Mangalorean Catholics.  Kodava Cuisine has traces of Bunts, Odia, Telugu & Bengali Cuisine. Some even go to the extent that it was brought forth by the Portuguese.  But a recipe with Rice, Coconut & Toddy, I really doubt.  Maybe it could even be rephrased as, did the Portuguese take the Appam to Sri Lanka & Malaysia, where we can find similar recipes like Appam Balik, Apam Beras/Nasi, Apam Kampung/Tembam, Apam Pisang, Apam Gula Hangus, etc., & etc., Burmese Ah-Boh, Indonesian Serabi, Thailand's Khanom Khrok all fall under the same genre.
      It sounds so similar to most of the Kerala Appams like Vellayappam, Vattayappam, Paalappam, Kallappam, Kalathappam, Idiyappam, Pesaha Appam, Unniyappam, Neyyappam, Kuzhalappam, Achappam...

Ha... so many Appams in list.

      If you are looking for an out of an Indian theory there comes Ethiopian Injera, made with Teff Flour(which belongs to Finger Millet/Ragi family) and the Yemeni Lahoh made from Sorghum(which is Jowar/Cholam). Both are fermented foods. Both regions had trade contacts with Kerala. Both foods are visually almost identical to our own Appam.
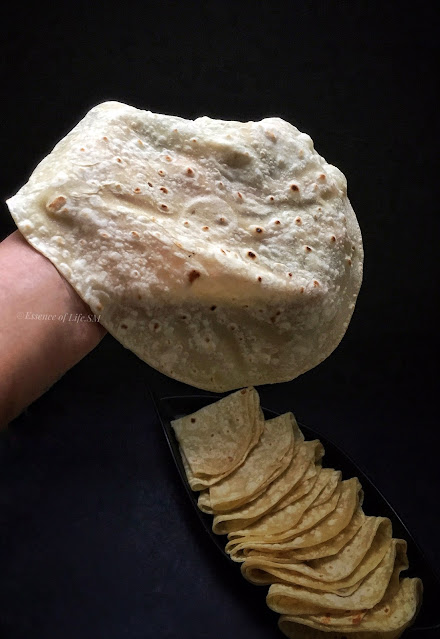
      I have already posted a recipe for Vellayappam/Appam earlier which is prepared with Rava Kurukku/Semolina Paste. This Appam recipe is one of the simplest and the most traditional recipe which I got from Winnie Aunty. We can use Toddy in the batter instead of Yeast to induce fermentation. This Appam batter yields, lacy, crispy edges with a soft fluffy centre.


For more recipes from GODS OWN COUNTRY - KERALA  click here...


Cuisine - South India, Sri Lanka & Southeast Asian
Course - Main Course
Difficulty - Medium
Yields - 30-35 Appams
Author - SM


Preparation Time - 15-20 Minutes
Soaking Time - 4-5 Hours
Fermentation Time - 10-12 Hours/Overnight


WINNIE AUNTY'S SIMPLE & EASY APPAM RECIPE

APPAM, VELLAYAPPAM
WINNIE AUNTY'S SIMPLE & EASY APPAM RECIPE


INGREDIENTS:

Raw Rice - 2 Cups
Cooked Rice - 3/4 Cup
Coconut - 1 Cup
Salt - To Taste


Yeast Mix :

Yeast - 1/2 Tspn
Water - 1/4 Cup
Sugar - 2 Tspn


METHOD :

Yeast Mix :  
  • Activate the yeast by putting it in lukewarm water along with 2 Tspns of Sugar.
  • Leave it aside until it ferments. (For about 15-20 Minutes).

For the Batter :
  • Wash & Soak the Raw Rice for about 4-5 hours.
  • Once soaked, drain the Rice. (Can use the water used for soaking to grind the batter)
  • Grind Raw Rice, Cooked Rice and Coconut until it turns into a very smooth batter.
  • Add the Yeast Mix to the above batter.
  • Finally, *add Salt and mix the batter well.
  • Store it in an airtight container and leave it aside for another 10 - 12 hours or overnight to ferment.


To make  Appam :

  • Heat the Appam pan.
  • Pour a ladle full of batter into the pan.
  • Swirl the pan once, in such a way that the batter spreads around.
  • The centre of the Vellayappam should be slightly thicker than the edges.
  • Cover the pan with the lid and let it cook for around two minutes.
  • The flame should be kept at low.
  • Once the edges start to brown and the centre is cooked, the Appam/Vellayappam is ready.
  • Remove the Appam/Vellayappam from the pan.
  • Can serve with Stew, Red Coconut Chutney, Egg Curry with Coconut Milk or any curry of your choice. 
  • Appam/Vellayappam tastes great with sweetened Coconut Milk or simply serve it with Sugar/Brown Sugar.
  • Can also serve Steamed Bananas/Nendhra Pazham Puzhungiyathu/Nendhra Pazham cooked in Sugar Syrup along with Cloves as a side dish for Appam/Velleyappam.

For more TIFFIN ITEMS, Click here ...


NOTES :
 
  • Can use warm water to grind the batter, this is to speed up the fermenting process.
  • The Appam batter should be slightly thinner than the Dosa batter. 
  • Swirling the batter in the pan ONCE, yields crispy edges and soft, fluffy centres.
  • Activate the yeast in lukewarm water. Do not use boiling water for the purpose.
  • Adding Sugar to the Yeast Mix will speed up the activating process.
  • If you need to quicken the fermenting process, *avoid adding Salt to the Appam/Vellayappam batter until it ferments.
  • Add Salt just before making Appam/Vellayappam.
  • Fermentation time depends upon the weather. Adjust accordingly.


SHOP RELATED PRODUCTS:

CHUTNEYS & CONDIMENTS, KONGU CUISINE
KOLLU/HORSE GRAM THUVAIYAL

    
     Kollu/Horse Gram Thuvaiyal/Thogayal is a simple Lentil Chutney prepared with Horse Gram, Dry Red Chillies, Coconut and some seasonings.  This is a simple recipe which can be served along with steamed Rice or along with Idli, Dosa and Uthappams.  Kollu/Horse Gram Thuvaiyal is a traditional South Indian Dish unique to Kongu Cuisine.  It is very light to the stomach, aids digestion and it caters a wide range of health benefits.
     Kollu/Horse Gram Thuvaiyal, Rasam, Sutta Appalam is one common and best combination for a simple South Indian Lunch Menu.  Serve steaming hot Rice and this wonderfully flavoured Kollu/Horse Gram Thuvaiyal with a drizzle of melted Ghee.  The texture of this Thuvaiyal/Thogayal along with rice, ghee and accentuating aroma imparted from well-roasted Horse Gram leaves a refreshing feel overall. When it comes to Vazhaiyilai Virundhu, Thuvaiyal/Thogayal is one dish serve along with other dishes.  Kollu Thovaiyal can be served as one dish in a virundhu.
     Kollu/Horse Gram is one legume used extensively in  Kongu Cuisine and we can find quite a number of recipes like Kollu Masiyal, Kollu Rasam, Kollu Paruppu Sundal, Kollu Chutney, Kollu Thuvaiyal, Kollu Kurma Kollu Paruppu Podi and so on...   Kollu Thuvaiyal recipe is similar to Paruppu Thogayal and Chuttaracha Thenga Chammanthi where all the ingredients are roasted until fragrant and especially tamarind is roasted directly over the flame, slowly and carefully without burning it and then, it is traditionally ground in an Ammikkal (A flat stone) and rotund round stone called Kozhavi.  Grinding them traditionally in a Stone Mortar and Pestle, brings out the natural oil from the ingredients, making the Kollu/Horse Gram Thuvaiyal tasty and nutritious.  Kollu/Horse Gram Thuvaiyal can be ground in a mixer-grinder or in a small blender jar/coffee grinder.  Add very little or no water while grinding this Thuvaiyal. I have added Garlic Cloves and Asafoetida to cut down the gastric effect from the Dhal.

To Read about the HEALTH BENEFITS OF HORSE GRAM, Click here...


Cuisine - Kongu Cuisine(South India)
Recipe Type - Condiment
Spice Level - Medium - High
Difficulty - Easy
Serves - 3- 4
Author - SM


Preparation Time - 5 Minutes
Cooking Time - 5 - 7 Minutes

For more Recipes on CHUTNEYS & CONDIMENTS, Click here...


INGREDIENTS :

Horse Gram - 1/3 Cup
Coconut - 1/4 Cup
Dry Red Chillies - 6 Nos.
Garlic - 3 Nos.
Curry Leaves - 1 Sprig
Tamarind - 1 Small Lime Size
Salt - To Taste
Asafoetida - a Pinch
Oil - 2 Tbpsn


 METHOD :

  • Insert the Tamarind into a skewer and char it on a direct flame until the colour changes, for about 10-15 seconds. Keep this aside.
  • Heat Oil, roast the Dry Red Chillies until they fluff up.
  • Add Horse Gram and roast it until they turn into slightly golden brown in colour and aromatic, on a very low flame.
  • Add Garlic Cloves and Salt to the above ingredients, fry until garlic is well sautéed.
  • Saute on a very low flame until they turn dry.
  • Add Curry leaves, grated Coconut and fry until coconuts are dry and turn into a slight golden colour. (Care should be taken not to burn the ingredients).
  • Add Asafoetida Powder to the above and give a quick stir.
  • Switch off the flame and allow this mixture to cool.
  • Grind Horse Gram/Kollu Thuvaiyal into a smooth paste in Mortar and Pestle or in a dry blender jar.
  • Do not add water while grinding. Kollu Thuvaiyal.
  • Kollu Thuvaiyal is a perfect match for Steamed Rice, serve it with a drizzle of melted ghee over it.
  • Goes well with Dosa, Idli and Uthappam too.


 For more recipes with HORSE GRAM/KOLLU, Click here...

NOTES :

  • Can also do use coconut slices in the recipe.  If using coconut slices, roast them first, as they will take a longer time to fry. Then add the rest of the ingredients one by one.
  • Adjust the amount of Red Chillies and Tamarind to your preference. 
  • Charring the Tamarind over direct flame gives a slightly smoky flavour and brings out the sweetness from the tamarind.
  • If using tamarind with seeds, remove the seeds and threads if any and shred it into small pieces and then insert it into the skewer. Do not soak Tamarind in water for this recipe.
  • Roast all the ingredients on a very low flame until they turn into golden brown in colour and aromatic.
  • Care should be taken not to burn the ingredients, which would spoil the taste of the Kollu /Horse GramThuvaiyal.
  • This is a dry Thogayal/Thuvaiyal, grinding it with mortar and pestle (Ammikkal) yields best results.
  • Can use a small blender/coffee grinder or mixer-grinder to grind this, if needed can add few drops of water to the mixture.
  • Adding Garlic Cloves & Asafoetida to the  Kollu Thuvaiyal is truly optional.


DESSERTS, PULUT HITAM, BEE KOH MOY
BLACK STICKY RICE DESSERT - PULUT HITAM


     "Black Sticky Rice Dessert/Pulut Hitam" is a dessert made of Black Glutinous(sticky) Rice and Coconut Milk, mildly sweetened with Palm Sugar/Rock Sugar. This Southeast Asian dessert is cooked to the consistency of rice porridge, with a rich and creamy flavour. A note of Pandan from freshly knotted Pandan Leaves gives this dessert an authentic touch.
     Black Sticky Rice Dessert/Pulut Hitam is one of the most popular Malaysian Dessert in the Southeast Asian region. It has different names throughout the region, 'Bubur Ketan' in Indonesia, 'Bee Koh Moy' in Hokkien, 'Bubur Pulut Hitam' in Malay and so on.  This black sticky rice dessert is a local favourite. It is one of the most popular & common desserts in Nyonya & Peranakan families. 
      I tasted this Pulut Hitam in our friend's brother's place in Melaka.  His wife Komala asked me whether I have tasted Pulut before and to me, I had no idea what it was.  She immediately arranged to buy Pulut, freshly grated coconuts, etc., and when we went back to her house in the evening there she had this beautiful dessert ready for me. Mysteriously coloured, chewy Rice in a rich and creamy Coconut Milk base & the dessert was mildly sweet.  It was she who introduced to me this Dessert & the recipe.
      Sticky Rice is one common variety of Rice available in South East Asian Region and you can find a wide range of desserts and dishes prepared out of it.  This dessert is prepared with Black Sticky(Glutinous) Rice which has a dark purple colour that is almost black. It is rich in antioxidants and has a high fibre content in it. This Black Sticky(Glutinous) Rice is usually used in desserts in the Southeast Asian region. This rice is also known as "Forbidden Rice".


STICKY RICE, RICE
BLACK STICKY(GLUTINOUS) RICE  - PULUT HITAM

     Once cooked this Black Sticky(Glutinous) Rice makes this dessert beautiful with its colour.  It turns into a bright purplish burgundy colour adding uniqueness to the dessert.  I usually add Palm Sugar/ Rock Sugar which yields a mild sweetness to Pulut Hitam. Adding Palm Sugar or the Malaysian Gula Melaka adds a nutty sweetness and goes hand in hand with the colour of the Black Sticky Rice Dessert. Above all the dessert is mildly sweetened, it is commonly termed as Bubur Pulut Hitam - Porridge(Bubur) masqueraded as a Dessert.
      I usually soak the Black Sticky(Glutinous) Rice overnight or at least for 6-8 hours before cooking.  But it can also be cooked without soaking the rice beforehand, but it takes a longer time and an extra amount of water to cook. And the cooked rice doesn't yield a perfect texture. The Rice should be cooked until soft.  Pulut Hitam/Black Sticky Rice can be cooked in a rice cooker or in a Pressure Cooker. It can also be cooked in a steamer/saucepan. Pulut Hitam/Black Sticky Rice can be cooked until liquid is reduced to a thicker consistency. Leaving the cooked rice for 4-5 hours will also allow the starch to be released from the glutinous rice and thicken the dessert.


For more DESSERTS, Click here...


Cuisine - Hokkien (Asian)
Course - Dessert
Difficulty - Easy
Serves - 2-3
Author - SM

Preparation Time - 10 - 15 Minutes
Soaking Time - 6-8 Hours/Overnight
Cooking Time - 30-45 Minutes


HOW TO COOK BLACK STICKY RICE DESSERT 

PULUT HITAM/BEE KOH MOY


DESSERTS, PULUT HITAM, BEE KOH MOY
BLACK STICKY RICE DESSERT - PULUT HITAM


INGREDIENTS:

To Cook the Black Sticky Rice :

Black Sticky(Glutinous) Rice - 1 Cup
Water - 5-6 Cups
Pandan Leaves - 2 Nos.

For Black Sticky Rice Dessert - Pulut Hitam/Bee Koh Moy:

Palm Sugar/Rock Sugar - 1/4 Cup
Thick Coconut Milk - 3/4 Cup
Thin Coconut Milk - 3/4 Cup
Salt - To Taste


For detailed steps on HOW TO MAKE COCONUT MILK, Click here...


METHOD:

To Soak & Cook the Black Sticky Rice :

  • Clean, Wash the Black Sticky Rice 2-3 times or until water runs clear.
  • Soak the Black Sticky Rice in water for about 8-10 hours/Overnight.
  • Once soaked, drain and discard the water used for soaking.
  • Add 5-6 Cups of Water, knotted Pandan Leaves and cook the Black Sticky Rice until the rice turns soft.


HOW TO COOK BLACK STICKY RICE?

In Sauce Pan :
  • Pour the Water, knotted Pandan Leaves in a Sauce Pan and bring the water to Boil
  • Add soaked Black Sticky Rice into the Saucepan and allow it to boil on a medium flame.
  • Reduce the flame to low, cover and cook for another 45 minutes to 1 Hour.
  • Keep checking the water level at intervals.
  • If it becomes dry, add more boiling water.
  • Adjust the amount of water and cook until the Rice turns soft.

In a Rice Cooker :
  • Add Soaked Black Sticky Rice, 5-6 cups of Water and knotted Pandan Leaves into the Rice Cooker.
  • Cover and cook, if you have the porridge function then use it while cooking the Black Sticky Rice.
  • Cook until the rice turns soft.

In a Pressure Cooker :
  • I cooked the Black Sticky Rice in a Pressure Cooker. 
  • Add Soaked Black Sticky Rice, 5-6 cups of Water and knotted Pandan Leaves into the Pressure Cooker.
  • Close the lid and cook on a high flame for 2-3 Whistles, lower the flame and cook for another 4-5 whistle.
  • Switch off the flame and allow the pressure to release.
  • Once the pressure is totally released, remove the lid.
  • Check whether the Rice is cooked.  
  • It may have some water left along with the cooked rice.
  • Cook until the Water is totally absorbed(in a very low flame, stirring continuously).
  • Cook until the rice turns soft and all the water is totally absorbed.

For Black Sticky Rice Dessert - Pulut Hitam/Bee Koh Moy:

  • Once the Black Sticky Rice is cooked, add Palm Sugar/Rock Sugar to it along with a cup of Water.
  • Cook this on a low flame until the Palm Sugar/Rock Sugar melts.
  • Pour in 1/2 Cup of Thin Coconut Milk and cook this on a low flame for few minutes.
  • Stir the ingredients while cooking.
  • Finally, pour 1/2 Cup of Thick Coconut Milk and cook briefly.
  • If time permits, leave the Dessert aside for at least 20-30 minutes before serving.
  • This will enable the sticky rice to absorb the sweetness and flavour.
  • Serve Pulut Hitam/Bee Koh Moy in small bowls topped with reserved Thick Coconut Milk.
  • Add more Coconut Milk if you like the dessert creamier.

NOTES :

  • The Rice should be soft once cooked.  Can increase the amount of water if required.
  • This is a mildly sweet Dessert, adjust the amount of sweetener to suit your Sweet Tooth.
  • If you feel the Black Sticky Rice Dessert is thick, add more Coconut Milk.
  • Adjust the consistency of the dessert to suit your preference.
  • Serve the Black Sticky Rice Dessert warm or cold.


    "Tomato Tango: A glass of fresh tomato juice in a sugar dipped glass.
    "Tomato Tango: A Burst of Flavour in Every Sip"


    "Tomato Tango: Sip into Sunshine with this Fresh and Flavourful Juice!"

        We resided in a cozy abode nestled in the bustling heart of Coimbatore, or as my Dad fondly called it, where the bulk of my formative years unfolded. Despite its modest size, our home exuded the quintessential charm of a middle-class family dwelling. Dwelling in such snug quarters fostered an unparalleled sense of closeness and unity among us. Our humble abode comprised just two rooms: by day, the living room doubled as a bedroom, seamlessly transforming into a dining area come evening, while every nook found purpose, serving as a snug study corner or a compact kitchen.

        Back in the day, items like refrigerators, televisions, mixers, grinders, and even telephones were considered luxuries. I can vividly recall the joyous moments when my parents managed to acquire each of these necessities, one by one, as our home gradually transformed into a place of comfort and contentment. Despite its simplicity, our humble abode stood as a testament to the belief that true happiness is created by people, not by wealth or material possessions.

        The tale of Tomato Juice harks back to a time when we didn't have a blender (mixer-grinder) at home. During tomato season, when the market overflowed with ripe tomatoes at unbelievably low prices, I witnessed the women in our neighbourhood stockpiling them. However, there came a point when the abundance of tomatoes exceeded our capacity to consume them fresh, especially without the aid of refrigeration. In those days, my mother would briefly blanch the tomatoes, squeeze them by hand, strain the juice, add sugar, and transform them into tomato juice. She had her own unique methods for making juices back then. While preparing juices with oranges and mosambi was relatively straightforward, making apple juice involved steaming the apples, mashing them, and adding milk and sugar. Similarly, she would mash and squeeze grapes and watermelon to extract their juice.

        Whenever I make tomato juice now, it evokes nostalgic memories of those days, accompanied by the distinct aroma of tomato juice. Using ripe tomatoes adds natural sweetness to the drink, while balancing the inherent acidity of tomatoes with sugar or honey. Besides being versatile and delicious, tomato juice is a nutritional powerhouse, offering a wide range of health benefits and aiding in weight loss by cutting down calorie intake.

        Freshly made tomato juice is my preferred choice. You can enhance its flavour by adding preferred sweeteners or spicing it up with pepper powder or Tabasco sauce. You can also elevate its nutritional profile by combining it with other vegetables like carrots, beetroot, or celery. Moreover, you can transform tomato juice into a variety of cocktails by adding gin, vodka, rum, beer, or tequila. Experiment with flavours by incorporating jalapeño, lime, basil, or oregano for a delightful fusion of taste and aroma.


    For a variety of thirst quenching fresh Juices, Smoothies & Drink Recipes, click here...


    Recipe Type - Juice
    Difficulty - Easy
    Serves - 1
    Author - SM  

    Preparation Time - 5–10 Minutes

    "Fresh homemade Tomato Juice - Embrace the Refreshing Zest"


    Ingredients for Tomato Juice:

    Tomatoes - 2–3 Nos.
    Sugar/Honey - 1 Tablespoon
    Ice Cubes/Water -1/ 2 Cups

    Add-ons (If preferred) :

    Lime Juice - 1/2 Tablespoon
    Mint Leaves - Few


    Method:

    • Wash the Tomatoes, cut it into 4–6 pieces.
    • In a blender jar add Tomato pieces, Sugar/Honey and Ice Cubes/Water and blend until all the ingredients are well combined and puréed.
    • Sieve it through a colander
    • Pour the Tomato Juice into a glass.

    For a Citrusy Mint Note in Tomato Juice (Optional) :

    • Add Lime Juice to the puréed Tomato Juice and give a quick stir.
    • Pour the Tomato Juice into a glass.
    • Garnish the Juice with Mint Leaves and Chill before serving if you like.


    To read about the Health Benefits of Tomatoes, click here...


    Notes & Tips:

    • Alternatively, place the Tomatoes into a bowl and let it cool in a refrigerator/freezer for 1–2 hours before blending.
    • Can avoid adding Ice Cubes/Water.
    • Adding Sugar/Honey will balance the natural acidity of the Tomatoes, adjust to suit your taste preference.
    • Can add Soda Water instead of Water/Ice cubes for a punchy Carbonated Tomato Juice.
    • Can also add Tabasco Sauce/Pepper/Jalapeño for a spicy punch in the drink. 
    • Can convert the Tomato Juice into wonderful cocktails too.


    CHICKEN, CURRIES
    TOMATO CHICKEN


         While trying different variations of recipes, I came along with this recipe whilst cooking Burma Bhai Chicken, our family favourite Chicken in Scrambled Egg Gravy.  This is the base for the recipe, a vibrant and fiery looking red coloured Chicken Curry half way to the above recipe.  Totally a Chicken recipe cooked with lots of Tomatoes and Onions.  The colour of the Curry looks quite appealing to the senses and also has a combined tastes of tanginess from the tomatoes and spiciness from the Red Chilli Powder.   
         This Tomato Chicken is a simple recipe, a quick fix prepared with seared chicken pieces and slow cooked in an Onion-tomato based curry.  Pan-seared Chicken pieces yield super succulent pieces in the Tomato Chicken. This Tomato Chicken tastes great with Parottas, Chapati or any other Roti Varieties. It goes well as a side dish for Steamed Rice or along with any Rice dishes like Biriyani, Pulao etc.,


    For more Recipes with CHICKEN, Click here...


    Cuisine - Indian
    Recipe Type - Curry, Gravy
    Course - Side Dish
    Spicy Level - Medium-High
    Difficulty - Easy
    Serves - 2-3
    Author - SM

    Preparation Time - 15-20 Minutes
    Cooking Time - 20-30 Minutes


    HOW TO COOK TOMATO CHICKEN


    CHICKEN, CURRIES
    TOMATO CHICKEN

    INGREDIENTS :

    For Tomato Chicken :

    Chicken - 250 Gms
    Onion - 1 No.
    Green Chillies - 3 Nos.
    Garlic - 2-3 Cloves
    Ginger -1/2" Piece
    Turmeric Powder - 1/2 Tspn
    Red Chilli Powder - 11/2 Tspn
    Tomatoes - 2-3 Nos.
    Fennel Seeds - 1 Pinch
    Curry Leaves - 1 Sprig
    Oil - 2 Tbspns
    Salt - To Taste


    To Garnish :

    Coriander Leaves - few

    METHOD:

    • Heat Oil in a pan, reduce the flame to medium-low, splutter Fennel Seeds and Curry Leaves.
    • Pan sear the Chicken Pieces on a low flame until the colour changes.
    • Saute finely chopped Onions, Green Chillies, Garlic & Ginger until Onions turn translucent.
    • Add Turmeric Powder, Red Chilli Powder to the above and fry for a while on a very low flame.
    • Add finely chopped Tomatoes and saute it until tomatoes are well cooked and oil separates from the masala.
    • Sprinkle some water, if required.
    • Cover and cook until the Chicken Pieces are done.
    • Add Salt and mix well.
    • Allow it to boil on a very low flame for few minutes or until the raw flavour goes.
    • Garnish the gravy with chopped Coriander Leaves.
    • Serve Tomato Chicken hot along with Parotta/Roti Canai or Chapatis.

    NOTES :

    • Choose ripe red coloured tomatoes.
    • Do not add water while cooking Tomatoes.
    • Slow cooking the masala on a very low flame enhances the flavour.
    • If preferred can add more tomatoes.
    • Adjust the amount of spices to your preference.
    • Can substitute half the amount of Red Chilli Powder with Kashmiri Chilli Powder for a bright red coloured Tomato Chicken. 
    • Pan searing yields juicy and succulent Chicken pieces.
    • Adjust the consistency of the gravy to suit your preference.

    BEEF, FROM GODS OWN COUNTRY
    KAPPAYUM IRACHIYUM ULARTHIYATHU - KERALA STYLE BEEF & TAPIOCA STIR-FRY
        
         Beef & Tapioca are two loves of any Keralite.  Their love for the ingredients are self-proclaimed and have a wonderful number of dishes prepared with the same.  A combination of a starchy Vegetable, particularly tuberous roots along with Meat is quid pro quo.  The fatty essence from the meat is naturally absorbed by the root giving an extraordinary taste and flavour to the dish. And this "Kappayum Irachiyum Ularthiyathu" is of no excuse from the fact.
       This is my husband's favourite dish and most of the weekends we end up buying Tapiocas.  If there is a stock of Beef in my freezer then, this combo is sure to pop-up. With all exaggerated exclamations proclaiming his love for this Kappayum Beefum, he tries to trick us to get tempted with the dish.  He has an utter skill of doing this, adding the words, spicy, hot, when you eat it along with flaky Parotta etc., & etc.,  What I enjoy the most about the dish, is when he devours it with undiluted devotion.  I just get carried off looking at his contentment.
         They sell Tapiocas, freshly harvested from the farms on roadsides. Those tapiocas are always starchy and of perfect texture when cooked.  I always wonder about the perfect Tapiocas we get around in our area. Perfectly cooked Tapiocas yield you perfectly textured Kappayum Irachiyum. While cooking 'Kappayum Irachiyum Ularthiyathu', the Tapioca and Beef should be cooked separately.  The reason is both have varied cooking time. Once cooked both Tapioca & Beef are combined and cooked on a low heat until each piece is well coated with the masala. For perfect Kappayum Irachiyum, Tapiocas shouldn't be overcooked or mushy which will totally spoil the look and texture of the dish. Kappayum Irachichiyum Ularthiyathu goes well with Malabar Parotta/Chapati/Steamed Rice. It can also be served along with Bread.


    For more Recipes with BEEF, Click here...

    Cuisine - Kerala
    Course - Main Course/Side Dish
    Spice Level - Medium-High
    Difficulty - Medium
    Serves - 4- 6
    Author - SM

    Preparation Time - 20-30 Minutes
    Marination Time - 20-30 Minutes
    Cooking Time - 45 Minutes - 1 Hour.


    For more KERALA KALLU SHAPPU RECIPES, Click here...


    KAPPAYUM IRACHIYUM ULARTHIYATHU - KERALA STYLE BEEF & TAPIOCA STIR-FRY

    BEEF, FROM GOD'S OWN COUNTRY
    KAPPAYUM IRACHIYUM ULARTHIYATHU - KERALA STYLE BEEF & TAPIOCA STIR-FRY

    INGREDIENTS :

    To Cook Tapioca :

    Tapioca - 1/2 kg
    Turmeric Powder - 1/2 Tspn (optional)
    Water - Until it covers the Tapioca pieces
    Salt - to taste

    To Marinate & Cook Beef :


    Beef /Mutton - 500 Gms
    Shallots - 20 Nos.
    Tomato - 1 -2 Nos.
    Ginger - Garlic Paste - 1 Tbspn
    Green Chillies - 2 -3 Nos.
    Turmeric Powder - 1/2 Tspn
    Red Chilli Powder- 1 Tspn
    Coriander Seeds Powder - 1 Tspn
    Vinegar/Curd - 2 Tbspn
    Curry leaves- 1 Sprig
    Salt - To Taste


    For Kappayum Irachiyum Ularthiyathu :

    Mustard Seeds - 1 Tspn
    Dry Red Chillies - 2 Nos.
    Curry Leaves - 2 Sprig
    Onion - 2 Nos.
    Turmeric Powder - 1/4 Tspn
    Kashmiri Chilli Powder - 11/2 Tspn
    Coriander Powder - 11/2 Tspn
    Garam Masala Powder - 1/2Tspn(Optional)
    Pepper Powder - 1/2 Tspn
    Cumin Powder - 1/4 TspnFennel Powder - 1/4 Tspn
    Salt - To Taste
    Coconut Oil - 1 Tbspn.

    For Garnishing :

    Coriander Leaves - Few
      

    METHOD  :

    To Boil Tapioca :

    • Peel the Tapioca and wash it.
    • Then cut it into pieces of the desired size.
    • Wash it well until the water is clear.
    • Boil tapioca in water by adding salt and turmeric powder.
    • Cook until the pieces are soft.
    • Drain and discard the water.

    To Marinate & cook Beef :

    • Clean, Wash and Cut Beef/Mutton into small cubes. Drain the washed Beef/Mutton pieces in a colander.
    • Pound the Shallots coarsely.
    • Chop the Tomatoes and keep it aside.
    • Marinate the Beef with all the ingredients mentioned under "To marinate" along with pounded Shallots and chopped Tomatoes.
    • Leave this aside for about 20-30 Minutes.  
    • Add enough water and cook the Beef/Mutton in a pressure cooker or in a saucepan.
    • Cook until the meat turns soft and succulent.
    • Once the meat is cooked, see if there is any extra water left along with the meat.
    • Allow it to cook on a low flame stirring occasionally until it dries up.
    • Switch off the flame and keep it aside.


    For Kappayum Irachiyum Ularthiyathu :

    • Dry Roast Fennel Seeds on a low flame until it splutters and turns aromatic.
    • Dry Roast the Fenugreek Seeds on a low flame until it splutters and turns aromatic.
    • Grind the above spices into a fine powder and keep it aside.
    • Meanwhile, heat Coconut Oil in a pan.
    • Splutter Mustard Seeds, Dry Red Chillies and Curry Leaves.
    • Saute finely chopped Onions, until Onion turns translucent.
    • Reduce the flame to low, add Turmeric Powder, Kashmiri Chilli Powder, Coriander Powder,  Garam Masala Powder and give a quick stir.
    • Fry this on a very low flame, until the raw flavour goes.
    • Sprinkle some water, if necessary and cook until Oil separates from the masala.
    • Add cooked Beef pieces and mix well.
    • Cook this on a low flame for few minutes. 
    • Add a few pieces of Cooked Tapiocas and gently mix it along with the above ingredients.
    • Sprinkle the Pepper Powder, powdered Fennel & Fenugreek Powder and give a quick stir.
    • Cook Kappayum Irachiyum on a low flame for about 2-3 minutes until each piece is well coated with the masala.
    • Adjust the Salt to suit your taste preference.
    • Garnish Kappayum Irachichiyum Ularthiyathu with finely chopped Coriander Leaves.
    • Serve Kappayum Irachichiyum Ularthiyathu as such or along with Malabar Parotta/Chapati/Steamed Rice.
    • It can also be served along with Bread.

    For more recipes from GODS OWN COUNTRY - KERALA  click here... 


    NOTES :

    • Cook Tapioca with enough water and discard the excess water.
    • I have cooked the Beef in a Pressure Cooker.
    • I have used Vinegar to soften the meat.
    • Adjust the spice level according to your taste preference.
    • Kashmiri Chilli Powder gives a nice red colour to the dish without being too spicy.
    • I have used Kashmiri Chilli Powder & regular Red Chilli Powder in the recipe.
    • If you are using regular Chilli Powder alone, adjust accordingly
    • Coconut Oil gives an authentic flavour to the dish, can substitute it with any other Vegetable Oil.


    ________________________________________________________________________________

    Important : Food Safety 

    • Tapioca naturally produces cyanide*, which is poisonous to humans; however, the cyanide may be removed during processing.
    • So peel and wash it thoroughly with enough water.
    • Also, can soak them in water overnight and then discard the water and wash them again before cooking.
    • Cook Tapioca with enough water to cover them, and then discard the water once it is cooked.
    • These steps ensure that the little amount of toxin present in it are removed.

          *Cyanogenic glycosides present in tapioca,  releases hydrogen cyanide during enzymatic hydrolysis by beta-glucosidase. These are transformed within humans and animals after the plant tissue has been macerated

    SUN-DRIED, VADAGAM/VADAM/VATHAL
    KOOZH VADAGAM/VADAM


          The Summer scenarios are incomplete without the story of Vadam/Vadagam preparation. You call it as Vadam/Vadagam/Sandige/Vadiyalu/Kondattam in South Indian Languages.  Along with the Season, the women folks get busy preparing Pickles, Vathal, Vadams, Appalams, Spice Powders, mostly which needs crisp Sun-dried process.  Even we usually buy our yearly provision in Summer and dry each and every Rice, Dhal, Spices in our balcony. Then store in it big airtight containers ready to be catered throughout the year.
         Vathal/Vadam making is an integral summer ritual which converts the seasonal produce in the best of its way utilizing the sizzling sweltering sunshine. The morning scene, just before the sun shows off its real prick, the ladies get ready with their batches of Batters and Curd dipped Vegetables ready to be laid on to the sheets of Clothes in their terraces.  Kids who would be enjoying their Summer holidays would be their helping hands, ironically made to scare away the crows which come to eat these vadagams.  Some even keep a Black Umbrella to scare off the crow. Crows have a liking for these semi-dried Vadams & Vathals. They fly at a speed, keeping up a perfect angle and lift off these goodies like an ace Kingfisher catching a fish. Precision and accuracy of the crow is a real challenge to the women folks.
         The idea of pickling was brought forth to use the seasonal goodies throughout the year and to cut down wastage, the Vathal/Vadam also falls into the category. Crisply Sun-dried Vegetables or a mixture of batter turns into perfect side dishes for Rice and also it can be eaten as a snack.  The tiring scenarios of the womenfolks in scorching Sun brings out the best goodies in their pantry. These sun-dried goodies appear out of nowhere during the mealtime.
          This Summer, my Mom was saying that she prepared her age-old Koozh Vadagam, which she had long forgotten & suddenly she remembered the recipe and gave a try. She usually prepares Mor Milagai & Bittergourd & Long Beans Kondattam(Vathal).  These Sundried Vegetables are called Kondattam in some parts of Kerala.  I immediately asked her to save some for me.  Unplanned, I visited my hometown in June and here I got a batch of fresh sun-dried Koozh Vadagams.
         This is my Moms recipe and she said we have to add a handful of Sago in the recipe, but a handful can turn out to be a measurement too big or too small.  So I have converted it into Cup measurement which fitted well. Koozh Vadagam is a Sun-dried item prepared with ground Rice & Sago.  Spices like Green chillies and Cumin Seeds are added to the Koozh Vadagam to add an extra note of taste and flavour. If the Sun is really hot, Koozh Vadam dries up quickly. Store it in airtight containers. When deep-fried these Koozh Vadagams puffs up into double the size and acquires a crisp buoyancy.


    Cuisine - South India
    Recipe Type -Vadagam/Vathal
    Spice Level  - Low
    Difficulty - Medium
    Author - SM


    Soaking Time - 8-10/Overnight
    Preparation Time - 25 - 30 Minutes
    Cooking Time - 20 - 30 Minutes
    Drying Time - 3-4 Days

    HOW TO MAKE KOOZH VADAGAM/VADAM


    SUN-DRIED, VADAGAM/VADAM/VATHAL
    KOOZH VADAGAM/VADAM


    INGREDIENTS :

    Raw Rice - 1 Cup
    Sago - 1/4 Cup
    Green Chillies - 3-4 Nos.
    Cumin Seeds - 1 Tspn
    Salt - To Taste
    Water - 2-3 Cups

    METHOD :

    • Clean, Wash & Soak Sago in ample of water overnight or at least for 8-10 hours.
    • Alternatively can Soak the Sago in hot Water for 2-3 Hours.
    • Clean, Wash & Soak Raw Rice in ample of water overnight or at least for 8-10 hours.
    • When the ingredients are well soaked.
    • Combine Raw Rice, Sago, Green Chillies and grind it into a fine batter, adding little water at a time.
    • Can use the water used for soaking the ingredients.
    • The Batter should be of pouring consistency.
    • Add Salt to the batter and mix well.
    • Pour in 2 Cups of Water to Batter and dilute the consistency.
    • Heat a heavy-bottomed pan, preferably a Non-stick Pan.
    • Pour in the Koozh Vadagam Batter and cook it on a low flame, stirring continuously.
    • After a few minutes, the batter will thicken into a glossy texture and starts to leave the sides of the pan.
    • If you feel the batter is thickening too quickly, can add some more hot water to the batter.
    • Make sure there are no lumps.
    • The batter should be cooked until it has turned into a glossy texture.
    • The final batter should be thickened to a pliable dough-like consistency.
    • Add the Cumin seeds and give a final stir.
    • Allow the Koozh Vadagam Mix to cool down.
    • Spread a plastic sheet, on top of that spread a clean cloth.  
    • Alternatively can spread it out on big steel plates too.
    • Pinch out small portions from the Koozh Vadagam mix.
    • Evenly spread it out on the Cloth or on the Plate.
    • Allow the Koozh Vadagam to dry in direct sunlight for 3-4 days.
    • Once totally dried up, store the Koozh Vadagams in airtight containers.
    • Perfectly dried Koozh Vadagams/Vadams can last up to a year or so.

    NOTES :

    • During peak summer these Koozh Vadagams get dried soon. Adjust the drying time according to the climate.
    • For a twist in taste & flavour try adding Onions/Dry Red Chillies/Carom Seeds in Koozh Vadagams

    HOW TO DEEP FRY KOOZH VADAGAM/VADAM

    SUN-DRIED, VADAGAM/VADAM/VATHAL
    KOOZH VADAGAM/VADAM

    INGREDIENTS :

    Koozh Vadagam/Vadam - few
    Oil - To Deep Fry

    METHOD :

    • Heat Oil in a Pan, allow the oil to smoke off.
    • Reduce the flame to medium-high.
    • Add a handful of Koozh Vadagams into the Oil and fry until it turns crispy and puffs up in size.
    • Remove the deep-fried Koozh Vadagams from the oil with a slotted spoon.
    • Line it up on Paper towels and transfer it into an airtight container.
    • Serve this Koozh Vadagam/Vadam along with Rice & Curry or as a Snack.


    PICKLES, MANGO
    RAW MANGO THOKKU - MANGAI THOKKU


         If there is a knot tied in heaven, then it is truly the combination of Curd Rice and Pickle.  And if it is a pickle like Raw Mango Thokku, then it takes the relationship to the next level.  When my neighbour's Mango tree gets loaded with Mangoes, my experiments with Raw Mangoes becomes endless.  I fill my pantry with fresh batches of Mango Pickles like Avakkai, Kadu Manga Achar, Cut Mango PIckle, Instant Mango Pickle, Mangai Thokku and even at times I make Sweet Mango Pickle. 

    This time I made three different Pickles in a day - 
    • Kerala Kadu Manga Achar
    • Avakkai Mango Pickle &
    • Mangai Thokku
         I love Ruchi Urugai's Mango Pickle and used to buy the normal Cut Mango Pickle and Avakkai Urugai frequently. Those were the days I used to buy Pickles and thought Pickle making was a tedious & meticulous job. I have never had an impression with Manga Thokku until I wrongly picked a bottle of Ruchi Urugai with this type of Pickle.  Since then I am hooked up with Mango Thokku.  Time has changed into such a scenario that I least remember when I bought a bottle of Pickle. I always have a ready stock of different types of pickle in my refrigerator.  This Mango Thokku recipe is from my vintage cookbook.
          Mango Thokku is a type of Pickle prepared with grated Raw Mangoes and the rest of the process remains the same as a normal Pickle recipe. It is spicy, appetizing and sure to tantalize your taste buds.  Combine it up with Curd Rice for an utter delicacy.


    For more PICKLE Recipes, Click here...


    Cuisine - Tamilnadu (Indian)
    Recipe Type - Pickle
    Spice Level  - High
    Difficulty - Easy
    Yields - 21/ 2-3Cups
    Author - SM

    Preparation Time - 15 - 30 Minutes
    Cooking Time - 8-10 Minutes
    Maturing Time - A day or Two


    HOW TO MAKE RAW MANGO THOKKU - MANGAI THOKKU

    INGREDIENTS :

    For Raw Mango Thokku - Mangai Thokku :

    Raw Mango - 3 Cups
    Gingelly Oil - 1/2 Cup
    Mustard Seeds - 1/2 Tspn
    Curry Leaves - a Sprig
    Turmeric Powder - 1/2 Tspn
    Red Chilli Powder - 2-3 Tbspn
    Asafoetida - 3/4 Tspn
    Salt - To Taste
    Jaggery - a small Piece

    To Dry Roast & Grind:

    Fenugreek Seeds - 1/2 Tspn. 

    METHOD :

    • Dry roast the Fenugreek Seeds on a very low flame until it splutters.
    • Cool and powder it.
    • Wash, Peel and grate the Raw Mangoes and keep it aside.
    • Heat the Sesame Oil in a pan.
    • Splutter the Mustard Seeds, lower the flame, then add Asafoetida Powder and Curry Leaves.
    • Immediately add the grated Raw Mangoes and saute it on a low flame until it becomes soft & translucent.
    • Add Salt, Turmeric Powder, Red Chilli Powder, roasted Fenugreek Powder, to the above and mix well.
    • Add Jaggery to the above.
    • Cook this is on a low flame until oil separates from the pickle.
    • Switch off the flame and allow the Raw Mango Thokku to cool down.
    • Store it in clean & dry airtight bottles.


    NOTES :

    • Adjust the amount of Salt and Chilli powder as per your taste preference.
    • Pour some extra oil if you feel the Mango Thokku is dry.
    • More oil, more storage period. 
    • Dry roasting the fenugreek seeds helps to preserve the pickle as well as gives a nice flavour.
    • Jaggery gives a slight sweetness to the pickle and also balances the sourness. (adding it is truly optional).
    • Avoid using steel/aluminium/copper containers for storing the pickles, as they tend to react with the acidic nature of salt and the Lemon.
    • Store the Raw Mango Thokku in clean and dry Porcelain/Glass/Ceramic Jars.
    • Always use clean & dry spoons(preferably wooden spoons) for the pickle.
    • Wet Jars/spoons can spoil the pickles as the moisture in them helps in the growth of Fungus.
    • If you feel that extra oil should be added, once the pickle is made, Heat the Sesame Oil, cool it and then pour it over the pickle.
    • Allow it to cool completely before storing it into sterilized bottles. 
    • Refrigerate the Raw Mango Thokku.  It can stay good even with less oil and preservatives. 
    • If stored properly, Raw Mango Thokku can last for a year or so.


    SPICE POWDERS, HOMEMADE, SPICES
    CURRY MASALA POWDER

         My introduction with this Curry Masala was through Aachi Masala.  Until then I have never used this spice powder.  Aachi's Curry Masala Powder, which was marketed as, which could be used in most of the Curries. Obviously, it is named Curry Masala.  There are even some variations as Mutton Masala Powder, Chicken Masala Powder etc., Though most these spice powders use slightly different spices as a combination of ingredients, they are almost similar in taste, aroma and flavour.
         If there is one spice powder I commonly use in my kitchen then it is this Curry Masala Powder.  My daughter extensively uses this in most of her recipes, even while scrambling an Egg(Mutta Chikki Porichathu).  A simple Masala Powder which has turned into a must-have in my pantry.
         It was during my initial days of blogging(and even before the idea even came up in my mind), while I was reading through quite a lot of authentic recipes and at one instance I came up with a story of Curry Powder and its authenticity. While writing for this particular recipe, I couldn't forget what I read about the so-called Curry Powder.
         Curry Powder as such has a historical mention that it is an absolute British invention, to re-incorporate the very Indian Curry in a British style.  If we say curry powder is a British invention then what's traditionally Indian is the one & only Garam Masala. I even came up with another Curry Powder called Madras Curry Powder, least to find a mention in any of the authentic Indian recipes.

         These words are from Madhur Jaffrey's vintage cookbook, “An Invitation to Indian Cooking” 
    caught my attention,

    ... Don’t forget that Jaffrey wrote these words in the year 1973.


    Courtesy - An Invitation to Indian Cooking by Madhur Jaffrey

         But I feel South Indian kitchen has always used this mixture of spice powder in the name of Curry Masala.  Whatsoever, if the spice mix can yield wonderfully flavoured dishes, I'm sure to add it into my pantry.  This particular spice powder has been blended and used to my convenience for the past 12 years. Curry Masala Powder is a simple combination of Spices with flavours accentuating from the Spices used in it.
         Choose the fresh and good quality of whole spices for Curry Masala Powder.  Perfectly mixed spices will yield the most flavourful Curry Masala Powder. And the major factor to get the flavours as new as it is every time you use it,  store them in airtight containers kept away from heat, sunlight and moisture. If you get everything right, then it will stay good for months.


    For more HOMEMADE SPICE POWDERS, Click here...


    Cuisine -  Indian
    Recipe Type - Spice Powder
    Spice Level - Medium
    Difficulty - Easy
    Yields -3/4-1Cup(approx)
    Author: SM

    Preparation Time - 10 - 15 Minutes
    Cooking Time - 10 - 15 Minutes

    HOW TO MAKE CURRY MASALA POWDER


    SPICE POWDERS, HOMEMADE, SPICES
    CURRY MASALA POWDER


    INGREDIENTS :

    For Curry Masala Powder :

    Dry Red Chillies - 25-30 Nos.
    Coriander Seeds - 1/2 Cup
    Fennel Seeds - 2 Tbspn
    Cumin Seeds - 1 Tbpsn
    Cinnamon - 5-6 Sticks
    Cloves - 7 -8 Nos.

    METHOD :

    • Dry Roast the Dry Red Chillies in a pan until it fluffs-up and keep it aside.
    • Dry Roast Coriander Seeds on a very low flame until fragrant for about 5-7 minutes and keep it aside.
    • Next, add Fennel Seeds & Cumin Seeds into the pan and dry roast it on a low flame until the spices splutter.
    • Remove it from the pan and keep it aside.
    • Next, add Cloves and Cinnamon into the pan and dry roast it on a low flame until the spices turn aromatic.
    • Allow the dry roasted ingredients to cool down.
    • Combine all the ingredients and grind it into a fine powder.
    • Transfer the Curry Masala Powder into a clean and dry airtight container.


    NOTES :

    • Can sundry the Spices before preparing the Curry Masala Powder, but it is purely optional.
    • Dry Roast the ingredients separately.
    • Dry roast the spices on a very low flame.
    • Care should be taken not to burn the ingredients which will totally spoil/alter the taste of the Masala.
    • Cool the ingredients before grinding it.
    • If stored properly stays good for about 2-3 months in room temperature.
    • Store it in the freezer for longer shelf life.
    • Curry Masala Powder can be used while making Mutton Curry, Chicken Curry, Puli Kuzhambu, Scrambled Egg, Prawn Masala, Minced Meat Masala, Kurma, etc.,
    Newer Posts Older Posts Home

    Search Essence of Life - Food


    I Me Myself

    SM - Essence of Life
    Essence of Life - Food is all about daily cooking with a simple sense of taste and health. It is all about food. Not a day goes by without eating for most of us, so what we eat matters on the whole.

    Food in the mode of goodness increases the duration of life, purifies one's existence, and gives strength, health, happiness, and satisfaction. Above all ingredients, the most vital one in my kitchen is love.
    Sm
    @ Essence of Life - Food

    Ebook - "What I Cook – For Onam"

    Ebook - "What I Cook – For Onam"
    Celebrate Onam the authentic way! Discover 25 timeless Kerala Sadya recipes in my ebook What I Cook – For Onam. From avial to payasam, bring home the flavours of tradition. Available now on Amazon!

    Subscribe & Follow

    "Quick-Fix Vishu Sadhya Recipes"

    "Quick-Fix Vishu Sadhya Recipes"
    Busy as a bee but still want to cook a grand Sadhya? If you’re short on time but refuse to compromise on tradition, I’ve a feq quick-fix Sadhya Dishes - From instant pickles to 3-minute pachadis, these Quick-Fix Sadhya Vattom are lifesavers. You can whip up these essential items in under an hour. Click here for easy Vishu Sadhya recipes!

    Follow Essence of Life - Food

    ASK FIRST!

    Please note that all rights for the photographs and texts on this blog, unless otherwise mentioned, rests with the author. Please do not use without permission.

    Advertisement


    Advertisement

    Main Ad

    "Guide to our Cookie Policy"

    • Cookie Policy

    Popular Posts

    • Pesaha Appam & Paal Recipe | Traditional Kerala Indri Appam for Maundy Thursday
      Pesaha Appam & Pesaha Paal – A Sacred Maundy Thursday Tradition Pesaha Appam & Pesaha Paal – A Sacred Maundy Thursday Tradition...
    • How to Make Kerala Kanji | Traditional Rice Porridge with Payar, Chammanthi & Achar
      Traditional Kerala Kanji Meal with Payar, Chammanthi & Achar " Kerala Kanji (Rice Porridge) – A Soulful Meal with Payar, Chammanth...
    • Maida Chapati - All-Purpose Flour Chapati
      Fluffy Maida Chapati- All Purpose Flour Chapati Perfect Maida Chapati Recipe: Thin, Soft, and Delicious      Discover one of the...
    • Kizhi Parotta: Kothu Parotta and Salna Wrapped in Banana Leaves
      Unveiling the Flavourful Kizhi Parotta Kizhi Parotta: A Flavourful Fusion of Parotta and Curry Wrapped in Banana Leaf Introduction to Kizhi ...
    • Madurai Mutton Chukka Varuval
      Madurai Mutton Chukka Varuval Madurai's Signature Dish: Authentic Mutton Chukka Varuval Sangam Valartha Madurai, Tamizh Valartha Madurai...
    • Home
    • I Me Myself
    • From My Kitchen
    • Heirloom Recipes
    • Sadhya
    • Around the World
    • Malaysian Cuisine
    • Thai Cuisine
    • South East Asian
    • Menu
    • eBook
    • Video Documentation
    • Download This Template
    • Glossary

    Social Plugin

    Blog Archive

    • Pesaha Appam & Paal Recipe | Traditional Kerala Indri Appam for Maundy Thursday
    • How to Make Kerala Kanji | Traditional Rice Porridge with Payar, Chammanthi & Achar
    • Maida Chapati - All-Purpose Flour Chapati
    • Kizhi Parotta: Kothu Parotta and Salna Wrapped in Banana Leaves

    About Blog


    Food stylist & photographer. Loves nature and healthy food, and good coffee. Don’t hesitate to come for say a small “hello!”
    • Home
    • About
    • Contact

    Popular Posts

    Pesaha Appam & Paal Recipe | Traditional Kerala Indri Appam for Maundy Thursday

    Image

    How to Make Kerala Kanji | Traditional Rice Porridge with Payar, Chammanthi & Achar

    Image

    Maida Chapati - All-Purpose Flour Chapati

    Image

    Kizhi Parotta: Kothu Parotta and Salna Wrapped in Banana Leaves

    Image

    Madurai Mutton Chukka Varuval

    Image

    Labels

    LUNCH MENUS 277 FROM GODS OWN COUNTRY 178 AROUND THE WORLD 160 Manvasanai - Flavours from Tamil Soil 126 DESSERTS 118 SADHYA 117 VEGGIES 107 CURRIES 103 MALAYSIAN CUISINE 80 BREAKFAST 78 DIWALI RECIPES 72 SNACKS & SAVOURIES 69 JUICES & DRINKS 66 RICE DISHES 65 HOW TO... 64 TIFFIN ITEMS 64 CHICKEN 57 From My Family's Kitchen - Heirloom Recipes 52 CHUTNEYS & CONDIMENTS 47 SEA FOOD 46 INDIAN SWEETS 44 CHINESE CUISINE 41 PAYASAM / PRADHAMAN / KHEER 40 CHRISTMAS RECIPES 32 DHAL 29 BIRIYANI & PULAO 28 AMMA & ACHAN'S SPECIALITIES 27 EGG 27 FISH 26 PICKLES 26 APPETIZERS/STARTERS 24 MUTTON 24 BAKING 23 GLOSSARY 23 INDIAN BREADS 22 INDONESIAN CUISINE 22 KONGU CUISINE 21 INDIAN STREET FOOD 20 KERALA PALAHARAM 20 TIPS & TRICKS 19 BEVERAGES 18 CAKES 18 SOUTHEAST ASIAN DESSERTS 18 SPICE POWDERS 18 SMOOTHIES 17 VIRUNDHU 15 RASAM 14 THAI CUISINE 13 MIDDLE EASTERN CUISINE 12 APPAM 11 CHAAT ITEMS 11 INDO-CHINESE RECIPES 11 NOODLES 11 PANEER 11 COCKTAILS & MOCKTAILS 10 MILLETS 10 SOUPS 10 WINES 10 ROTIS 9 RAITHAS & SALADS 8 BEEF 7 COOKIES 7 HOMEMADE MILK PRODUCTS 7 BREADS 6 MY STRICT APPICER'S a.k.a. MY DAUGHTER'S RECIPES 6 PUDDINGS 6 JAPANESE CUISINE 5 KUIH MUIH 5 SYRUPS 5 JAM 4 CANDIED FRUITS 3 EASTER 3 ICE CREAM 3 ICING & FROSTING 2 SAUCES 2 VADAGAM/VADAM/VATHAL 2 HOMEMADE COOKING ESSENTIALS 1 NAIVEDYAM/ PRASADHAM 1 eBook 1