s
Essence of Life - Food. Powered by Blogger.

Essence of Life - Food

  • I Me Myself
  • From My Kitchen
    • Indian Recipes
    • Kongu Cuisine
    • From God's Own Country - Kerala
    • Sadhya
    • Lunch Menu
    • Tiffin Items
    • Indian Street Food
    • Diwali Recipes
    • Spice Powders
    • Pickles
  • Around the World
    • Malaysian Cuisine
    • Thai Cuisine
    • Indonesian Cuisine
    • South East Asian Cuisine
    • Japanese Cuisine
    • Chinese Cuisine
    • Christmas Recipes
    • Wines
  • For The Sweet Tooth
    • Desserts
    • Cakes
    • Payasam/Pradhaman/Kheer
    • Indian Sweets
    • Puddings
    • Ice Creams
  • Food As Medicine
    • Home Remedies
    • Juices/Drinks/Smoothies
  • Tips & Tricks
    • How To...
    • Homemade
  • Glossary
  • eBook


JUICES & DRINKS, COCKTAILS, MOCKTAILS,
HOMEMADE GINGER ALE RECIPE


     Ginger Ale - a totally refreshing and rejuvenating drink.  A simple recipe which is surprisingly easy to make at home.  Ginger Ale is nothing but a mixture of Ginger Syrup, Carbonated Water, Sweetener and with added flavours from Lemon/Orange.  Within no time you can get hold of one of the most refreshing drinks - Sweet, spicy and slightly tart with a citrusy note.
     Recently I have been fixing quite a number of Cocktails for my husband and the main reason was the Ginger Wine I brewed last year.  Within a few days, a whole batch got over.  I tried few Cocktails like Moscow Mule, Dragon Cocktail and few drinks like Ginger Ale, Honey & Lemon with Ginger Wine, Ice Tea, etc.,   I felt that Ginger Wine did total justice while I recreated it into Ginger Ale, as it gave a natural fizz with a kick.  But as usual I was worried about the alcoholic content when it's "my drink", so when I brewed the next batch I brewed a batch for just 3 days and omitted Dry Red Chillies in it. This Ginger Ale Recipe here is a combination of Homemade Ginger Wine which yields a naturally fermented and fizzy Ginger Ale. For a total non-alcoholic fix, I have also added a recipe of Ginger Ale with homemade Ginger Syrup.
     Ginger Ale is quite soothing and also it proves beneficial for digestive problems & ward of nausea.  All the more Ginger has been used in traditional medications for thousands of years.  Ayurveda and Traditional Chinese Medicine have been using Ginger for its immense therapeutical values.
     Once the Ginger Syrup/Ginger Wine is ready, what you have do is just mix it up with Club Soda/Carbonated Water, Sweeten it up with Sugar/Honey and add a note of Lemon/Orange which gives a nice kick to the drink and above all serve it cold. This Ginger Wine/Ginger Syrup can be converted into Cocktails/Mocktails or simply add it to your Iced Tea, Watermelon Juice, Lemon Juice, Green Apple Juice, Grape Juice, etc., for an extra zing.

Recipe Type - Drink
Difficulty - Easy
Author - SM


For more JUICES, DRINKS & SMOOTHIES, Click here...


HOW TO MAKE GINGER SYRUP/GINGER WINE FOR GINGER ALE


JUICES & DRINKS, COCKTAILS, MOCKTAILS
HOMEMADE GINGER ALE RECIPE


INGREDIENTS :

For Ginger Syrup :

Ginger - 2 Cups
Water - 4 Cups
Sugar - 1-11/2 Cups
Lemon Juice - of 2 Lemons.

METHOD :

How to make Ginger Syrup :

  • Peel, clean and wash the Ginger.
  • Gently crush the Ginger or coarsely grind it in a mixer/grinder/blender without water.
  • Collect the crushed/ground ginger and mix it into the Water.
  • Add Sugar and Lemon Juice to the above and mix well.
  • Boil the Ginger Water mixture on a high flame for about 8-10 Minutes.
  • Reduce the flame to medium-low and again boil it for another 5-10 Minutes.
  • The mixture should have reduced to 3/4 of the total volume.
  • Switch off the flame and allow the Ginger Syrup to cool down.
  • Once cooled down, strain the Ginger Syrup.
  • Store it in a clean & sterilized bottle in a refrigerator.
  • Ginger Syrup stays good for about 5-7 days.

NOTES :

  • Can substitute White Sugar with Brown Sugar or add an equal amount of White and Brown Sugar in Ginger Syrup.
  • Brown Sugar gives an added colour to the Syrup.
  • Can add herbs like Mint Leaves or Cinnamon/Clove to add an extra note of flavour in the syrup, but it is truly optional.


For Ginger Wine :

For a detailed recipe on GINGER WINE, Click here...
  • Just brew it for 2-3 Days, if you are using it for making Ginger Ale.
  • Can avoid adding Dry Red Chillies and Caramel while preparing the mix for Ginger Ale(which are preferred ingredients for Ginger Wine).
  • Dry Chillies in the Ginger Wine add a spicy note to the drink it is added into.
  • Caramel is added just to give colour and fullness to the Ginger Wine.


HOW TO MAKE GINGER ALE


JUICES & DRINKS, COCKTAILS, MOCKTAILS
HOMEMADE GINGER ALE RECIPE


INGREDIENTS :

For Ginger Ale :

Ginger Syrup/Ginger Wine  - 1/4 Cup
Soda/Carbonated Water - 1 Cup
Sugar/Honey - To Taste(Optional)
Lemon/Orange Juice

METHOD:

  • Fill a tall Glass with Ice cubes.
  • Pour 1/4 Cup of Ginger Syrup/Ginger Wine along with a Cup of Soda/Carbonated Water.
  • Add your preferred sweetener and mix well.
  • Add a dash of Lemon/Lime/Orange Juice and give a quick stir.
  • Thoroughly mix the drink until fizzy.
  • Serve Ginger Ale decorated with slivers of Ginger and a Lemon Slice.


NOTES :

  • I have used Soda in this recipe.
  • Can also use Carbonated Water or Sparkling Mineral Water while fixing Ginger Ale.
  • I prefer adding unflavoured plain Soda for the recipe.  
  • Carbonated drinks like Sprite, 7Up, etc., makes the drink Sweeter.
  • Add preferred Sweeteners to sweeten up the drink.
  • Can totally avoid adding any sweeteners as the Ginger Syrup/Ginger Wine has sweetness in it.
  • Can serve Ginger Ale with few Fresh Mint Leaves for a minty flavour. 


    July 19, 2019 No comments
    HOW TO MAKE CANDIED GINGER
    CANDIED GINGER

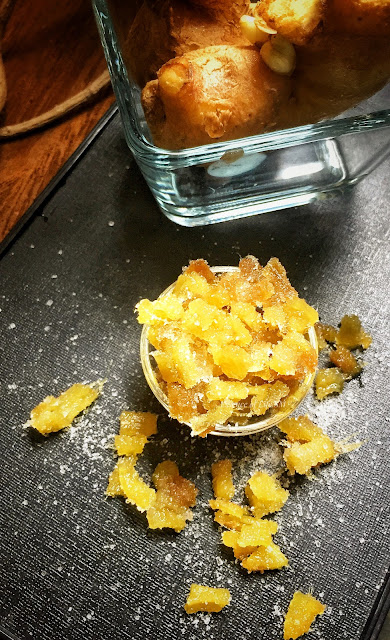
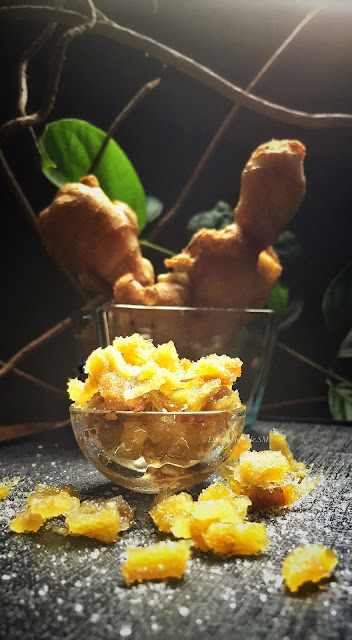
        Most of the Traditional Christmas Cakes, Puddings, Cookies call for Candied Citrus Peels, Fruits & Ginger. Simmer a few slices or pieces of Ginger in Sugar Syrup and there you go with flavourful Homemade Candied Ginger. All you need is just a few cups of Ginger, Sugar, a bit of time & patience.  It is so easy to make and much more flavourful than the store-bought Candied Ginger.  

        All these years, I was literally skipping on to the idea of adding Candied Ginger into any of the recipes which called for candied ginger.  The reason was I didn't have any & couldn’t find any in the store, or should I say I didn't bother to buy it? Then, thinking of making it... wasn't sure how and had always thought it was a tedious process.  Only until I figured out how to make Candied Fruits and Candied Peels. Since few years I have been making Candied Fruits and peels all by myself and this year planned to get my hands with Candied Ginger. I can hear some of you asking, "Why would I want Candied Ginger and above all why I should go to the length and breadth of making it at home?

    HOW TO MAKE CANDIED GINGER
    CANDIED GINGER

        Homemade Candied Ginger is indeed the best, fresher with a stronger flavour, and it has no additives, preservatives or artificial food colouring.  Also, you can also reap the health benefits of ginger.  Ginger has been used medicinally for centuries.  Ginger is an extremely healthy herb with a variety of benefits. Research has shown it to be effective in treating upset stomachs, nausea, motion-sickness, pregnancy, lowering cholesterol and inflammation, preventing clogged arteries and may even kill cancer cells. 

        Anyway, we are not here to talk about the all known health benefits of Ginger.  But this Candied Ginger is literally so tempting that you may want to gobble up a few at the go.  Keep in mind to eat it in moderation.  Though it's loaded with health benefits, it also has the Sugar in it.  Candied Ginger is a versatile ingredient that will liven up so many dishes and drinks.

    HOW TO MAKE CANDIED GINGER
    CANDIED GINGER

        The Candied Ginger were a Sweet, flavourful treat perfect for adding into Christmas Fruit Cakes, Puddings, Cookies, Muffins, Pancakes, Pies, Pear/Apple Crumble, Jams, Fruit Loaves, Cocktails, Mocktails and the list goes on and on!. It was worth the effort. I could even eat some Homemade Candied Gingers as such.

        And one bottom line note:  Don’t discard the drained Ginger Water & Syrup.  It yields you with two delicious by products: GINGER WATER & GINGER SYRUP!  Use the ginger water while making tea or a drink.  Add a teaspoon or two of Ginger Syrup to your drinks for a refreshing ZING!

    For more CANDIED FRUITS & PEEL RECIPES, Click here...

    Recipe Type - Candied Fruits
    Difficulty - Medium
    Author - SM


    Preparation Time - 15-20 Minutes
    Cooking Time - 30-45 Minutes 
    Soaking Time - 12-15 Hours/ Overnight

    For a detailed Recipe on HOW TO SOAK DRY FRUITS FOR CHRISTMAS CAKE, Click here...

    HOW TO MAKE CANDIED GINGER

    HOW TO MAKE CANDIED GINGER
    CANDIED GINGER

    INGREDIENTS:

    To Cook the Ginger Pieces:

    Ginger - 3 Cups
    Water - as Required

    For Candied Ginger:

    Sugar - 2 Cups
    Water - 1-11/2 Cups
    Salt - a Pinch
    HOW TO MAKE CANDIED GINGER
    CANDIED GINGER

    METHOD:

    • Scrape the outer skin of the Ginger.
    • Chop the Ginger into small cubes or into thin slices & keep it aside.
    • I used about 3 Cups of Ginger.
    • Boil enough of Water in a pan. Once it starts to boil, add chopped Ginger into it.
    • Boil it on a medium-low flame for about 3-5 minutes. 
    • Switch off the flame, Reserve 1/2 a Cup of Water and drain the remaining water.  (Reserve the water and it can be used for making)
    • Reserve the blanched Ginger cubes.
    • Add the blanched Ginger Cubes along with 1/2 cup of reserved Ginger into a pan.
    • Add 2 Cups of  Sugar and 1 Cup of Water to the above ingredients. 
    • Boil the Sugar Syrup on a medium-low flame, stirring occasionally.
    • Cook until the Sugar is completely dissolved and the Ginger Cubes are cooked, and it has absorbed most of the Sugar Syrup.
    • The mixture would start to slightly thicken up at this stage(sugar syrup shouldn't get crystallized).
    • Cook until it reaches one-string consistency.
    • I cooked until the Sugar Syrup got completely absorbed by the Ginger cubes.
    • If there is any extra Sugar Syrup, drain it well through a colander.
    • Leave it aside in a wire rack to dry for 12-15 hours/overnight.
    • Candied Ginger Cubes would have absorbed the Sweetness and would have turned dry.
    • Soak it up in a Paper Towel for a few minutes if you feel the Candied Ginger to be moist.
    • Mine was totally dry and had the perfect texture.
    • I made Ginger candies to be used in Christmas Fruit Cake and to add them to Cocktails. 
    • If you prefer to eat them as a Candy, gently toss the ginger slices in a bowl of sugar, so they are coated all over. Place the ginger slices back on the cooling rack to sit overnight.
    • Store it up in clean Airtight containers.
    • For longer shelf life, store it in a refrigerator.
    • Can use it in Cookies, Fruit Cakes, Buns, Puddings, Crumbles, Bread Loaves, Ice creams etc., 
    HOW TO MAKE CANDIED GINGER
    CANDIED GINGER

    NOTES:

    • I have used the young & small Ginger Roots while making Candied Ginger.  They're less woody and tender.  Learnt it after a prior trial that old ginger are not best while making Candied Ginger.
    • Cut the Ginger into slices or into cubes.  I made small cubes out of it, as I made it specifically to be used in the Dry Fruit Mix for X'mas Fruit Cake.
    • I cooked until the Sugar Syrup got completely absorbed by the Ginger Cubes.
    • If there is any extra Sugar Syrup, drain it well through a colander.
    • Save the Syrup & use in cakes, sauces and drinks. Goes well while making Teas.
    • Stays good stored at room temperature in an airtight container. 
    • Candied Ginger can be stored for up to 3-4 Months in the refrigerator.
    • I have made this Candied Peel for baking purpose.
    • I live in a humid area, so even if I toss them with Sugar, it tends to turn moist after a few hours. So, I left it as such and stored them in an airtight container in the refrigerator.
    • Alternatively, if you are using the Candied Ginger as a SNACK. Strain and dredge the Cubes/Slices in finely granulated Sugar and place them on a rack to dry overnight. 
    • If you live in a Humid area, you can dry the candied ginger in the oven.  Set the Oven to the lowest temperature and leave this for about 20-30 minutes, or until the Candied Ginger turns dry and crisp.  While cooking it in the oven, make sure to leave the Oven door slightly open. 
       

    December 03, 2022 No comments
    Homemade ginger garlic paste with turmeric, salt, and oil, giving it a rich golden hue, stored in a glass jar.

    Homemade Ginger Garlic Paste – Fresh & Flavourful


    "How to Make and Store Ginger Garlic Paste – Easy & Long-Lasting Recipe (No Preservatives!)"

    Why Homemade Ginger Garlic Paste is Best

        Tired of store-bought ginger garlic paste that lacks flavour and is packed with preservatives? Try this easy DIY ginger garlic paste recipe—a fresher, healthier alternative with a longer shelf life! Packed with flavour and perfect for quick cooking, it's completely preservative-free!

        I have always been someone who prefers making fresh ginger garlic paste whenever a recipe calls for it. Store-bought versions never appealed to me. However, a few years ago, when I fell sick with chickenpox and severe GI inflammation, my daughter stepped up to manage the kitchen while juggling her online classes and exams. She prepped several ready-to-use items like ginger garlic paste, curry bases, pasta sauces, and even homemade paneer. Watching her meticulous planning and execution amazed me, making me realise how perfectly she handled everything.

    Fresh, Preservative-Free Ginger Garlic Paste for Everyday Cooking

        Once I recovered, I adopted some of her time-saving methods, including making a batch of ginger garlic paste for convenience. At first, I noticed that the paste would turn green, possibly due to oxidation. After experimenting, I found that adding turmeric and salt prevented discolouration, and topping it with a layer of oil helped extend its shelf life. Trust me, this is one of the best Indian cooking hacks to save time in the kitchen while ensuring fresh, preservative-free flavour.

    The Game-Changer

        Once I started making these ready-to-use ginger garlic pastes, there was no looking back! Now, I always keep bottles of homemade ginger garlic paste stocked up, ready to use in Indian curries and everyday cooking. It’s a total time-saver, making meal prep effortless. Plus, these flavourful and fresh pastes come with the added bonus of being completely preservative-free—pure homemade goodness in every dish!

    Why You need Homemade Ginger Garlic Paste

    • This time-saving kitchen tip helps you cut down prep time and makes everyday cooking effortless.
    • Knowing how to store ginger garlic paste properly ensures that it stays fresh and fragrant for months.


      Why settle for the bottled stuff? Check out these Recipes that uses Homemade Ginger Garlic Paste! Your taste buds will thank you!


      A jar filled with smooth homemade ginger garlic paste, enhanced with turmeric and oil for a vibrant colour and longer shelf life.

      Homemade Ready-to-use Ginger Garlic Paste


    Why You’ll Love This Recipe

    • Fresh, homemade, and free from preservatives.
    • Enhances flavour in curries, stir-fries, and marinades.
    • Easy to store and lasts longer with simple preservation techniques.
    • Saves time in everyday cooking.

    Craving a quick and flavourful curry? Try this Homemade Ginger Garlic Paste recipe which can be used in recipes like Murg Makhani, Chicken Tikka Masala, Matar Paneer Gravy, Chana Masala etc.,


    reshly made homemade ginger garlic paste with turmeric and oil, stored in a glass jar for extended shelf life. Perfect for Indian curries and everyday cooking.

    Homemade Ginger Garlic Paste – Quick & Easy Recipe


    Recipe Overview

    • Cuisine: Indian
    • Yield: Approx. 2–3 cups
    • Recipe Type: Condiment
    • Author: SM

    Time Estimate

    • Preparation Time: 15 minutes

    Cooking to simplify your cooking? Explore a variety of ready-to-use homemade Podi and flavourful masala powders!


    How to Make and Store Ginger Garlic Paste – Time-Saving Kitchen Tips

    A jar of fresh ginger garlic paste with turmeric, oil, and salt, giving it a golden hue and a rich, smooth texture.

    Easy Homemade Ginger Garlic Paste

    Ingredients for Homemade Ginger Garlic Paste

    • 500 grams Fresh Ginger, peeled and chopped
    • 500 grams Garlic Cloves, peeled
    • 1/2 teaspoon Turmeric Powder (Optional)
    • 2 teaspoons Salt
    • 2 tablespoons Oil (for preservation)


    Method - Step-by-Step Instructions

    Step 1. Prepare the Ingredients

    • Wash and dry the ginger and garlic thoroughly.
    • Use a spoon or knife to peel the ginger skin.
    • If using whole garlic cloves, peel them (or buy pre-peeled garlic for convenience).
    • Ensure both are completely dry before grinding to prevent excess moisture.

    *Pro Tip: Moisture can reduce shelf life, so always dry ingredients completely before blending.

    Step 2. Blend the Paste

    • Add ginger, garlic, turmeric, and salt to a mixer/grinder.
    • Blend until smooth, adding a splash of oil if needed.
    • Scrape down the sides and blend again to ensure an even texture.

    *Pro Tip: Avoid adding water while grinding; oil helps with consistency and preservation.

    Ginger garlic paste stored in a glass jar, made with salt, turmeric and oil for longer shelf life.

    Easy D.I.Y Ginger Garlic Paste - Fresh, Preservative-Free & Long-Lasting

    Step 3. Store Properly

    • Transfer the paste to clean, airtight glass jars.
    • Pour a thin layer of oil on top to preserve freshness.
    • Store one jar in the refrigerator and another in the freezer for long-term use.

    *Pro Tip: Always use a dry spoon to scoop out the paste to prevent spoilage.

    How to Store Ginger Garlic Paste for Maximum Freshness

        Best Ways to Store Ginger Garlic Paste for Long Shelf Life

    • Fridge: Stays fresh for up to 3–4 weeks.
    • Freezer: Lasts up to 3 months. Use ice cube trays for portioned storage.

    *Pro Tip: Always use a dry spoon to scoop out the paste to prevent spoilage.

    A spoonful of thick, creamy ginger garlic paste with a vibrant golden colour, ready to be used in cooking.

    Fresh Homemade Ginger Garlic Paste – Kitchen Staple

    Pro Tips & Notes 

    How to Store Homemade Ginger Garlic Paste Without Preservatives

    • Prevent Discolouration: Adding turmeric and salt prevents the paste from turning green due to oxidation and also extends shelf life.
    • Top with Oil: A thin layer of oil on top helps seal in freshness and extends shelf life.
    • Use Ice Cube Trays: Freezing in small portions makes it easier to thaw only what you need.
    • Dry Utensils Only: Always use a dry spoon to avoid introducing moisture.

    Planning a Party Menu? Use this Homemade Ginger Garlic Paste to make Tandoori Chicken or Chicken Lollipops


    A well-blended, aromatic ginger garlic paste stored in a jar, made with turmeric and oil for enhanced freshness.

    Preservative Free & Potent: Homemade Ginger Garlic Paste

    FAQs

    1) Why Does Ginger Garlic Paste Turn Green?

        Ginger garlic paste can sometimes develop a greenish hue due to natural chemical reactions in garlic. While this is usually harmless, it’s best to prevent it for better shelf life and appearance.

            Key Reasons:

    • Sulphur Compounds in Garlic: React with air and storage conditions, leading to discolouration. 
    • Oxidation: Prolonged exposure to air accelerates greening. 
    • Acidic Reactions: Ingredients like lemon juice or vinegar can trigger colour changes (I personally don’t recommend using them). 
    • Water Content: Adding water while grinding can contribute to oxidation and shorten shelf life.

            How to Prevent It:

    • No Water While Grinding: Avoid water; instead, add salt for a smoother consistency.
    • Turmeric & Salt: One of the common Indian cooking hacks is to add turmeric and salt, which prevents oxidation, maintains freshness and helps prevent discolouration.
    • Oil Layer: Sealing the top with oil extends freshness.
    • Airtight Storage: Store in a clean, dry, airtight container in the fridge or freezer.

    2) Is Green Ginger Garlic Paste Safe to Eat?

    • A greenish tint is usually safe, but if your paste develops a sour smell, slimy texture, or off taste, it's best to discard it.

    3) Can I store ginger garlic paste without refrigeration?

    • Since homemade paste has no preservatives, refrigeration or freezing is essential to maintain its freshness.

    4) How much paste equals fresh ginger and garlic?

    • 1 tablespoon of ginger garlic paste = approximately 1 teaspoon each of minced ginger and garlic.


    Freshly ground ginger garlic paste stored in a jar, made with turmeric and oil for enhanced freshness.

    Homemade Ginger Garlic Paste – Fragrant & Versatile

    Time-Saving Kitchen Hack!

        Making your own ginger garlic paste is a total game-changer! It cuts down prep time while keeping that bold, fresh flavour intact. Plus, with turmeric and oil, it stays fresh for longer—no preservatives needed!

        Homemade Ginger Garlic Paste – Aromatic, Versatile & Always Ready!

    Recipes That Uses Homemade Ginger Garlic Paste 

        Why stop at making this essential paste when you can put it to good use in some of the most-loved recipes on the blog? Try these flavour-packed dishes:

    • Fish Tawa Fry 
    • Fish 65 
    • Kerala Prawn Roast
    • Chicken Popcorn 
    • Biriyani & Pulao Recipes
    • Shahi Korma 
    • Egg Kadai Masala 
    • Kerala Egg Roast

    Click on the links and bring out the best in these dishes with fresh, homemade Ginger Garlic Paste!

    Give it a try and let me know how it works for you!

    If you love time-saving kitchen tips, check out these other homemade pantry staples

    • Homemade Sambar Powder 
    • Instant Garam Masala 
    • Quick Pepper Powder

    Cooking just got easier!!!


    February 25, 2025 No comments

    CHUTNEYS & CONDIMENTS
    GINGER CHUTNEY - ALLAM PACHADI RECIPE


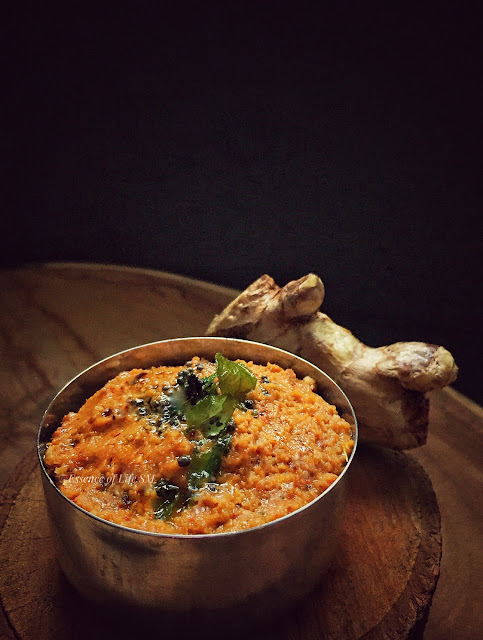
          An authentic Andhra Style spicy Chutney prepared with fresh Ginger, Dhals, Spices & Tamarind. This Ginger Chutney or colloquially called Allam(Ginger) Pachadi is loaded with flavours and tastes.  It obviously has an overwhelming aroma & a pungency unique to Ginger.  This Chutney has a combination of tastes imparted from Tamarind & Jaggery which helps to balance the overall taste and flavour of Ginger.  This is a popular Chutney from Andhra Cuisine served along with dishes like Idli, Dosa, Pesarattu etc., Or simply serve it as a side dish for Rice.
         
         Though this Chutney recipe seems to be a simple one, few extra tips prove beneficial for perfectly cooked Allam Pachadi - Ginger Chutney.
    • Use fresh and tender ginger. 
    • Avoid huge & fibrous Ginger roots.
    • Mature ginger can make the chutney taste bitter.
    • Ginger has to be sauteed on a very low flame until it turns translucent and aromatic.
    • Grate the Ginger or finely chop it into equal sizes.
    • Care should be taken not to brown or overcook the Ginger, which can make this Ginger Chutney Bitter. 

    For more CHUTNEYS & CONDIMENTS, Click here...

    Cuisine - Andhra(South India)
    Course - Side dish
    Spice Level - Medium - High
    Difficulty - Medium
    Serves - 3 - 4
    Author - SM


    Preparation Time - 5 -10 Minutes
    Cooking Time - 10-15 Minutes


    HOW TO COOK GINGER CHUTNEY - ALLAM PACHADI RECIPE

    CHUTNEYS & CONDIMENTS
    GINGER CHUTNEY - ALLAM PACHADI RECIPE


    INGREDIENTS:

    For Allam Pachadi/Ginger Chutney:

    Ginger - 1/4 Cup
    Dry Red Chillies - 4-5 Nos.
    Bengal Gram Dhal(Chana Dhal/Kadala Paruppu) - 11/2 Tbspn
    Black Gram Dhal(Urad Dhal/Uzhundhu) - 1 Tbpsn
    Mustard Seeds - 1/4 Tspn
    Fenugreek Seeds - 1/4 Tspn
    Curry Leaves - a Sprig
    Tamarind - 1 Lime sized
    Jaggery - a Small Piece
    Salt - To Taste
    Oil - 2 Tbspn

    For Tempering:

    Oil - 1 Tspn
    Mustard Seeds - 1/4 Tspn
    Curry Leaves - a Sprig.

    METHOD:

    • Finely grate the Ginger and keep it aside.
    • Heat Oil in a heavy-bottomed/non-stick pan.
    • Splutter Bengal Gram Dhal, Black Gram Dhal, Mustard Seeds & Fenugreek Seeds.
    • Roast the above ingredients on a very low flame until it splutters and turns into light golden brown in colour.
    • Care should be taken not to burn the ingredients.
    • Now add finely grated Ginger and saute it on a low flame until the raw smell disappears.
    • Add Salt to the above and give a quick stir.
    • Add the Tamarind Paste along with Jaggery and mix well.
    • Cook until the mixture turns slightly dry.
    • Allow the Allam Pachadi mixture to cool.
    • Grind the Allam Pachadi Mixture into a fine paste adding little water, if required.
    • Collect the ground Allam Pachadi into a bowl and keep it aside.
    • Meanwhile, heat Oil in a pan.
    • Splutter Mustard Seeds & Curry Leaves.
    • Pour the tempering over to the ground Allam Pachadi/Ginger Chutney and mix well.
    • Serve Allam Pachadi/Ginger Chutney along with Idli, Dosa or with Rice.
    • It is a popular Chutney served along with Pesarattu.

    NOTES:

    • I have used Tamarind Paste in this recipe.
    • If using Normal Tamarind, Soak it in warm water for about 5 - 10 Minutes and extract Tamarind juice out of it. 
    • Ginger is spicy on its own with a note of pungency. Adjust the amount of Dry Red Chillies to suit your spice level. 
    • Tamarind & Jaggery helps to balance the overall taste & flavour of this Ginger Chutney.
    • Can substitute Jaggery with Sugar/Brown Sugar/Palm Sugar.
    • The Dhals added into the Chutney gives a body to the Chutney.
    • Fry the Dhals on a very low flame until it turns into light golden brown in colour.
    • Care should be taken not to burn the dhals, which will totally spoil the taste of the Chutney.
    • Tempering the Chutney is purely optional.


    April 23, 2020 No comments
    Homemade ginger wine served chilled with ice and spiced garnish

    Homemade Ginger Wine with Ice

    Ginger Wine – A Homemade, Heartwarming Toast to New Beginnings

    Homemade Ginger Wine - Fresh, Spicy & Made Without Yeast 

    "This easy homemade ginger wine recipe is made without yeast, infused with fresh ginger and chillies, and is a festive must-have for Christmas or New Year."

    Let’s welcome the New Year with a cheer... and a clink!
    A glass of my long-dreamt-of homemade Ginger Wine – warming, aromatic, and soul-hugging. 🍷✨

        As I write this, Essence of Life – Food completes its 3rd year and steps gracefully into its 4th (2019). And what better way to celebrate this milestone – and the new beginnings that come with January – than by finally ticking off a recipe I’d been meaning to make for years?

    Yes, years.

    A Recipe 10 Years in the Waiting...

        This Ginger Wine Recipe has lived quietly in my handwritten recipe book since 2009 – underlined, starred, and stubbornly marked “for next time.” Every now and then, I’d buy ginger specifically for it, only to back out at the last minute. Maybe it was the timing, maybe the laziness – who knows?

        But this year, with a few batches of Raisin Wine and Banana Wine already snug in my wine corner, I decided: enough waiting! I rolled up my sleeves and brought this spicy little number to life.

    And it didn’t disappoint.

    What Makes This Ginger Wine Special?

    This isn’t your store-bought wine. It’s:

    • Made without yeast (yes, natural fermentation!)
    • Infused with the sharp heat of fresh ginger roots
    • Balanced with dry red chillies for a warm zing
    • Deepened by a touch of caramelised sugar – for that gorgeous hue and bittersweet body
    • No raisins, no additives – just honest, old-fashioned flavours. 


      The first sip is like being wrapped in a spiced shawl – earthy, bold, and just sweet enough.  (Though I didn't sip any!!! 😅)


    Let's look into the Cultural Significance of Ginger Wine

    Ginger Wine in Indian Christian Communities

        Now here’s a sip of tradition that goes way beyond the bottle! Ginger wine isn’t just a cosy winter warmer or a Christmas classic across the world—it also holds a beautifully nostalgic spot in the hearts of many Indian Christian communities.  Especially among East Indian Catholics in Mumbai and Goan Catholics. These communities have a long tradition of making homemade wines like ginger wine for festive occasions such as Christmas and weddings.

    A Festive Favourite in East Indian & Goan Homes

        Among the *East Indian Catholics of Mumbai and Goan Christians, homemade wines are not just recipes—they’re rituals. Come Christmas or a wedding, kitchens buzz with the making of ginger wine, toddy, and even khimad (a local brew you probably haven’t heard of unless you’ve been lucky enough to sit at one of those bustling festive tables).

        In East Indian homes, ginger wine is often lovingly simmered in earthen jars and later served in quaint little clay glasses called cheuvnies. Rustic, earthy, and utterly charming—just the way Christmas memories should be.

    Kolkata’s Christmas Tradition

        Travel to Kolkata, and you’ll find another heart-warming tradition: homemade ginger wine, paired with rich fruit cake, gifted and shared as tokens of love during Christmas. It’s not just a treat—it’s a custom soaked in sweetness and sentiment.

    Ginger Wine is More Than a Drink—It’s a Heritage

        From the mud pots of Mumbai to the colonial lanes of Kolkata, ginger wine has quietly fermented into something more than just a drink. It’s a symbol of togetherness, of heritage lovingly passed from one kitchen to another—one glass at a time.  And it stays as a meaningful part of Indian Christian culinary heritage and festive culture.


    *Did You Know?  Despite the name, “East Indian” Catholics actually hail from Mumbai and surrounding areas in western India — the term was given by the Portuguese and British long ago to distinguish them from other Indian Christians. So, no, they’re not from Northeast India! Just a quirky historical label that stuck around.


    New Year, New Cheers! 


        Let’s raise a toast to 2019 – to tradition, to homemade joys, and to this humble yet celebratory Ginger Wine. 🥂

    Ginger Wine – The Recipe Overview

    • Recipe Type: Homemade Wine
    • Difficulty: Medium
    • Yield: 1.5 bottles
    • Author: SM, Essence of Life – Food

    Time Estimate

    • Prep Time: 30–45 mins
    • Fermentation Time: 7–10 days


    Love this one? Wait till you see the rest – Dive into more Homemade Wine Recipes here!


    Old-School Ginger Wine – Traditional, Easy, Festive, Fiery & Full of Flavour


    Close-up of iced ginger wine showing rich golden colour

    Close-up of Ginger Wine on Ice


    Ingredients

    • Ginger – 1 cup, fresh and peeled
    • Sugar – 3 cups
    • Dry Red Chillies – 10–12 (adjust to taste)
    • Lemon Juice – juice of 2 lemons (or 2 teaspoons of citric acid)
    • Water – 1.5 litres
    • Caramelised Sugar – ½ cup (see below for detailed instruction)


    Let's first see How to make Caramel Syrup for Ginger wine,

    How to Caramelise Sugar for Ginger Wine

     
    Conical flask and pour jar filled with rich homemade caramel, beside a sugar bottle and scattered sugar crystals

    Homemade Caramel Syrup


    Ingredients for Caramel

    • Sugar – ½ cup
    • Water – 1 tablespoon
    • Warm water – ¼ cup (heated but not boiling)


    For a detailed step-by-step guide on How to make Caramel Syrup, click the link.


    Step-by-Step Method for Caramelizing

    Combine Sugar and Water

    •  In a heavy-bottomed pan, add ½ cup sugar and 1 tbsp water.

    Melt Sugar

    • Place the pan on medium heat and let the sugar melt slowly without stirring.

    ProTip: Do not stir the sugar & water while melting to avoid crystallisation.  And use medium heat throughout the entire process for even caramelisation and to prevent burning.

     Watch for Colour Change

    • Keep an eye on the sugar syrup as it turns golden brown. Remove from heat once this colour is reached.

    ProTip: Caramelise to your preferred colour, from golden brown (mild flavour) to dark brown (richer flavour).


    Warm Water

    • Meanwhile, warm ¼ cup water until just warm (not boiling).
    • Add Warm Water carefully.
    • Slowly pour the warm water into the caramelised sugar. Be cautious of bubbling and splashing.

    *Safety Note: Pour slowly and carefully—caramelised sugar can splash and cause burns.  Do not stir the sugar and water while melting to avoid crystallisation. Use warm water only; do not use hot or cold water to avoid seizing the caramel.

    Boil the Mixture 

    • Return the pan to medium heat and boil gently for about 5 minutes.

    Cool Down

    • Turn off the heat and let the caramel cool before using.

    ProTip: Caramel can be prepared in advance and refrigerated until needed.


    Step-by-Step Method for Ginger Wine

    Prep the Ginger

    • Wash and peel the ginger thoroughly.
    • Slice it roughly, then coarsely crush using a mixer grinder or mortar-pestle.

    ProTip: Crushing helps extract more flavour. Don’t grind it too fine – we want flavour, not mush!

    Simmer the Base Mixture

    • In a large heavy-bottomed pan, add the crushed ginger, sugar, dry red chillies, and 1.5 litres of water.
    • Bring it to a boil on medium heat, then simmer for 30 minutes, letting the flavours meld.

    Note: Your kitchen will smell absolutely divine at this stage.
    ProTip: Adjust chilli count based on their heat. Mine weren’t too spicy, so I used 12.

    Cool & Transfer

    • Turn off the heat and let the mixture cool completely.
    • Transfer to a glass or ceramic jar (or traditional bharani), ensuring it’s big enough to hold everything with room to stir.
    • Cover it with a tight-fitting lid.

    ProTip: Avoid plastic or metal containers for fermentation. Ceramic and glass are your best mates here.

    Add Lemon & Caramel

    • The next day, add lemon juice (or citric acid) and caramelised sugar to the cooled ginger mix.
    • Stir well with a long wooden ladle.

    Note: Lemon adds zing and helps preserve. Citric acid is a great substitute if you're out of lemons.
    ProTip: See below for how to make caramelised sugar easily at home.

    Fermentation Time

    • Cover the jar and set it aside to ferment for 7 to 10 days.
    • Each day, open the jar, stir well with a clean wooden ladle, and cover it again.

    Note: Stirring is crucial to keep fermentation active and healthy.
    ProTip: In tropical weather, fermentation can happen faster – keep an eye and nose on it!

    Strain & Store
    • After 7–10 days, strain the mixture using a fine muslin cloth or sieve.
    • Discard the sediment and transfer the wine to sterilised glass bottles.
    • Store in the refrigerator for longer shelf life.

    ProTip: Always use clean, dry bottles. Moisture invites mould – and we don’t want that drama! Do we?

    Serve & Enjoy

    • Serve chilled with a handful of ice cubes.
    • It’s sweet, spicy, zesty – and oh so satisfying. Cheers!

    ProTip: Store the bottled Ginger Wine in the refrigerator for longer shelf life and to keep the flavours fresh.


    Ginger Wine Storage Suggestions

    • Once fermented and strained, store the Ginger Wine in clean, dry glass bottles.
    • Refrigerate for best shelf life and flavour retention.
    • If stored well, it stays good for up to 6 months or more.
    • Avoid plastic bottles — the acidity of the wine doesn’t play well with them.

    ProTip: Label your bottles with the date brewed – it’s handy for tracking the ageing process.

    Serving Suggestions

    • Chill and pour over a generous handful of ice cubes.
    • Pair it with Christmas fruit cake, spiced biscuits, or just a relaxed evening.
    • You can even use it as a base for cocktails – try my Dragon Cocktail with fresh orange juice!
    • Add a slice of lemon or a curl of orange zest for an elegant touch.

    ProTip: The wine matures in flavour over weeks. So, if you can wait (I know it’s hard), it gets even better!Ginger Wine, Demystified

    FAQ - Ginger Wine, Demystified

    Is this an alcoholic drink?

    • Yes, this version naturally ferments and contains mild alcohol. It’s not a hard liquor, but a mellow homebrew.

    Can I skip the red chillies?

    • You can reduce or skip, but they add a subtle warmth and complexity. Don’t worry — it won’t turn fiery.

    Why does wine turn cloudy? Is it spoiled?

    • Cloudiness during fermentation is normal. But if it smells off, or develops mould, discard it. Cleanliness is key.

    What if I don’t have a Bharani or Earthen jar?

    • Use a glass jar with a tight lid. Just ensure it’s non-reactive and roomy.

    Can I make it without caramelised sugar?

    • Yes, but caramel gives it depth, colour, and a rich finish. It’s worth that extra step!

     
    Refreshing ginger wine with ice & garnish in a wine glass

    Homemade Ginger Wine Recipe


    A Sip of Time-Honoured Warmth

        There’s something timeless about a bottle of homemade Ginger Wine — bold, spicy, gently sweet, and laced with memories. It’s not just a festive drink; it’s a bottled legacy. Whether you make it for Christmas, Easter, or just because nostalgia knocks, this golden brew connects generations.

        So roll up your sleeves, let the aromas fill your kitchen, and taste the magic of slow brewing. And hey, once you master this, the world of home brews is yours to explore…

    Recipes you might like:

    • Fancy a Grape Wine just like grandma made?
    • Or maybe Pineapple Wine that’s tropical and tangy.
    • Banana Wine, Dates Wine, Apple Wine – all waiting for you.
    • And don’t forget to shake up a Dragon Cocktail – my zesty ginger wine + orange mix for parties that slay.
    • Craving a fizzy twist? Try my refreshing Ginger Ale made from the same ginger wine – it’s sparkle with soul!

        If you enjoyed this recipe, you’ll absolutely love my collection of classic homemade wines and beverages — each one with a story, a season, and a soul.

        Take a sip and let tradition swirl on your palate — brewed right from your kitchen! I'd absolutely love to hear what you think — drop your thoughts in the comments below! 🥂

    Homemade Ginger Wine isn't just a drink—it's a toast to tradition. Let this be your new festive favourite. 🍷


      January 01, 2019 2 comments
      Older Posts

      Search Essence of Life - Food

      I ME MYSELF

      I ME MYSELF
      "Essence of Life - Food" is all about daily cooking with a simple sense of taste and health. It is all about food. Not a day goes by without eating for most of us. So what we eat matters on the whole. Food in the mode of goodness increase the duration of life, purify one's existence and give strength, health, happiness and satisfaction. So above all ingredients, one main ingredient in cooking is love.

      ASK FIRST!

      Please note that all rights for the photographs and texts on this blog, unless otherwise mentioned, rests with the author. Please do not use without permission.

      Recent Posts

      "Guide to our Cookie Policy"

      • Cookie Policy

      Follow Essence of Life - Food

      Labels

      AMMA & ACHAN'S SPECIALITIES (26) APPAM (11) APPETIZERS/STARTERS (24) AROUND THE WORLD (157) BAKING (22) BEEF (7) BEVERAGES (18) BIRIYANI & PULAO (27) BREADS (6) BREAKFAST (76) CAKES (17) CANDIED FRUITS (3) CHAAT ITEMS (11) CHICKEN (57) CHINESE CUISINE (41) CHRISTMAS PARTY MENU (104) CHRISTMAS RECIPES (30) CHUTNEYS & CONDIMENTS (47) COCKTAILS & MOCKTAILS (10) COOKIES (7) CURRIES (102) DESSERTS (117) DHAL (29) DINNER MENU (14) DIWALI RECIPES (72) EASTER (3) EGG (27) FAMILY HEIRLOOM RECIPES (30) FISH (25) FOOD AS MEDICINE (98) FOR THE SWEET TOOTH (150) FRIED RICE (10) FROM GODS OWN COUNTRY (174) GLOSSARY (24) HOME REMEDIES (26) HOMEMADE COOKING ESSENTIALS (1) HOMEMADE MILK PRODUCTS (7) HOW TO... (64) ICE CREAM (3) ICING & FROSTING (2) INDIAN BREADS (22) INDIAN STREET FOOD (20) INDIAN SWEETS (44) INDO-CHINESE RECIPES (11) INDONESIAN CUISINE (22) JAM (3) JAPANESE CUISINE (5) JUICES & DRINKS (65) KERALA PALAHARAM (18) KONGU CUISINE (20) KUIH MUIH (4) LUNCH MENUS (282) MALAYSIAN CUISINE (80) MIDDLE EASTERN CUISINE (12) MILLETS (10) MUTTON (24) MY STRICT APPICER'S a.k.a. MY DAUGHTER'S RECIPES (6) NAIVEDYAM/PRASADHAM (43) NOODLES (11) PANEER (11) PARTY MENU (110) PAYASAM / PRADHAMAN / KHEER (40) PICKLES (26) PIZZA (2) PUDDINGS (6) RAITHAS & SALADS (8) RASAM (14) REGIONAL DELICACIES (251) RICE DISHES (65) ROTIS (9) SADHYA (117) SAUCES (2) SEA FOOD (45) SMOOTHIES (17) SNACKS & SAVOURIES (67) SOUPS (10) SOUTHEAST ASIAN DESSERTS (18) SPICE POWDERS (18) SYRUPS (5) THAI CUISINE (13) TIFFIN ITEMS (64) TIPS & TRICKS (19) VADAGAM/VADAM/VATHAL (2) VEGGIES (107) VIRUNDHU (15) WINES (10) eBook (1)

      POPULAR POSTS

      • How to Make Kerala Kanji | Traditional Rice Porridge with Payar, Chammanthi & Achar
      • Ambalapuzha Paal Payasam Recipe: Divine Kerala Dessert for Festivals & Sadhya
      • How to Cook Kerala Matta Rice - Mastering the Art of Tradition
      • Nendhra Pazham Puzhungiyathu - Steamed Bananas: A Taste of Kerala
      • Maida Chapati - All-Purpose Flour Chapati

      Blog Archive

      • ▼  2025 (10)
        • ▼  July (1)
          • Avalose Podi Snack with Coconut, Banana & Jaggery ...
        • ►  June (2)
        • ►  May (2)
        • ►  April (1)
        • ►  March (1)
        • ►  February (1)
        • ►  January (2)
      • ►  2024 (27)
        • ►  July (2)
        • ►  June (2)
        • ►  May (3)
        • ►  April (8)
        • ►  March (2)
        • ►  February (5)
        • ►  January (5)
      • ►  2023 (54)
        • ►  December (9)
        • ►  October (1)
        • ►  September (2)
        • ►  August (6)
        • ►  July (7)
        • ►  June (5)
        • ►  May (6)
        • ►  April (8)
        • ►  March (2)
        • ►  February (3)
        • ►  January (5)
      • ►  2022 (54)
        • ►  December (4)
        • ►  November (6)
        • ►  October (4)
        • ►  August (1)
        • ►  July (5)
        • ►  May (5)
        • ►  April (7)
        • ►  March (4)
        • ►  February (8)
        • ►  January (10)
      • ►  2021 (99)
        • ►  December (12)
        • ►  November (13)
        • ►  October (5)
        • ►  September (5)
        • ►  August (10)
        • ►  July (5)
        • ►  June (5)
        • ►  May (5)
        • ►  April (12)
        • ►  March (7)
        • ►  February (10)
        • ►  January (10)
      • ►  2020 (130)
        • ►  December (10)
        • ►  November (11)
        • ►  October (12)
        • ►  September (11)
        • ►  August (11)
        • ►  July (10)
        • ►  June (10)
        • ►  May (10)
        • ►  April (11)
        • ►  March (12)
        • ►  February (12)
        • ►  January (10)
      • ►  2019 (165)
        • ►  December (15)
        • ►  November (8)
        • ►  October (15)
        • ►  September (22)
        • ►  August (15)
        • ►  July (15)
        • ►  June (10)
        • ►  May (10)
        • ►  April (15)
        • ►  March (15)
        • ►  February (10)
        • ►  January (15)
      • ►  2018 (128)
        • ►  December (17)
        • ►  November (13)
        • ►  October (15)
        • ►  September (5)
        • ►  August (10)
        • ►  July (10)
        • ►  June (9)
        • ►  May (12)
        • ►  April (12)
        • ►  March (8)
        • ►  February (8)
        • ►  January (9)
      • ►  2017 (102)
        • ►  December (8)
        • ►  November (5)
        • ►  October (8)
        • ►  September (10)
        • ►  August (10)
        • ►  July (10)
        • ►  June (11)
        • ►  May (10)
        • ►  April (10)
        • ►  March (6)
        • ►  February (6)
        • ►  January (8)
      • ►  2016 (116)
        • ►  December (10)
        • ►  November (10)
        • ►  October (10)
        • ►  September (10)
        • ►  August (10)
        • ►  July (10)
        • ►  June (9)
        • ►  May (6)
        • ►  April (7)
        • ►  March (7)
        • ►  February (7)
        • ►  January (20)

      Created with by ThemeXpose | Distributed By Gooyaabi Templates